

A powerful and easy-to-use player for the world of UVI sounds — perform, layer, add effects, arpeggiate, and explore a fully featured modern Library Browser.
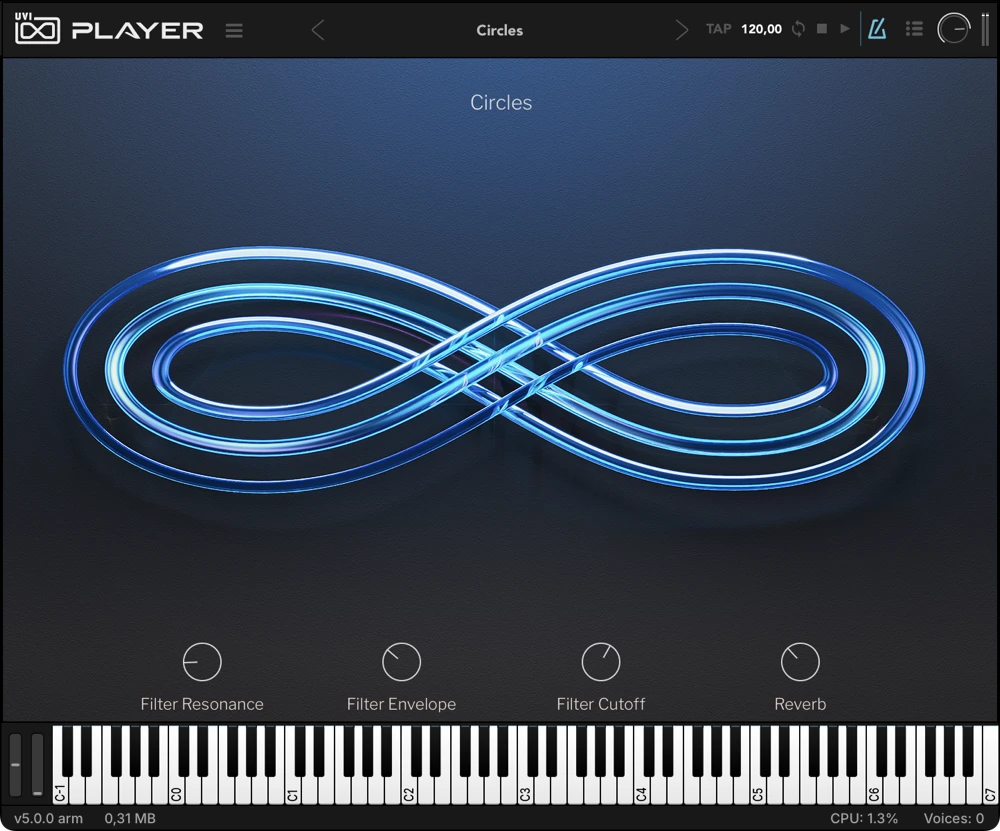
Introduction
UVI Player is the free player for UVI instruments, as a standalone application or a plug-in in any modern DAW, on macOS and Windows. Loading an instrument brings up its own dedicated interface, ready to be played and explored. Finding the right sound is fast, with a modern browser built around preset tags, text search, favorites, and instant audio previews. Go deeper by layering instruments, adding effects, and setting chords in motion with the built-in arpeggiator.
UVI Player plays UVI Soundware, the UVI-Powered instruments of our partners, and every Falcon Expansion, with its interface, macro controls, and presets exactly as designed. It comes with UVI Starter, 50 hand-crafted presets across a wide range of styles. Download UVI Player through UVI Portal, UVI’s downloader app.
Features
- Single mode for loading UVI sounds and instruments
- Plays and tweaks every Falcon Expansion with its own interface and macros
- Multi mode — unlimited parts with convenient mixing, meters, mute, solo, volume, pan, performance settings (keyswitches, range), and separate outputs
- Modern integrated browser with tags, audio previews, text search, and favorites
- UVI Starter soundpack (50 hand-crafted presets)
- Scalable UI adapts to different monitor sizes
- Powerful and flexible arpeggiator
- Comprehensive suite of professional FX — infinitely stackable with editable parameters (delay, reverb, phaser, chorus, EQ, filter, drive, distortion, compressor, and more)
- Manage instruments and loops in the same interface
- Real-time time-stretch and slice with beat-syncing
- Drag & drop MIDI and audio
- Loads AIFF, WAV, FLAC, MP3, REX, Apple Loops, and more
- MIDI learn and 128 host automation slots
Audio and MIDI Settings (Standalone Only)
To use UVI Player in standalone mode, select which MIDI inputs and audio outputs it uses. This only needs to be done the first time you launch it, or when your hardware changes (a new audio interface or controller keyboard): the settings are saved and reloaded at the next launch. In plug-in mode, audio outputs and MIDI inputs are set in your DAW, so you can skip this.
- Connect your devices — turn on and plug in your audio interface and MIDI controller before launching UVI Player.
- Choose File → Audio and MIDI Settings… — the menu bar is at the top of the screen on macOS, and in the UVI Player window on Windows.
- Select the audio and MIDI devices on the two pages of the Audio/MIDI Settings window, Device and Routing.
Device
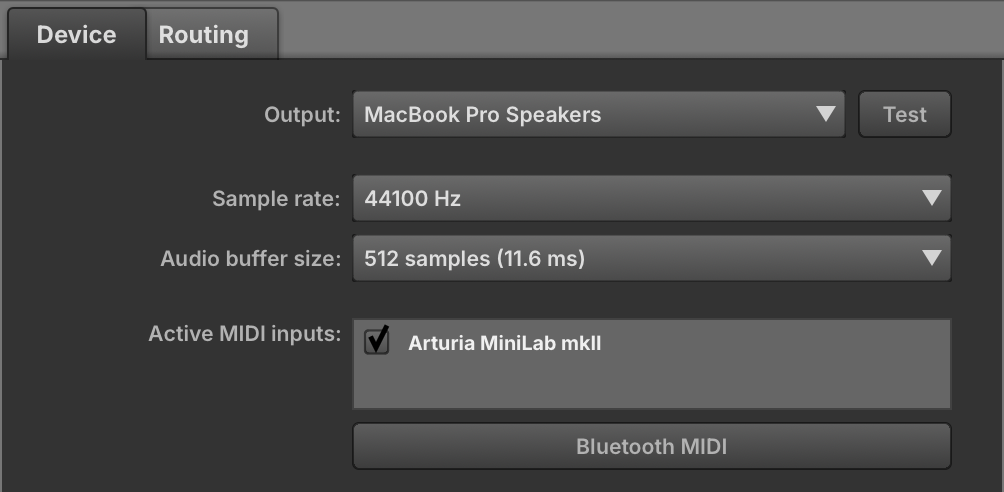
Select the audio interface from the Output menu (on Windows, choose the Audio device type, such as ASIO, first), activate the output channels you want if the device lists them, then select the Sample rate and Audio buffer size: lower buffer sizes reduce latency, larger ones avoid glitches. Test plays a tone on the outputs.
Under Active MIDI inputs, click the devices or sources to enable for MIDI input; on macOS, Bluetooth MIDI pairs a Bluetooth controller. All MIDI inputs are merged, but channels remain discrete: on each UVI Player part, select Omni to listen to all channels, or a channel from 1 to 16.
Routing
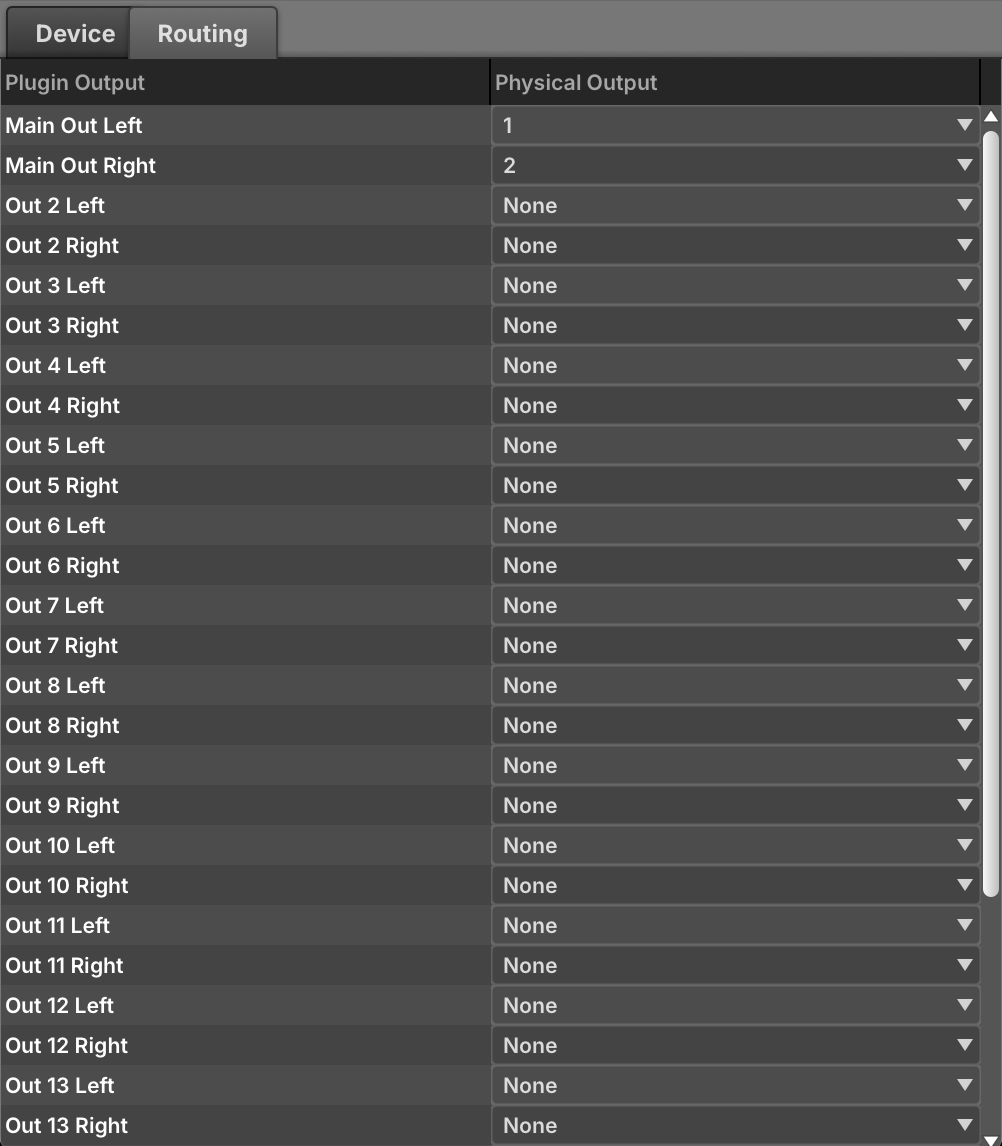
UVI Player can address up to 17 stereo outputs: Main Out, and Out 2 to Out 17. Use this page to link UVI Player’s outputs (Plugin Output) with those of your audio interface (Physical Output). It only matters with a multi-output audio device; with a stereo device there is nothing to set.
General Conventions
Throughout UVI Player, some common conventions are used for adjusting and interacting with controls. Alt/Option means Alt on Windows and Option on macOS.
| Action | Result |
|---|---|
| Hover | Shows a short description of the control in the footer. |
| Click and drag | Adjusts the value. You can also hover and use the mouse wheel. |
| Double-click | Enters a numeric value. |
| Right-click (Control-click on macOS) | Opens the control’s MIDI/Automation Control dialog. Alt/Option + right-click opens its MIDI Modulation dialog. |
| Alt/Option-click | Returns the control to its default value. |
| Arrow keys | Navigate the browser. |
Keyboard shortcuts:
- Space — start or stop playback (standalone mode)
- M — switch between Single and Multi mode (not while a browser is open)
- Esc — close the browser or the Preferences window
Initial View
This is UVI Player as it opens, in Single mode with no preset loaded. With Open browser on load on (default), the Library Browser opens over this view. The header and the footer stay in place in every view (except in the Frameless display mode); the area between them shows the loaded instrument, the browsers, or the Multi mode pages.
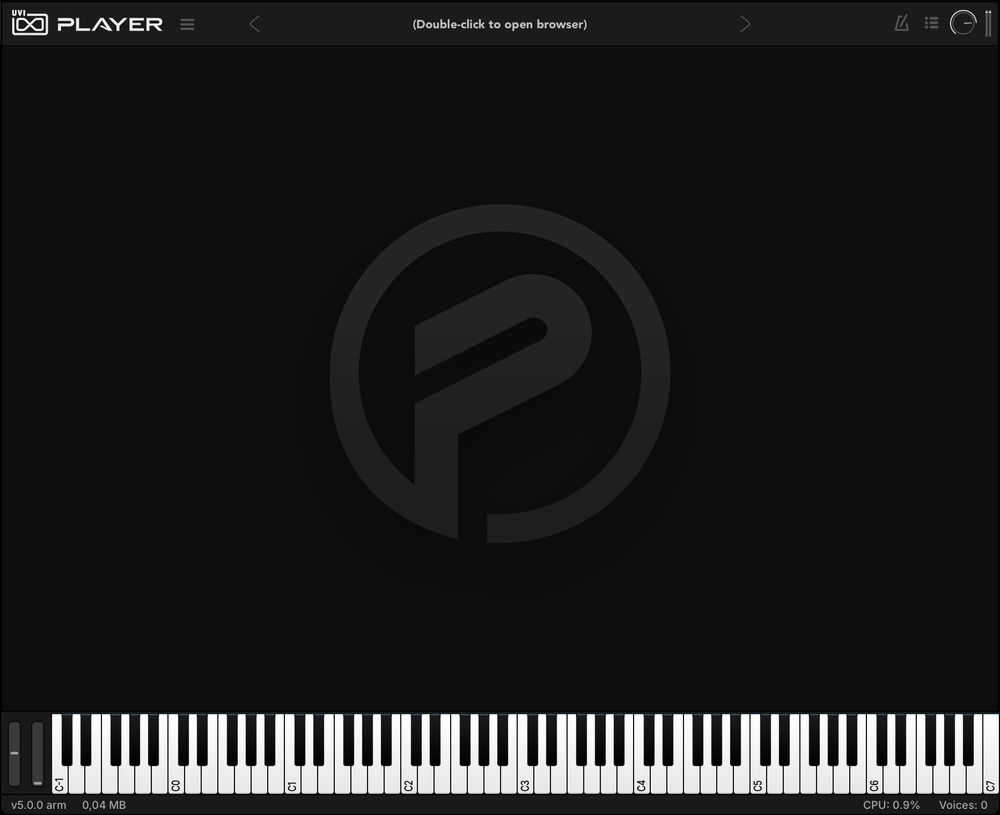
- 1 Main Menu
Opens the Main Menu: multis, mode, keyboard and browser, scaling, and Preferences. See Main Menu.
- 2 Preset Display
In Single mode, shows the loaded preset.
- Double-click
- opens the browser.
- ◀ / ▶
- steps through the presets of the same folder.
- Click and hold
- opens a menu of the folder the loaded preset comes from: its presets and other loadable files, with its subfolders as submenus. Choose an entry to load it into the part.
- Right-click
- adds the preset to — or removes it from — your favorites.
In Multi mode, shows the multi name; see Mixer.
- 3 Sync & Transport
Shows or hides the sync and transport controls.
- TAP
- sets the tempo as you click it repeatedly at a steady rate.
- Tempo
- 10 to 400 BPM (default 120). Double-click to enter a value, or click-drag to adjust. Unavailable while Sync is on, since the tempo then comes from the external source.
- Sync
- follows an external tempo source: the host DAW’s song tempo in plug-in mode, or MIDI Beat Clock in standalone (10 to 300 BPM). Off by default.
- Auto Play
- plug-in formats only, on by default: UVI Player’s playback follows the host transport as it starts and stops.
- Stop / Play
- stops and starts UVI Player’s playback by hand; Stop also returns the song position to the start. Both reflect the host transport state.
- 4 Single / Multi
Switches between Single and Multi mode. Keyboard shortcut: M.
- 5 Volume & Meters
Master output volume control and stereo level meter with peak hold.
- 6 Part Interface
The interface of the loaded instrument. See Single Mode.
- 7 Pitch Bend & Mod Wheel
Drag to send pitch bend and modulation wheel to the selected part.
- 8 Virtual Keyboard
Click to play the selected part; incoming MIDI notes light up the keys. Keys that the loaded Soundware colors (keyswitches, for example) are tinted accordingly.
- 9 Version & RAM Usage
- Version
- installed version of UVI Player.
- RAM usage
- memory used by the current multi.
- 10 Info
Shows the tooltip of the control under the mouse.
- 11 CPU & Voices
- CPU
- CPU usage of this instance.
- Voices
- active voice count, shared by all the UVI Player instances loaded in the same host.
Main Menu
The Main Menu opens from the menu icon (≡) next to the UVI Player logo (1). It is the same in Single and Multi mode. Point at a command to see what it does.
Which Browser?
UVI Player loads presets, sounds, multis, and effects from four browsers. They look alike but are not interchangeable: if a file won’t open from one, close it and open the right one.
| Name | What it is |
|---|---|
| Library Browser | Searches your UVI Soundware by tags, with audio previews. Single mode only. Opens by double-clicking the preset name, or with Show Browser in the Main Menu. See Library Browser. |
| Files Browser | Your disks, favorite places, and mounted Soundware, in columns; also loads audio files and loops. In Multi mode, it is the browser a part loads from. See Files Browser. |
| Multi Browser | Loads multis only. Opens with Load Multi… or by double-clicking the multi name. See Multi Browser. |
| Effect Browser | Adds or replaces an effect in a chain. Opens with +fx, or by right-clicking an effect name. See Effects. |
Library Browser
Type in the Search field to find presets, loops, and samples — matches appear in the results list as you type, and choosing tags narrows them further.
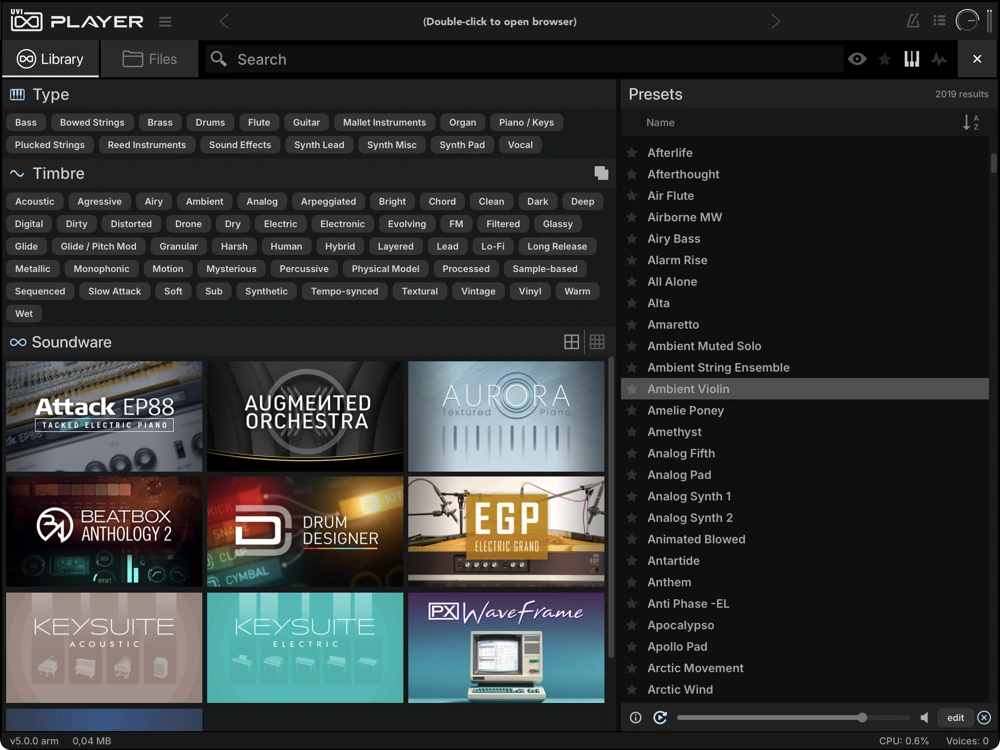
- 1 Browser Mode
Switches between the Library Browser, which searches your UVI Soundware collection, and the Files Browser, which browses your local filesystem.
- 2 Search
Enter a search term; matching results appear in the Presets list. Right-click the magnifying glass for Clear non available volumes or Reset database.
- Clear search (X in the field)
- click once to clear the text, twice to also clear all tag and Soundware filters.
- Show unavailable soundbanks (eye)
- also lists presets from Soundware that was indexed but is no longer on disk (shown dimmed).
- Favorite (★)
- narrows results to favorites only.
- Presets (keyboard icon)
- shows presets.
- Sounds (waveform icon)
- shows sounds and loops.
- Close browser (X)
- closes the browser.
- 3 Tags
Three tiers of tags for highly focused searches: Type (with a second level of subtypes), Timbre, and Soundware. Click a title to expand or collapse it. Cmd/Ctrl-click for combination search. In Timbre, toggle AND / OR mode using the button to the right of the label — AND returns the intersection of the selected timbre tags, OR their union. In Soundware, switch between large and small thumbnail display.
- 4 Presets
Results panel. Double-click a preset to load it.
- Name
- click the column header to toggle the sort order; right-click to resize columns or to add and remove them.
- Preset info (i)
- shows the tags of the selected preset.
- Auto preview
- previews the selected preset or sound automatically. On by default.
- Volume
- sets the preview volume.
- Auto close
- closes the browser when you load with a double-click. On by default.
Favorites
Mark presets as favorites to find them quickly. In the Library Browser, click the star next to a preset; in the Files Browser or on the preset name, right-click and choose Add to favorites (or Remove from favorites). To list only your favorites, turn on the ★ filter of the Library Browser.
Files Browser
The Files Browser offers a column-style view of your local filesystem and mounted Soundware. Selecting a folder reveals its contents in the adjacent right-hand column. Open it from the Files tab of the Library Browser; in Multi mode, it opens when you double-click a part name.
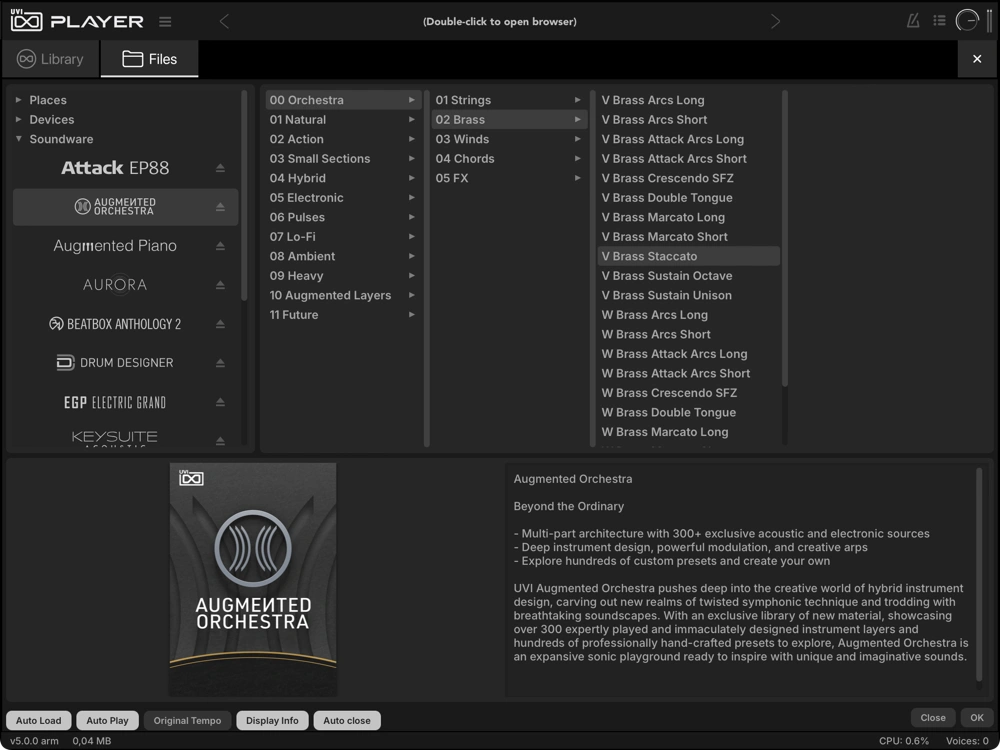
- 1 Browser Mode
Switches between the Library Browser and the Files Browser (Single mode only).
- 2 Category
- Places
- saved filesystem locations.
- Devices
- available volumes.
- Soundware
- mounted UVI Soundware.
Right-click an entry to remove it from the favorite places or to verify the integrity of a Soundware.
- 3 Folders
Folders show an arrow (›). Click one to show its contents in the next column; drag it to Places to save it as a favorite location.
- 4 Loadable Files
All compatible sample and instrument formats display here. Some Soundware appear as a single preset; most expose individual presets in this view. Supported audio files: AIFF, FLAC, MP3, MP4, REX1, REX2, SDII (macOS), WAV, WAV64, SND, and CAF. Drag a file to your DAW or desktop to use it there. Right-click a file to delete it or reveal it in the Finder (Explorer on Windows).
- 5 Soundware Details
Information on the selected file or Soundware.
- 6 Browser Options
- Auto Load
- loads the selected audio file into the current part automatically. On by default.
- Auto Play
- plays a sliced loop as soon as it loads. On by default.
- Original Tempo
- plays the loaded audio at its original tempo. Off by default.
- Display Info
- shows or hides the Soundware Details area. On by default.
- Auto close
- closes the browser when you load with a double-click. On by default.
- Close / X
- closes the browser without changes.
- OK
- closes the browser.
Multi Browser
The Multi Browser works like the Files Browser but loads multis only. Open it with Load Multi… in the Main Menu, or double-click the multi name (shown as “Default Multi” initially).
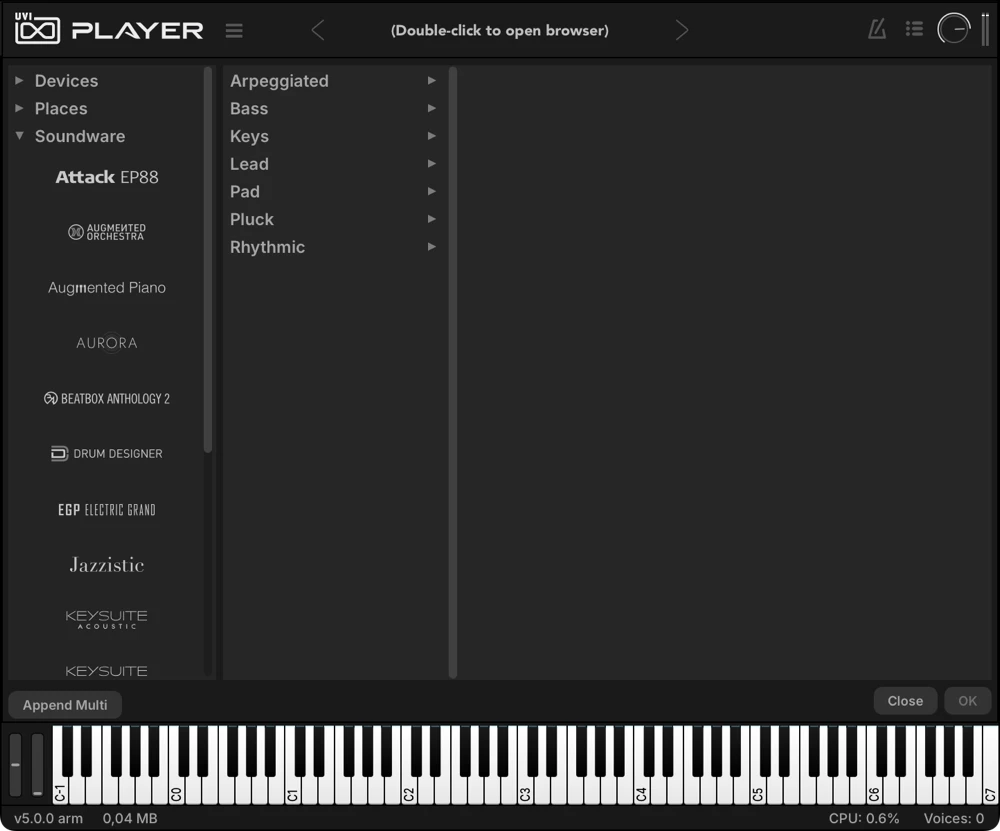
- 1 Category
- Devices
- available volumes.
- Places
- saved filesystem locations.
- Soundware
- mounted UVI Soundware.
- 2 Folders
Folders show an arrow (›). Click one to show its contents in the next column; drag it to Places to save it as a favorite location.
- 3 Loadable Files
The multi files in the selected folder.
- Append Multi — merge a multi into the current one. You may need to adjust the MIDI channels of the appended parts afterwards.
- Close — close without changes. OK — confirm and close.
Single Mode
Single mode shows one part at a time: the loaded instrument with its own interface, or the loop editor for an audio file. It is the part selected in Multi mode, so switching from Multi to Single mode shows that part. To play several parts at once, switch to Multi Mode.
Instruments
An instrument preset fills the area between the header and the footer with its own interface.
- 1 Part Interface
Dedicated edit interface of the loaded instrument. The UVI Starter pack is shown here.
- Preset Name
- shown at the top center.
- Macros
- preset sound parameters. Controls can be MIDI-learned or DAW-automated.
Loop / Phrase
Load an audio file (WAV, AIFF, REX, Apple Loops, or a loop from UVI Soundware) from the browser, or drop it onto UVI Player. With Auto Play on in the Files Browser, a sliced loop starts as soon as it loads. Sliced files open in Slice mode and can switch to Stretch or Sample; files without slices cannot use Slice mode.
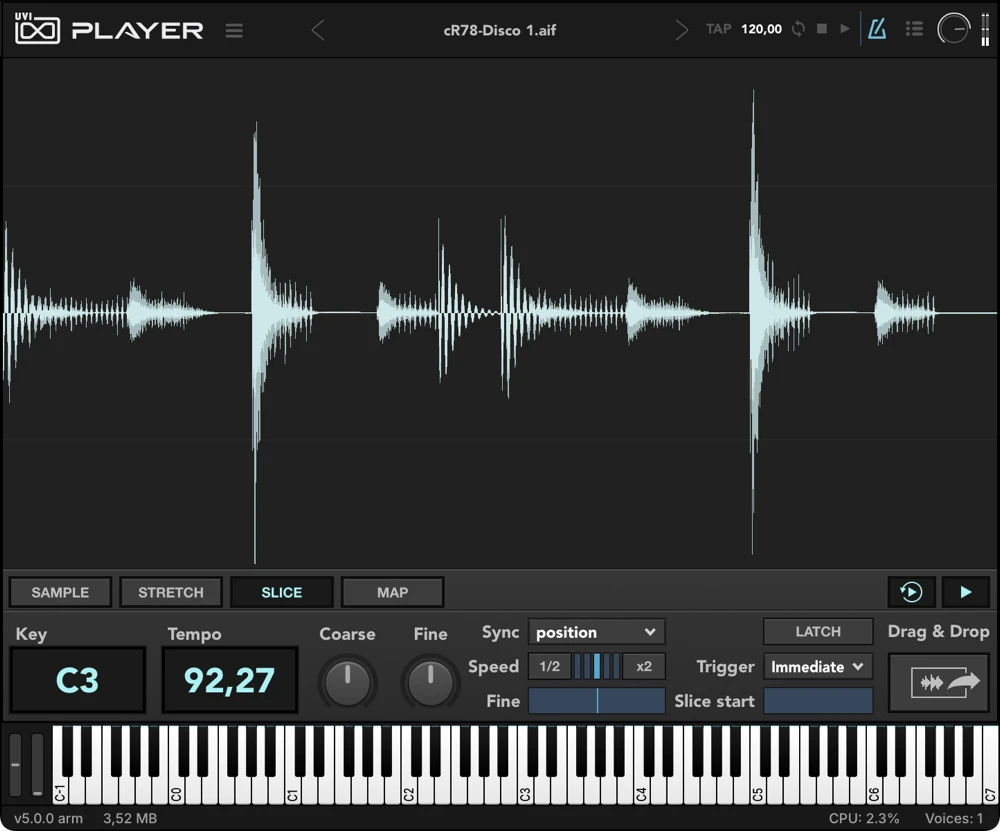
- 1 Waveform
The loaded audio file.
- 2 Playback Modes
- Sample
- plays like a regular sampler.
- Stretch
- pitch-shifted by MIDI notes while keeping playback speed constant.
- Slice
- default mode; syncs tempo by loop slice.
- Map
- option of Slice; maps each loop slice across the keyboard.
- 3 Key
The root key of the loop: the note that plays it at its original pitch.
- 4 Tempo
The loop tempo, up to 300 BPM. In Stretch mode, 0 takes the tempo from the file’s analysis or metadata. Hidden in Map mode.
- 5 Coarse & Fine
Tuning in semitones (±24) or cents (±100).
- 6 Sync & Speed
- Sync
- in Slice mode, Off / Tempo / Position (tempo and playback position), Position by default; in Stretch mode, Off / Tempo, Tempo by default. Not available in Sample mode, hidden in Map mode.
- Speed
- playback speed. The 1/2 and x2 buttons step through five positions — x1/4, x1/2, x1, x2, x4 — of the assigned tempo, shown by the lights between them.
- Fine
- adjusts the speed by ±50.00%.
- 7 Latch, Trigger & Start
- Latch
- sample plays as if the note is held: Stretch/Slice repeats indefinitely; Sample plays once. Hit the same note again to stop.
- Trigger
- when a note starts the loop: Immediate / Next Beat / Next Bar.
- Start / Slice Start
- in Sample and Stretch mode the control is labeled Start and sets where playback begins in the audio file; in Slice mode it is labeled Slice start and spans the first to the last slice.
Latch and Trigger are hidden in Map mode.
- 8 Auto Play & Play
Slice mode only.
- Auto Play
- loop files start and stop in sync with UVI Player’s playback actions.
- Play
- plays or stops the loop by hand.
- 9 Drag & Drop
Drag the loop to your DAW or desktop: a rendered WAV file in Sample, Stretch, and Slice mode, a MIDI file of the slices in Map mode.
Multi Mode
Multi mode shows all the parts of the instance in a mixer, with their settings, effects, and arpeggiators; the number of parts is unlimited. Together, the parts and their presets, the mixer, and the effect chains form a multi: save it as a file to recall it in any project (it holds the same state your DAW saves with the plug-in). To load a preset into a part, double-click the part name or choose Show Browser in the Main Menu.
Mixer
The Mixer lists every part with its MIDI channel, level, sends, and tuning.
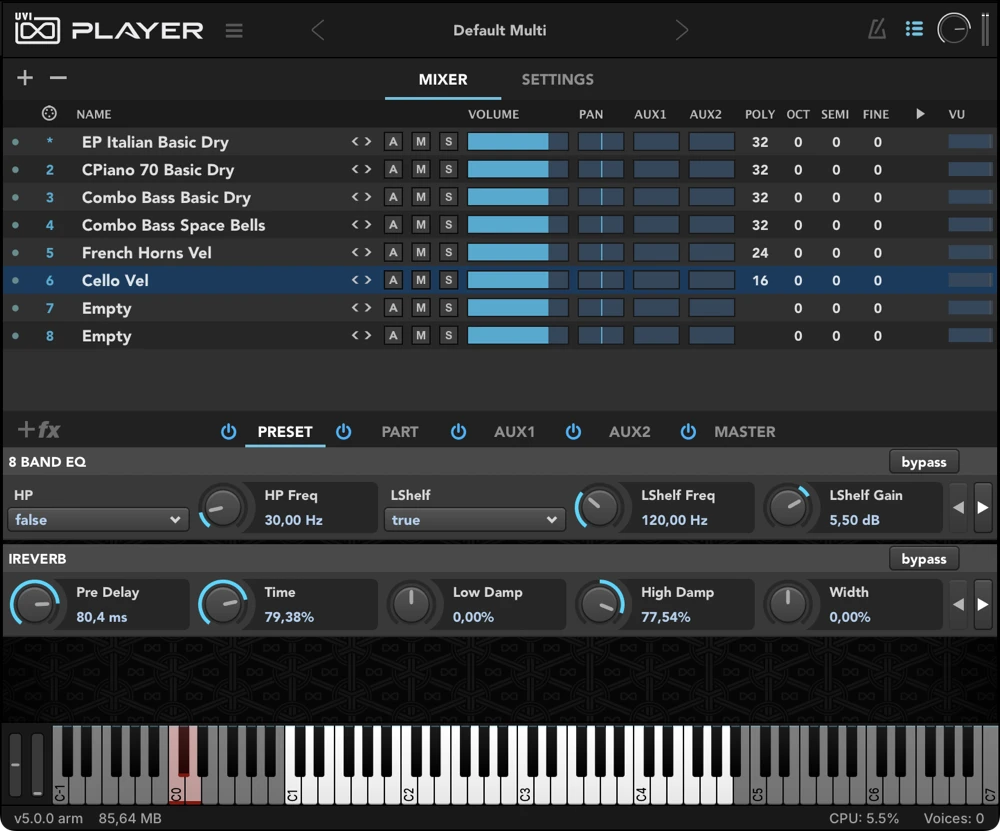
- 1 Multi Name
Double-click to open the Multi Browser, and use ◀ / ▶ to step through multis. The Main Menu loads, saves, and clears multis.
- 2 Add / Remove Part
- Plus (+)
- adds a new part to the current multi.
- Minus (−)
- removes the selected part.
- 3 Page Tabs
Switches between the Mixer and Settings pages in the upper half of the interface.
- 4 MIDI & Part
- MIDI Mute Toggle
- the leftmost dot mutes MIDI input.
- MIDI Signal
- indicates MIDI input activity.
- MIDI Channel
- click to set the part’s MIDI input: Omni (shown as
*), or channel 1 to 16. - Part Name
- the preset loaded in the part, or Empty. Double-click to open the browser, or drop a file on it; use ◀ / ▶ to step through the presets of the same folder. Right-click for Clear Part.
- 5 Sound Control
- Arp (A)
- opens the part’s arpeggiator.
- Mute (M)
- mutes the part output.
- Solo (S)
- solos the part output.
- Volume
- part output level.
- Pan
- stereo position.
- Aux 1 & Aux 2
- send amounts to the effect buses.
At the right, the ▶ column plays a loop loaded in the part, and VU shows its output level.
- 6 Poly, Oct, Semi & Fine
- Polyphony
- maximum voices per layer of the part’s preset, 1 to 256.
- Oct
- transposes the part in octaves, ±2.
- Semi
- transposes the part in semitones, ±24.
- Fine
- fine-tunes the played voices in cents, ±100.
- 7 Effects
Effect chains for the selected part — Preset and Part — plus the Aux 1, Aux 2, and Master buses shared by the whole instance. See Effects.
Settings
The Settings page is where you split and layer parts. Parts on the same MIDI channel play together (Part 1 listens in Omni; each new part gets the next channel, set in the Mixer). Key ranges, velocity ranges, and keyswitches, alone or combined, split the keyboard or switch parts on and off from your controller.
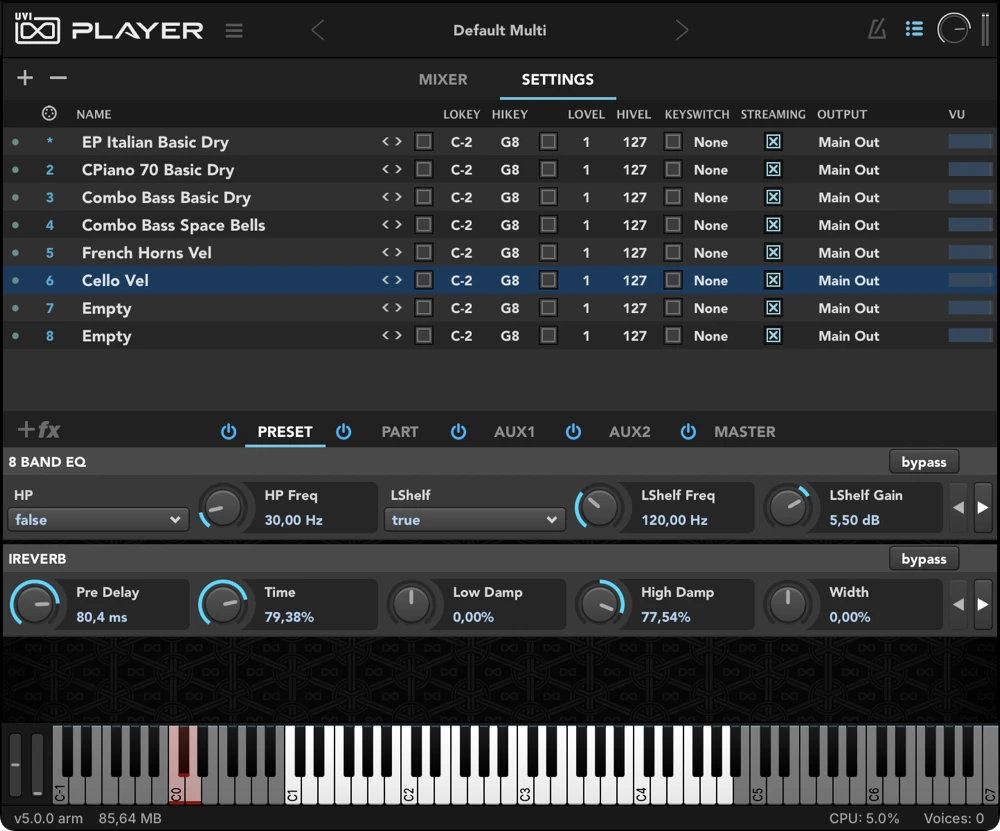
- 1 LoKey / HiKey
Set the part’s playable key range with a lower and an upper limit; this is what builds splits across several parts. Drag up or down, or double-click and play a key, to set a limit. The square switch at the left enables or disables the range.
The range cannot extend beyond the preset’s own key range.
- 2 LoVel / HiVel
Set the velocity range the part responds to, 1 to 127: notes played outside it are ignored — used to stack parts and change timbre with playing strength. The square switch at the left enables or disables the range; it is off by default.
- 3 Keyswitch
A MIDI note that turns the part on and off, so you can switch between parts, or groups of parts, while you play. Double-click the field and play a key to set it. The square switch at the left enables it.
- 4 Streaming
On by default: the part streams its samples from disk (see Preferences › Streaming). Turn it off to load all of the part’s samples into RAM, which helps when the drive is too slow.
- 5 Output
Assign the part to the master stereo output or one of 16 additional stereo outs; all parts default to Main Out. In standalone mode the outputs you actually get depend on the Audio and MIDI Settings and your audio device; in plug-in mode the list and its count depend on the plug-in format and the DAW. Built-in Auxes route to the Master bus only.
In a DAW, see its manual for multi-output routing, and the support articles.
Effects
UVI Player gives each part two effect chains — Preset and Part — plus three shared by the whole instance: Aux 1, Aux 2, and Master. Every chain runs its modules in series, top to bottom; for parallel processing, send parts to the Aux buses. UVI Player includes more than 40 effects.
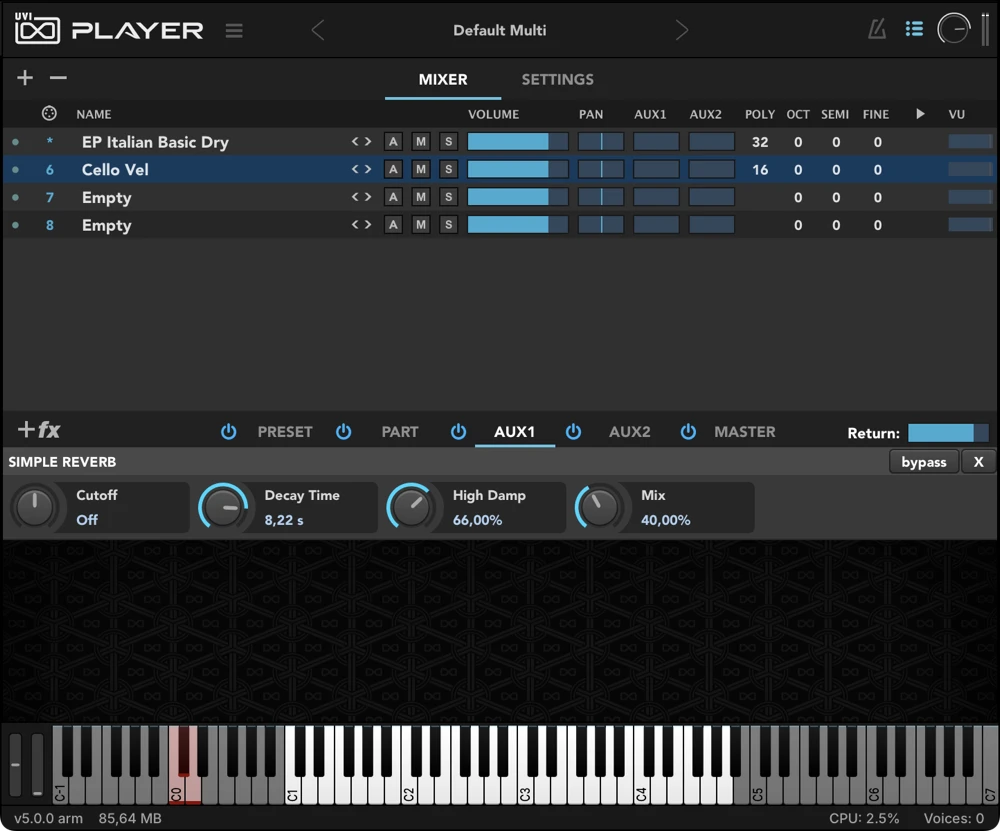
- 1 Preset / Part / Aux / Master Effects
Switches the effect chain display between Preset, Part, Aux 1, Aux 2, and Master.
- Power
- turns each chain on or off.
- Preset Effects
- the effects built into the loaded preset, with their parameters editable here; effects can be replaced or reordered, not added or removed. The tab only appears when the preset is unprotected — most commercial Soundware lock their presets and expose the Part chain alone.
- Part Effects
- applied to the part, post-preset effects.
- Aux 1 & 2 Effect Buses
- fed by the parts’ Aux 1 / Aux 2 sends.
- Aux 1 & 2 Effect Return
- the slider at the top right of an Aux tab, labeled Return, adjusts the bus level to Master.
- Master Effect Bus
- fed by all parts and effect buses.
- 2 Effect Insert
Click +fx to open the Effect Browser and add new effects. Unavailable on the Preset tab.
- 3 Effect Parameters
Right-click or double-click the effect name to reopen the Effect Browser on that slot — load a different FX preset, or replace the effect entirely; cancelling restores the effect that was there. Drag the effect name to reorder in the chain. When an effect has more than five parameters, arrows at the right edge page through them.
- 4 Sync, Bypass & Delete
- sync
- on tempo-based effects only: syncs to the host tempo or UVI Player’s tempo.
- bypass
- bypasses the effect.
- X
- deletes the effect. Not shown on the Preset tab.
Arpeggiator
Each part has its own arpeggiator (Multi mode only), which turns held notes into arpeggios, rhythmic gates, or step patterns. Open it with the part’s A button in the Mixer; click outside the panel to close it. To stop it, use Stop in the transport.
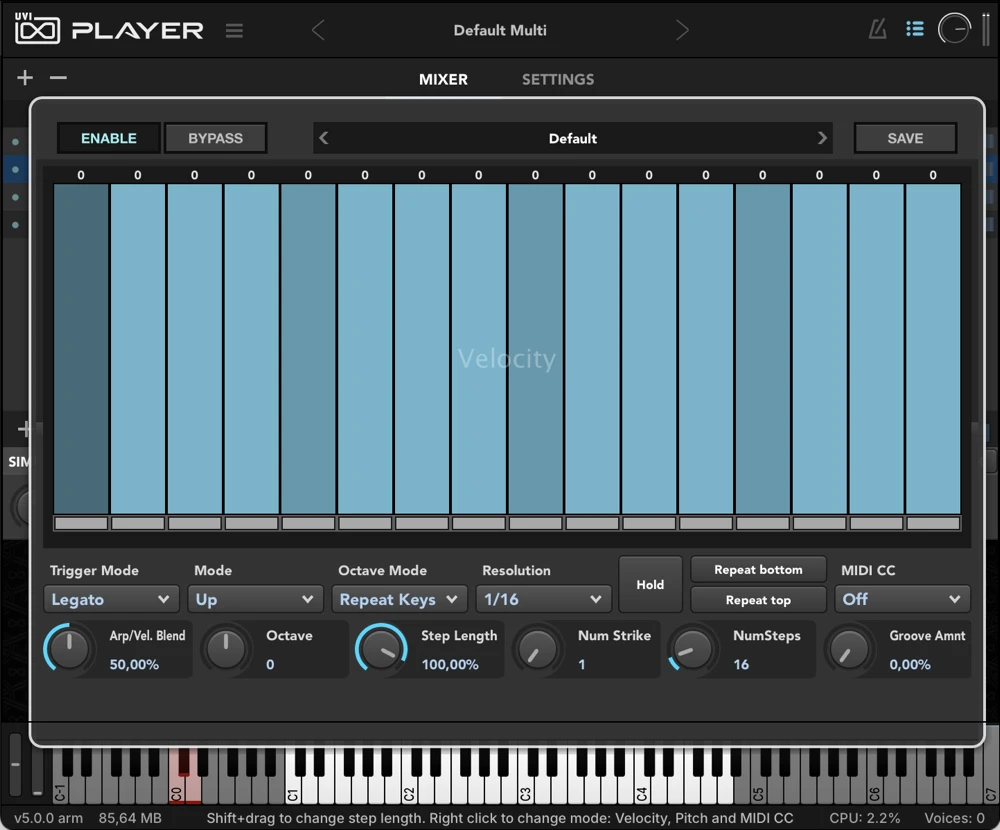
- 1 Enable & Bypass
- Enable
- turns the arpeggiator on or off.
- Bypass
- bypasses the arpeggiator pattern, keeping its settings.
- 2 Preset
Choose a factory or user pattern; ◀ / ▶ step through them.
- 3 Save
Saves the current settings as a user pattern, listed under User in the Preset menu.
- 4 Steps
Click-drag up/down to set a step value; Shift-click-drag left/right to set step length. Double-click a step to type its value, or use the mouse wheel; Alt/Option-drag sets steps to 0.
- Layers
- three independent layers: Velocity (0 to 100%), Pitch (±48 semitones), and MIDI CC (0 to 127). Right-click to switch.
- Enable / Disable
- click the box below a step to toggle it on or off.
- Merge
- Shift-click the box to join the step with the previous one for a longer note.
- 5 Trigger Mode
Note (each note resets to step 1), Legato (new notes continue from the current step), or Song Position (free-running).
- 6 Mode
The order in which notes are played; 28 orders, from Up, Down, Up & Down through the ZigZag, Spiral, Pinky, and Thumb families to Random, As Played, Chord, Mono Bassline, and Markovian.
- 7 Octave Mode
Repeat Pattern replays the pattern inside each octave; Repeat Keys (default) plays it once across all notes and octaves.
- 8 Resolution
The step size, 30 values from 32x (32 bars) down to 1/64 tri, including dotted and triplet divisions.
- 9 Hold & Repeat
- Hold
- holds notes after you release them.
- Repeat bottom / Repeat top
- in back-and-forth patterns, repeats the bottom or top note: with Repeat bottom, ABCBABCBA… becomes ABCBAABCBAA….
- 10 MIDI CC
The CC number (0 to 127, or none) sent by the MIDI CC layer.
- 11 Arp/Vel. Blend
Blends between the arpeggiator velocity (0%) and the incoming note velocity (100%).
- 12 Octave
Octaves above and below to play, −6 to +6.
- 13 Step Length
Global step length, 0 to 110%; e.g. a step setting of 50% and a knob setting of 50% results in a step length of 25%.
- 14 Num Strike
Triggers per step before advancing, 1 to 4.
- 15 NumSteps
The pattern length, 1 to 128 steps.
- 16 Groove Amnt
Adds swing by altering step trigger times.
MIDI Learn and Host Automation
Any FX parameter, macro knob, or slider that accepts modulation can be MIDI-learned or host-automated. Assignments are saved with the multi or project. The 128 host automation slots belong to the whole instance, and each one can target a parameter of any part.
Everything is set in the parameter’s MIDI/Automation Control dialog:
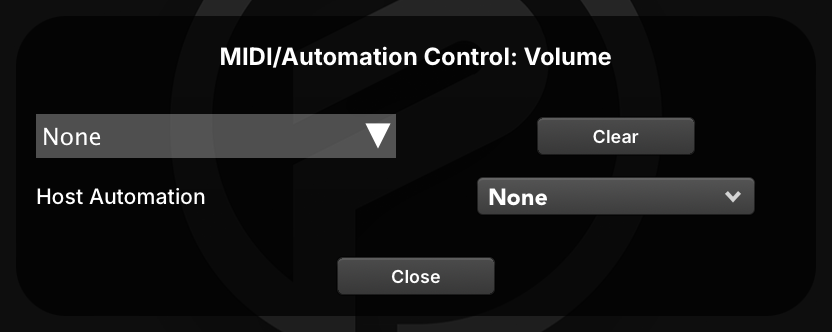
- 1 MIDI CC
The CC assigned to the parameter.
- 2 Clear
Removes the MIDI assignment and closes the dialog.
- 3 Host Automation
The automation slot (1 to 128) that exposes the parameter to your DAW.
- 4 Close
Closes the dialog.
Learn a MIDI CC:
- Right-click the parameter to automate.
- Move the physical MIDI controller (knob, fader, button…) to send its control data.
- UVI Player assigns the first CC it receives and closes the dialog. To assign a CC by hand, pick it from the dialog’s left-hand menu.
Remove a MIDI assignment: right-click the parameter and press Clear.
Modulate with a CC: Alt/Option + right-click a parameter to open its MIDI Modulation dialog instead of the MIDI/Automation Control dialog: choose a CC and set how far it moves the parameter with the depth slider.
Assign host automation:
- Right-click the parameter.
- Choose an automation slot from the Host Automation drop-down.
Preferences
Set UVI Player’s global options in the Preferences window: choose Open Preferences… from the Main Menu. It has three pages: General, Streaming, and Soundware.
General
The tuning reference of A, from 392.00 to 493.88 Hz, applied on top of any instrument-specific tuning. Each plug-in instance has its own. Alt/Option-click to reset it.
Hands the drawing of the interface to your GPU. Leave it off for better compatibility with integrated graphics processors.
The zoom level of the whole interface: 75%, 90%, 100%, 110%, 125%, 150%, 175%, or 200% — useful on HiDPI and 4K displays.
The zoom level of the instrument (script) interfaces only, from 100% to 200%. Same setting as Content Scaling in the Main Menu.
Leaves out the tags that none of the current results carries.
Lists everything the active filters allow before you type anything.
Shows each Soundware by its logo rather than its name in the browsers.
How long the browsers keep the filters you set: Remember, Forget after 1 hour, Forget after 1 day, Forget after 1 week, Forget on close, or Forget (always).
Streaming
Rather than loading whole samples into memory, UVI Player reads (streams) them from disk as they play: it uses less memory, and lets you play more samples than your RAM could hold. Streaming performance depends directly on the speed of the disk, so set its type accurately. The default settings suit most uses. To turn streaming off for a part, see Multi Mode › Settings.
The speed of the disk your Soundware sits on — Very fast - SSD, Fast - 7200 RPM, Medium - 5400 RPM (default), or Slow - USB1 / Network. If your UFS files are on several disks, match the disk holding the main UFS.
How much memory UVI Player keeps for samples on their way from the disk, from 1 to 256 MB. Default 40 MB. Smaller values load the CPU and disk more; larger ones use more RAM.
Restores and applies the default streaming settings.
Applies the hard drive type and cache size you chose.
Soundware
Search paths are the folders UVI Player scans for Soundware. You can set several; each has three toggles.
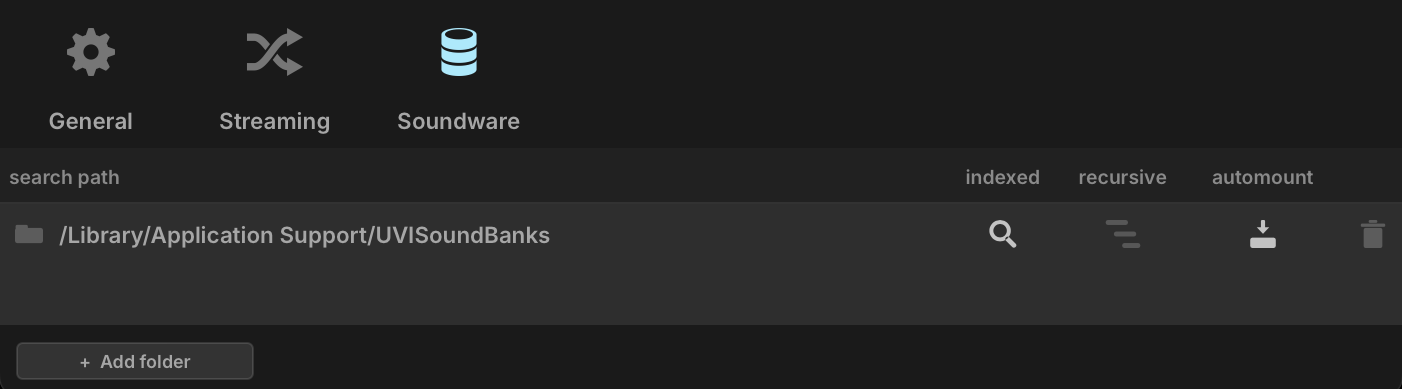
- 1 Search path
The folder this row scans.
- 2 Change folder
Click the folder icon to point this search path to another folder.
- 3 Indexed
The folder is included in the Library Browser search. On for a new folder.
- 4 Recursive
The folder is scanned with all its subfolders, not just the folder itself. Meant to be used with automount. This can significantly increase UVI Player’s startup time. Off for a new folder.
- 5 Automount
Every UFS Soundware (UVI Soundware comes as
.ufsfiles) found in the folder is mounted at startup. On for a new folder. - 6 Remove
Removes the search path from the list. The folder itself is not touched.
- 7 Add folder
Adds a search path: browse for the folder you want UVI Player to scan — a folder, not a UFS file.
Troubleshooting
No Sound
Work from the input to the output:
- MIDI input — in standalone mode, check that your controller is enabled under Active MIDI inputs (Device). In a DAW, check that the track sends MIDI to UVI Player.
- MIDI channel — the dot to the left of a part’s MIDI channel lights up when MIDI reaches it. If it stays dark, set the part to Omni or to the channel your controller sends on (Mixer).
- Part — check that the part is not muted, that another part is not soloed, and that its key range, velocity range, or keyswitch does not exclude the notes you play (Settings).
- Output — in standalone mode, check the audio device and its Routing; with a part sent to Out 2 to Out 17, check that your DAW or audio device actually receives that output.
Soundware or Presets Are Missing
- Check that the folder holding your
.ufsfiles is listed in Preferences › Soundware, with automount on, and indexed on for the Library Browser to find its presets. - If the Library Browser still misses or shows stale presets, right-click its magnifying glass and choose Reset database to rebuild the index, or Clear non available volumes to drop Soundware that is no longer there.
- Soundware that is no longer on disk still shows, dimmed, while the eye toggle of the Library Browser is on; Clear non available volumes removes it.
“…isn’t a valid UFS” Error
The Soundware file cannot be read: it may be damaged or incompletely downloaded, or need a more recent UVI Player. Right-click the Soundware in the Files Browser and choose Verify soundbank integrity; if it fails, download the Soundware again through UVI Portal. If the check passes, update UVI Player.
An Instrument Interface Is Framed in Red
The preset’s effects no longer match its interface, usually after effects were replaced or reordered in its Preset chain. Reload the preset. To add effects, use the Part chain (Effects).
Clicks, Dropouts, or High CPU
- Raise the Audio buffer size (Device) or your DAW’s buffer size.
- Check the Streaming preferences: set the Hard drive type to match the drive your Soundware is on. If that drive is too slow, turn Streaming off for the part (Settings) to load its samples into RAM.
- Lower the Polyphony of parts that do not need many voices (Mixer); the footer shows the CPU load and the active voices.
Distortion
Watch the master meter in the header. Lower the part volumes or the master volume, and check that no effect (drive, distortion, or EQ boosts) overloads its chain.
Contacting Support
Before contacting UVI Support, note the UVI Player version (shown in the footer), your operating system and host, the exact error message, and the steps that lead to the problem. Check whether it also happens with UVI Player alone, in standalone mode, and with another preset. This tells you whether the problem lies with one file or setup, or is general.