General Conventions
Throughout Falcon, some common conventions are used for adjusting and interacting with controls. Shortcuts are written Mac first: Cmd/Ctrl means Command on Mac and Control on Windows, and Alt/Option means Alt on Windows and Option on Mac.
| Action | Result |
|---|---|
| Hover | Shows a short description of the control in the status bar. |
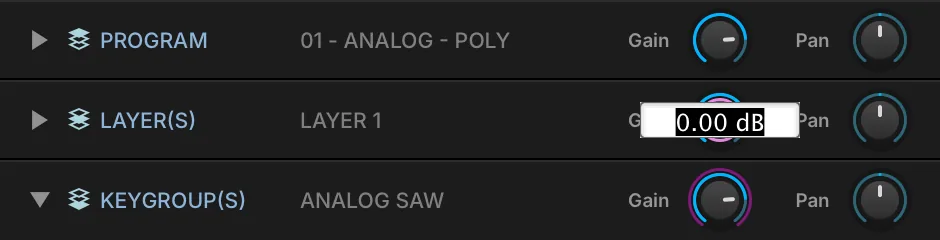
| Click and drag | Adjusts the value. Hold Cmd/Ctrl for finer adjustment. You can also hover and use the mouse wheel or the trackpad’s scroll gesture. |
| Double-click | Enters a numeric value. Press Return or click outside the field to confirm, Escape to cancel. |
| Right-click (Control-click on Mac) | Opens the control’s contextual menu, if it has one — for example, to assign modulation. |
| Alt/Option-click | Returns the control to its default value. |
| Arrow keys | Change the selected item in most lists, menus and file browsers. In trees — the Tree view, the sidebar browsers — Left collapses the selected item and Right expands it. |
Toolbar
The toolbar is displayed at the top of the window and is always visible in Main, Mixer, and Performance views. Most controls in the toolbar apply globally to the entire Falcon instance.
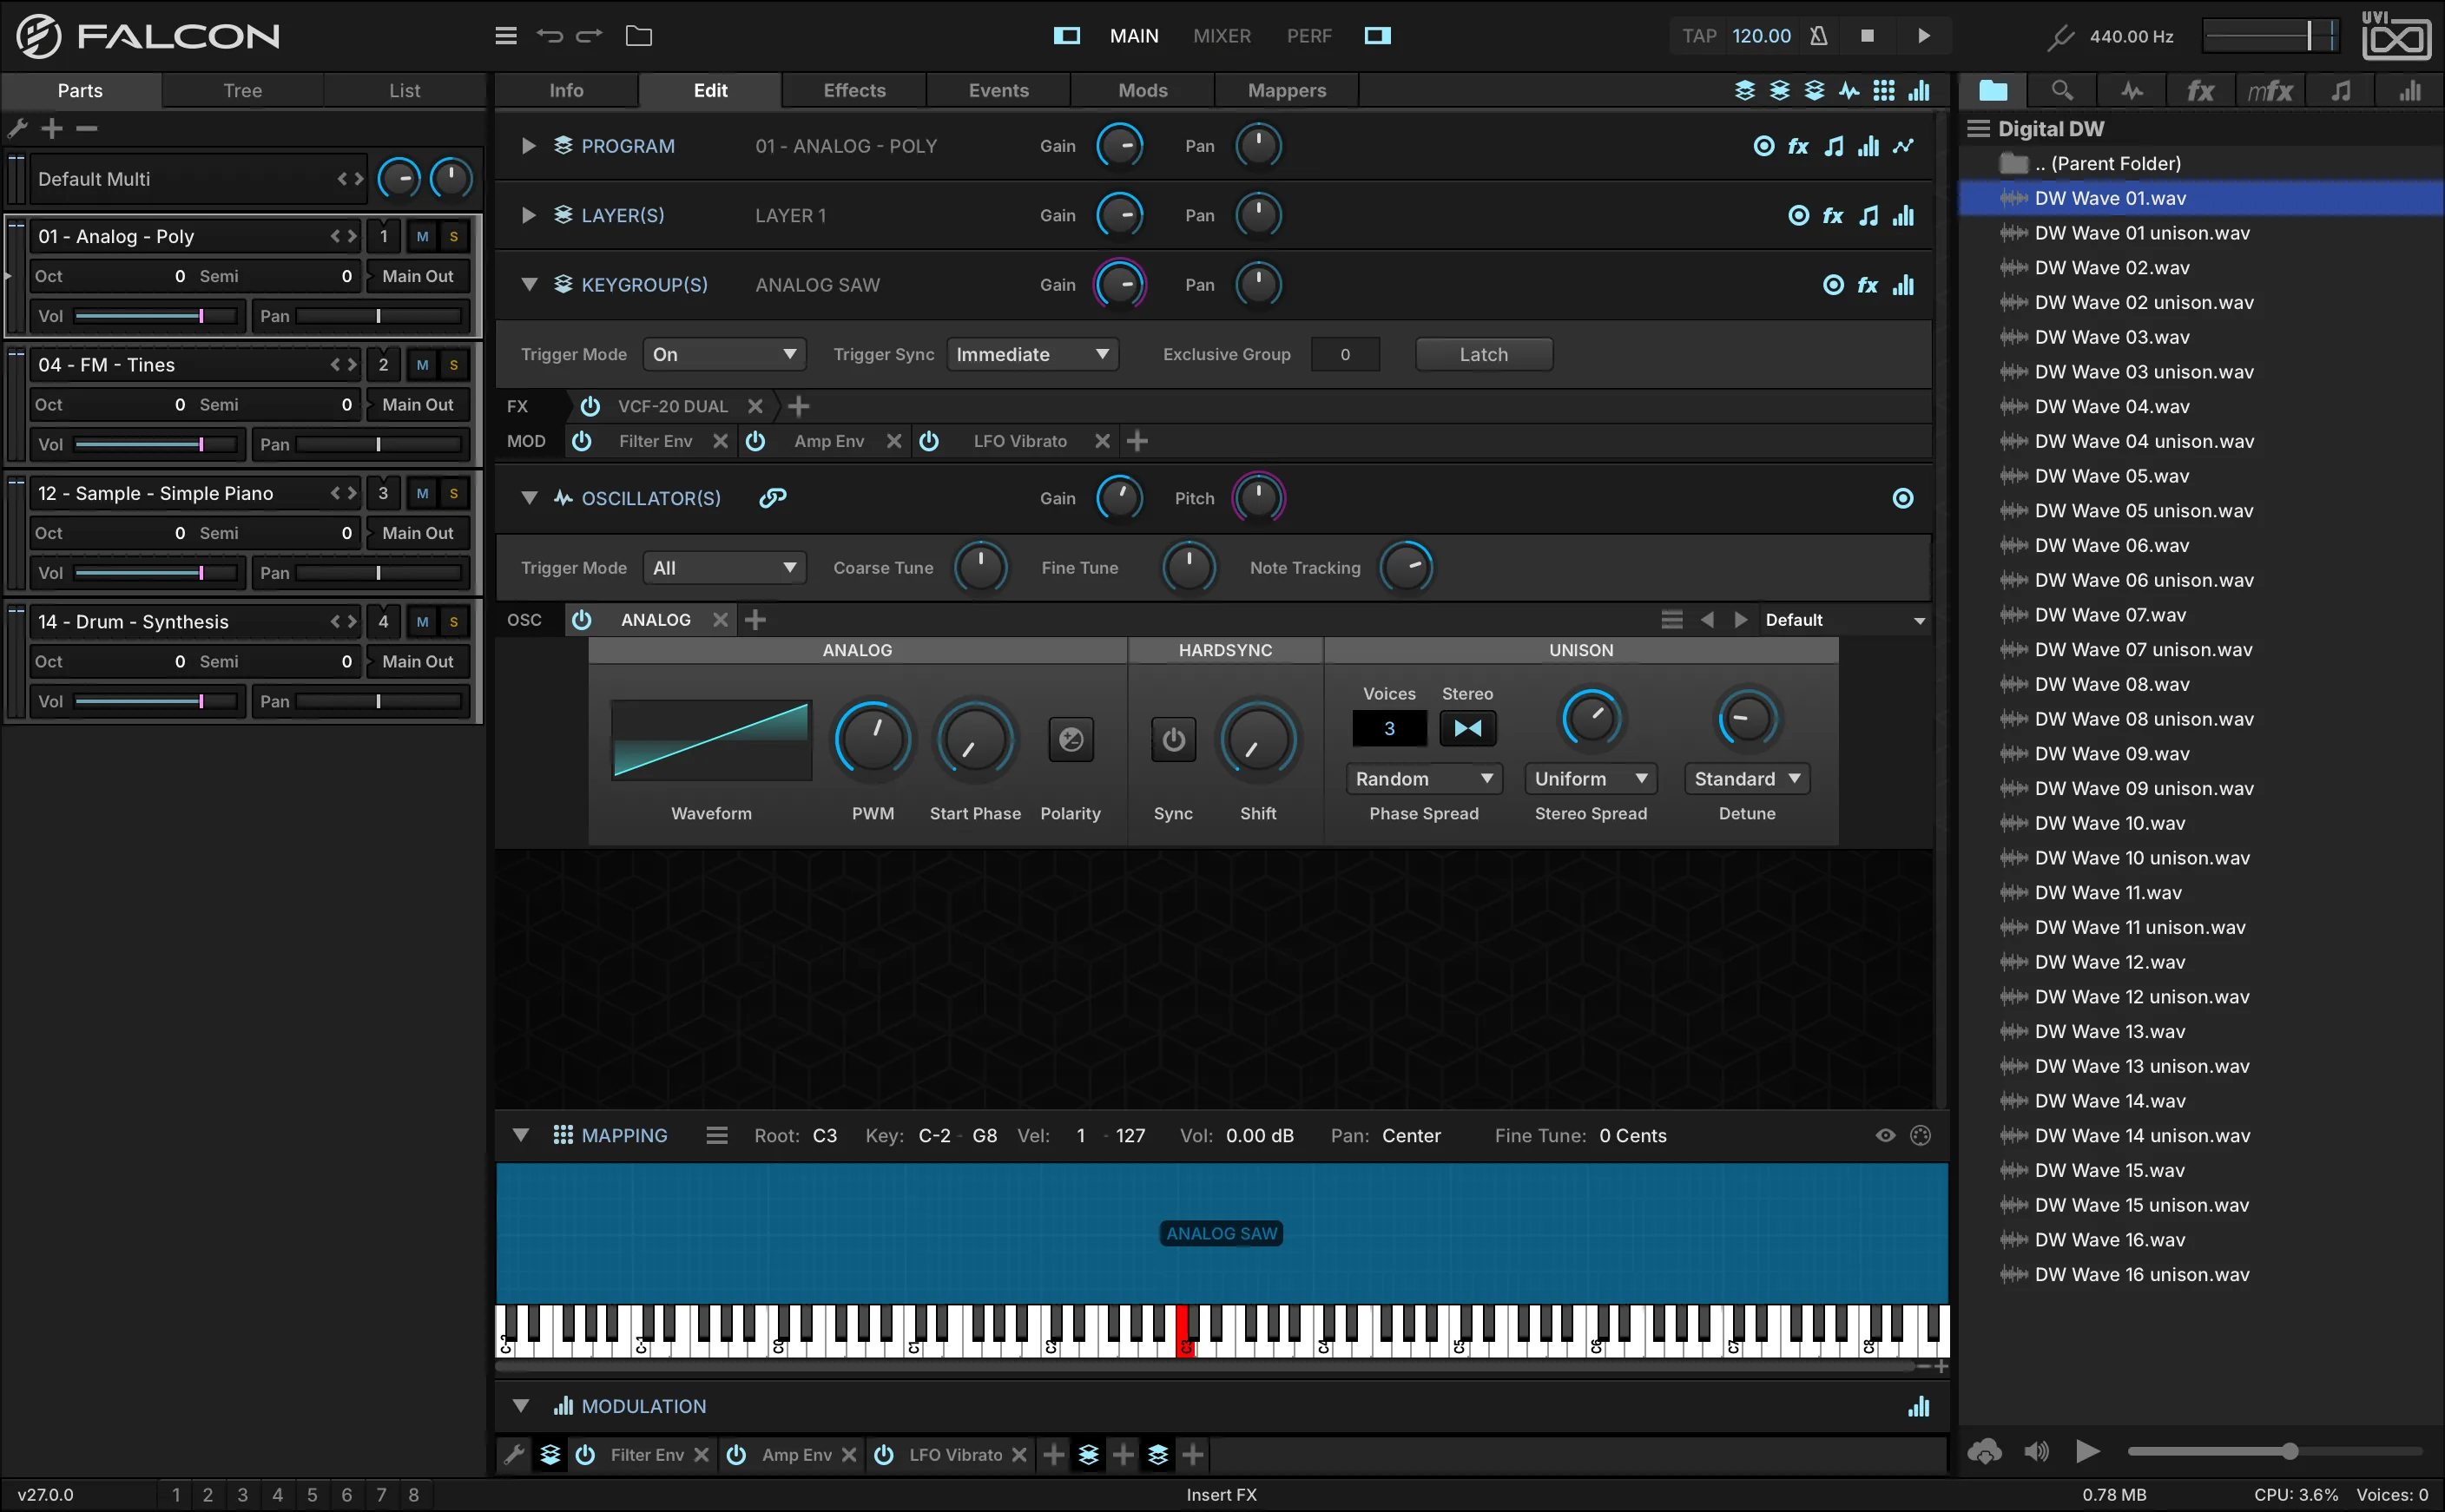
- 1 Main Menu
Opens the Main Menu: loading and saving multis and programs, Undo / Redo / History, UI snapshots, Preferences, and window size. Each command is described under Main Menu below.
- 2 Undo / Redo
Reverts or re-applies the last action. You can step back to any previous state with the History panel (available through the Main Menu).
- 3 Browser Toggle
Click the folder icon to open the Library Browser and view/load instruments, presets, or loops and sounds into the chosen part — the same as double-clicking the part’s program name. See Which Browser?
- 4 Changing the View
The MAIN, MIXER, and PERF buttons change the primary view of the Falcon window. See Main, Mixer and Performance.
- 5 Show/Hide Sidebar
The left and right sidebars can be individually hidden or shown. The left sidebar displays the PARTS, TREE, and LIST editors; the right sidebar displays the sidebar browsers. The left sidebar is shown in Main view only.
- 6 Tempo
Falcon’s current TEMPO, from 10 to 400 bpm. Double-click to enter a value, or click and drag up/down. Every tempo-synced parameter in Falcon follows it. When Sync To Host is enabled, the Tempo cannot be edited manually.
- 7 Tap Tempo
Tap the TAP button repeatedly at a consistent tempo to enter the tempo by feel rather than typing a value.
- 8 Sync To Host / AutoPlay
Enabling SYNC TO HOST causes Falcon to follow an external tempo source — the host application’s tempo when used as a plug-in, or MIDI Beat Clock when standalone. Enabling AUTOPLAY causes Falcon to play and stop along with the host. AutoPlay is not shown in standalone mode. For a loop’s own auto-play, see Parts.
- 9 Play / Stop
The PLAY and STOP buttons manually start and stop Falcon’s playback. When AutoPlay is enabled they also reflect the host application’s transport state.
- 10 Global Tune
GLOBAL TUNE adjusts the tuning for all parts, using the A above Middle C as a reference. Global Tune defaults to 440 Hz, and is adjustable from 392 Hz to 493.88 Hz.
- 11 Global Volume
GLOBAL VOLUME adjusts the output volume for the Main Outs.
Main Menu
The Main Menu opens from the menu icon at the left of the toolbar (1). Point at a command to see what it does.
Status Bar
The status bar is displayed at the bottom of the window and provides quick, at-a-glance information.
- 1 Version
The installed version of Falcon is displayed on the left side of the status bar.
- 2 Workspace
Store and recall the UI settings of the left and center panes as a workspace, up to 8 slots. Click the button to select a workspace; Shift-click to save the current state into a workspace; Shift+Cmd/Ctrl-click to delete the workspace. The number of a saved workspace is lit in blue. NOTE: Workspaces and Snapshots both manage left/center panel state, but they operate independently.
- 3 Hover Help
The center of the status bar displays contextual help as you use Falcon — for example “Global Volume” when hovering over the output volume knob, or “Oscillator tune in semitones” when hovering over the Oscillator module’s Coarse Tune knob.
- 4 Performance Summary
The right side of the status bar displays a performance summary for the current multi: memory usage, CPU usage, and the number of voices currently playing.
Main
The Main view is the primary view for creating and editing parts in Falcon, and the instruments and samples that those parts contain.
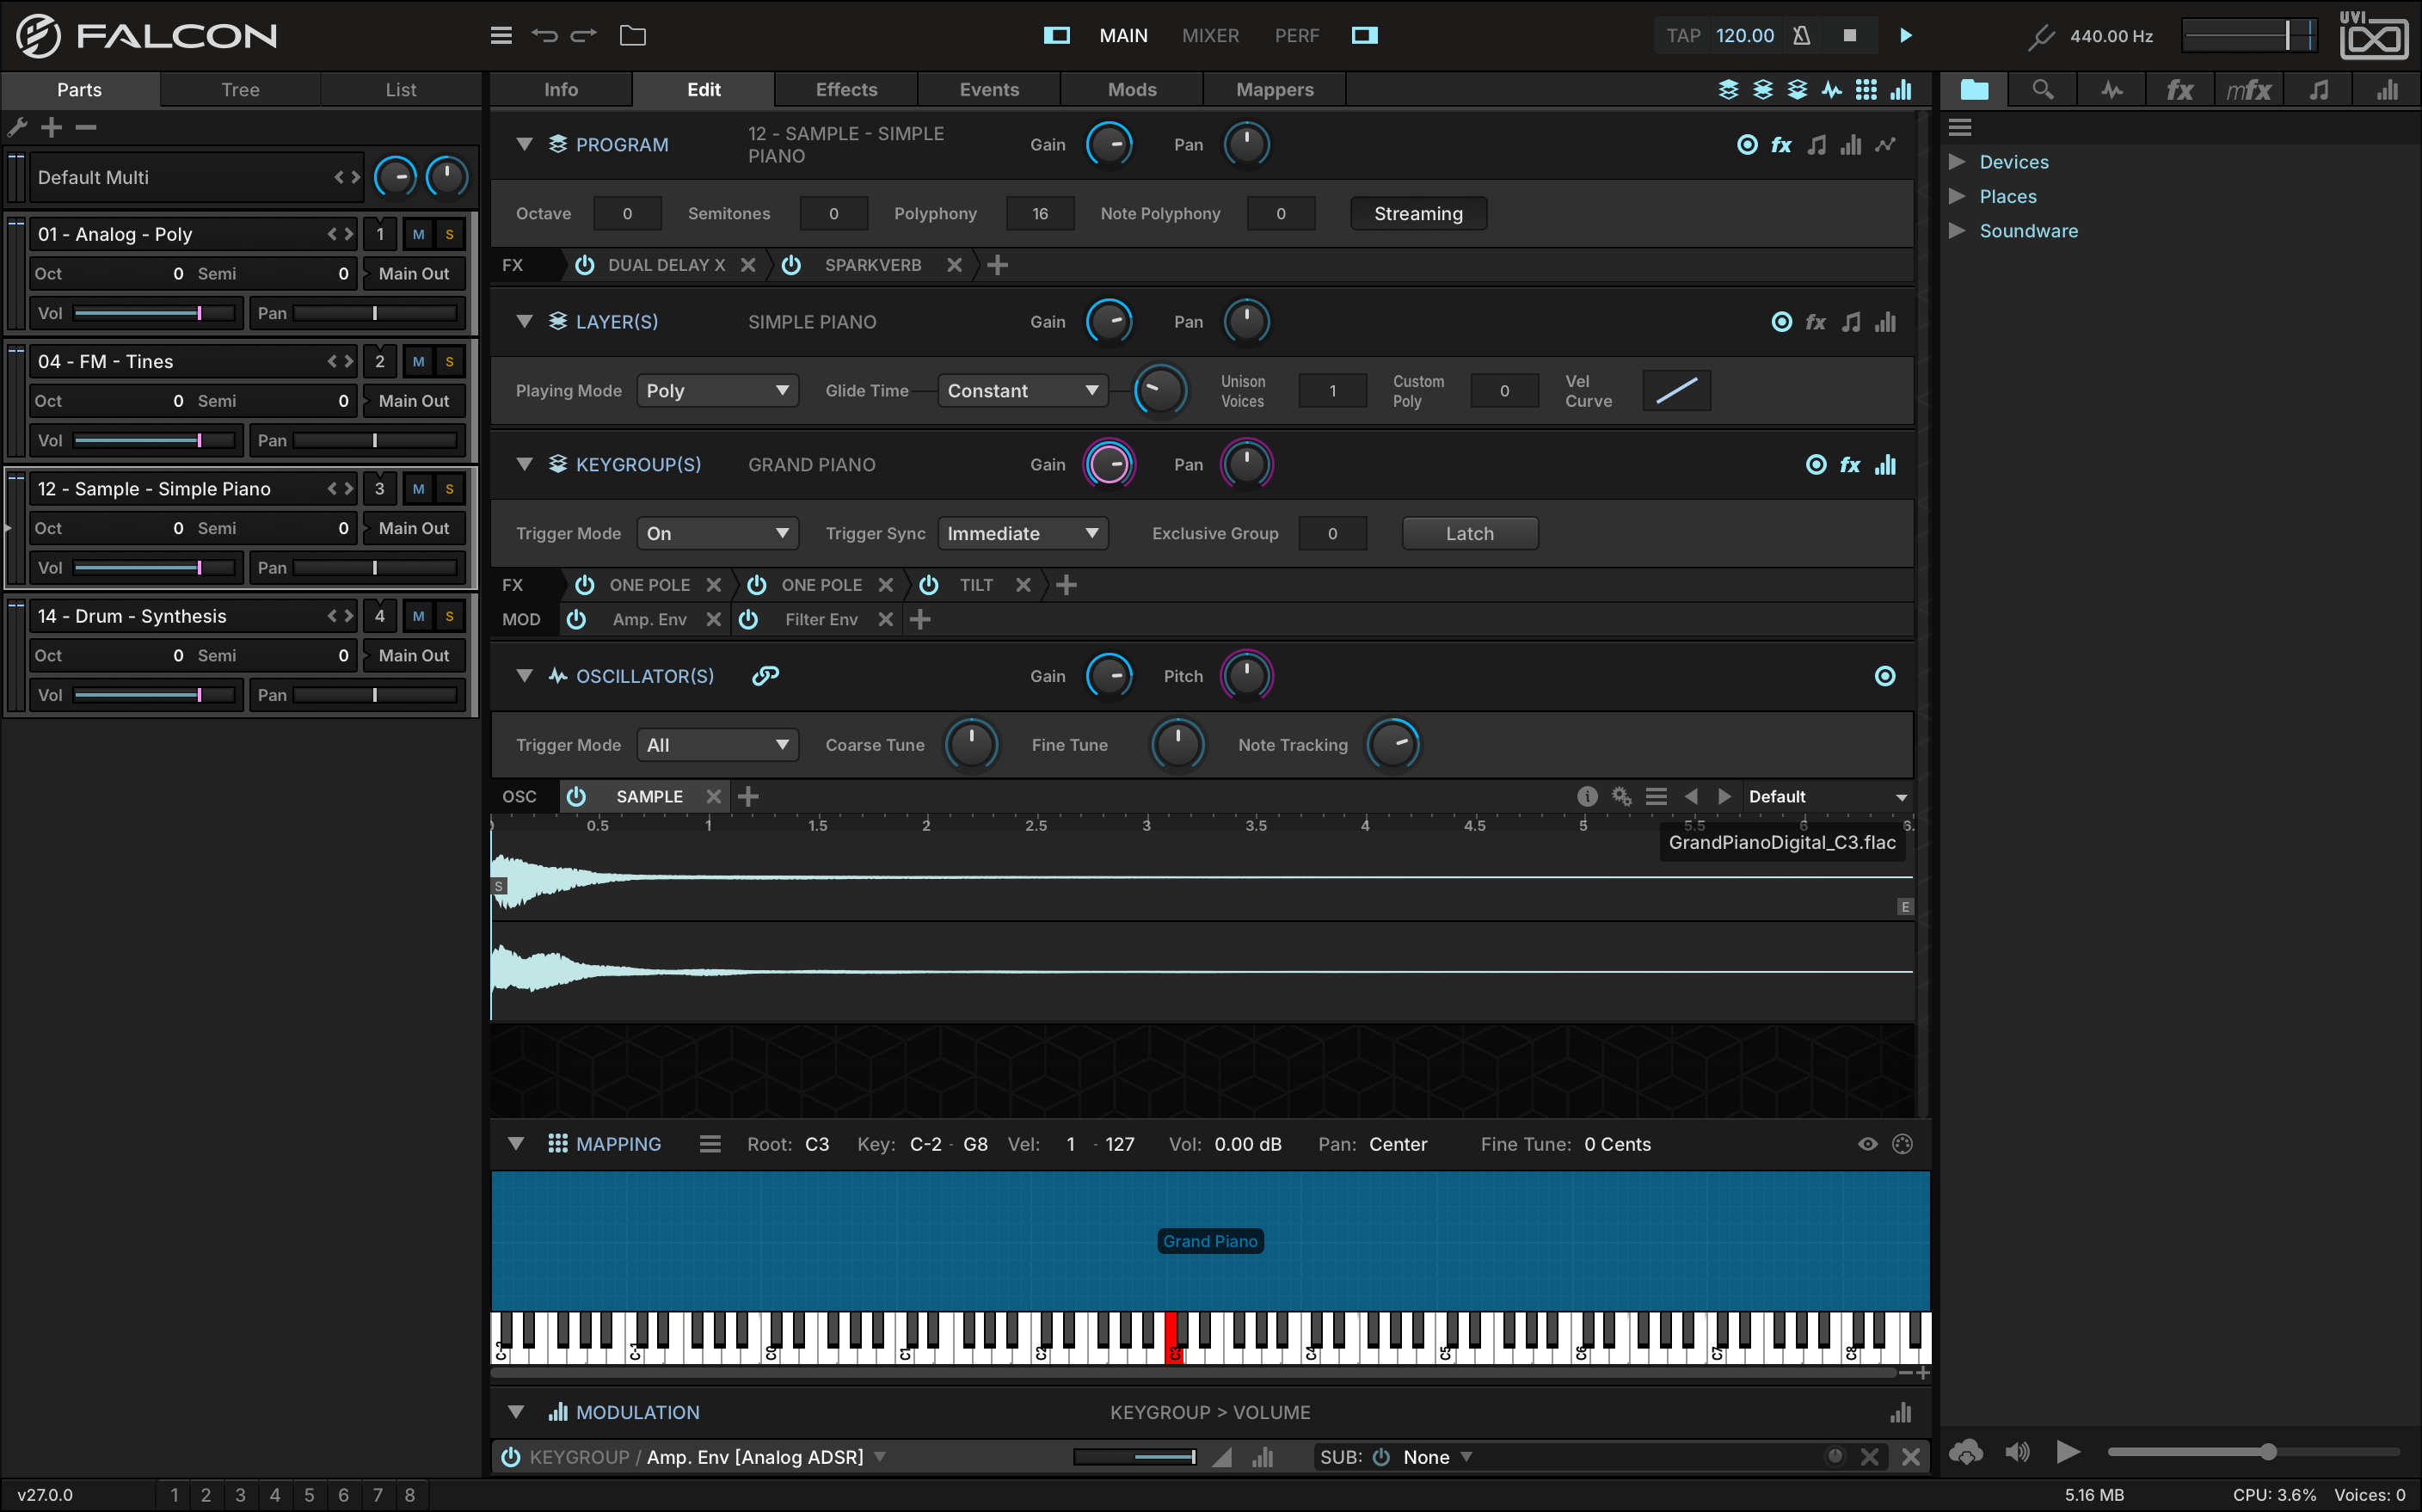
- 1 Toolbar
Always-visible top bar with Main Menu, browser toggle, view selector, sidebar toggles, tempo and transport. See Toolbar for full details.
- 2 Center Pane
Primary working area for viewing and editing parts — the Info, Edit, Effects, Events, Mods and Mappers tabs are displayed here.
- 3 Left Sidebar
The LEFT SIDEBAR hosts the Parts, Tree, and List editors for navigating the multi.
- 4 Right Sidebar
The RIGHT SIDEBAR hosts the sidebar browsers for loading programs, presets and samples.
Parts
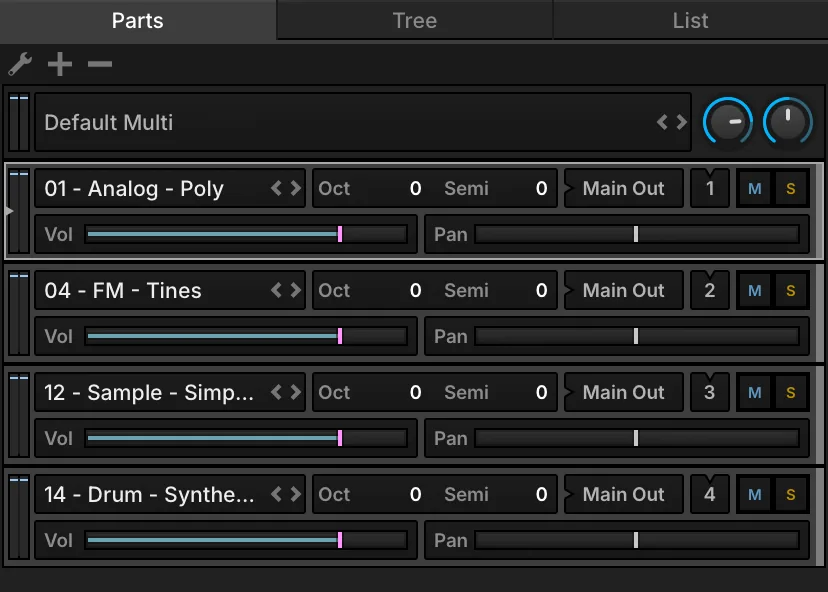
The Parts List, in the left sidebar, lists every part of the multi and selects the one displayed and edited in the center pane. Part settings are independent of the program loaded in the part, and are saved with the multi — or with your host session when Falcon is used as a plug-in.
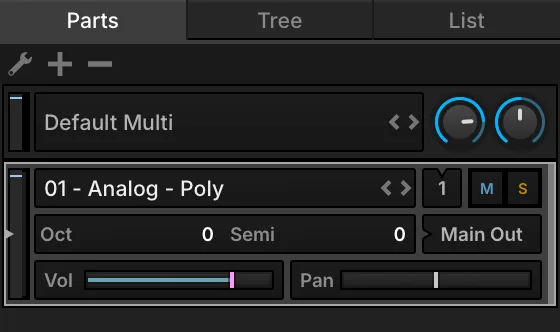
- 1 Parts List menu
Actions for the selected part: Empty selected Part, Load Program in selected Part and New Program in selected Part.
- 2 Add / remove parts
The + and − buttons add and remove parts. To reorder parts, press and hold a part and drag it.
- 3 Multi Controls
The name of the loaded multi. Double-click it to open the File Browser and load a multi, or use the previous/next buttons to step through the multis in the same folder.
- 4 Global Volume / Tune
The same Global Volume and Global Tune as in the toolbar, with the output meters of the Main Out.
- 5 Program name
The loaded program; an asterisk marks unsaved changes. Double-click to open the Library Browser, or Shift-double-click to show it in the FILES tab of the right sidebar — either one opens at the program’s location. Right-click for Empty Part, Delete Part, Duplicate Part, Load Program, Reload Program (discards the changes since the last save) and New Program.
- 6 Previous / Next program
Steps through the programs in the same folder.
- 7 MIDI Input
The part’s MIDI input (A1, A2, …), incremented automatically for each new part. Press and hold to change it; Omni listens on all ports and channels, and shows an asterisk.
- 8 Mute / Solo
Mute or solo the part. Alt/Option-click to mute or solo only that part; Cmd/Ctrl-click to mute or solo every part except the one clicked.
- 9 Output meters / MIDI indicator
The part’s output level. The MIDI indicator flashes whenever the part receives MIDI on its input.
- 10 Octave / Semi
Transpose the part’s incoming MIDI in octaves and semitones.
- 11 Audio Output
The part’s audio output; new parts go to the Main Out. Press and hold to route it to another output.
- 12 Volume / Pan
The part’s output level and stereo placement.
Additional controls on the part row, for loops and for the part color:
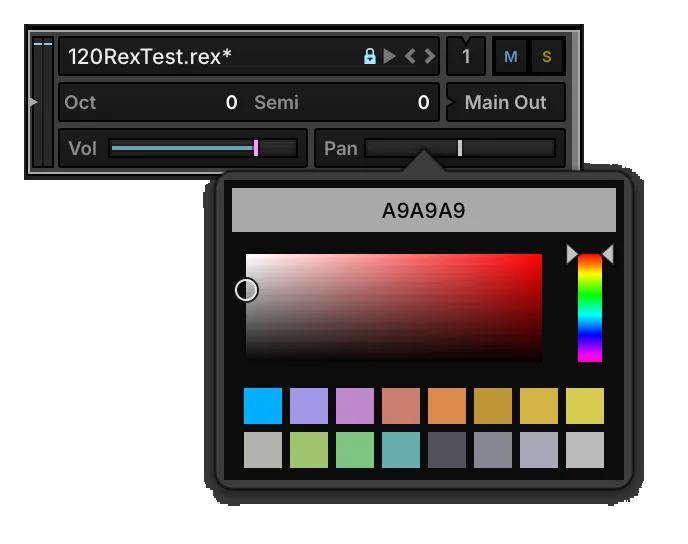
- 13 Unsaved changes
The asterisk after the program name: the program has unsaved changes.
- 14 Auto Play
Triggers the loop when Falcon’s playback starts.
- 15 Play
Lights while the loop is playing, and starts or stops it manually.
- 16 Part color
Click the color bar on the right of a part to choose its color.
Drag the right edge of the Parts List to widen it; the controls rearrange so that more parts fit at once.
Tree
The Tree shows one part as a hierarchy of nodes, following Structure: from its program down to each keygroup and oscillator. Its two sections, INSTRUMENT (the nodes) and INSPECTOR (the details of the selected node), are collapsed or expanded with the arrow left of their name; drag the Inspector’s top edge to change its height.
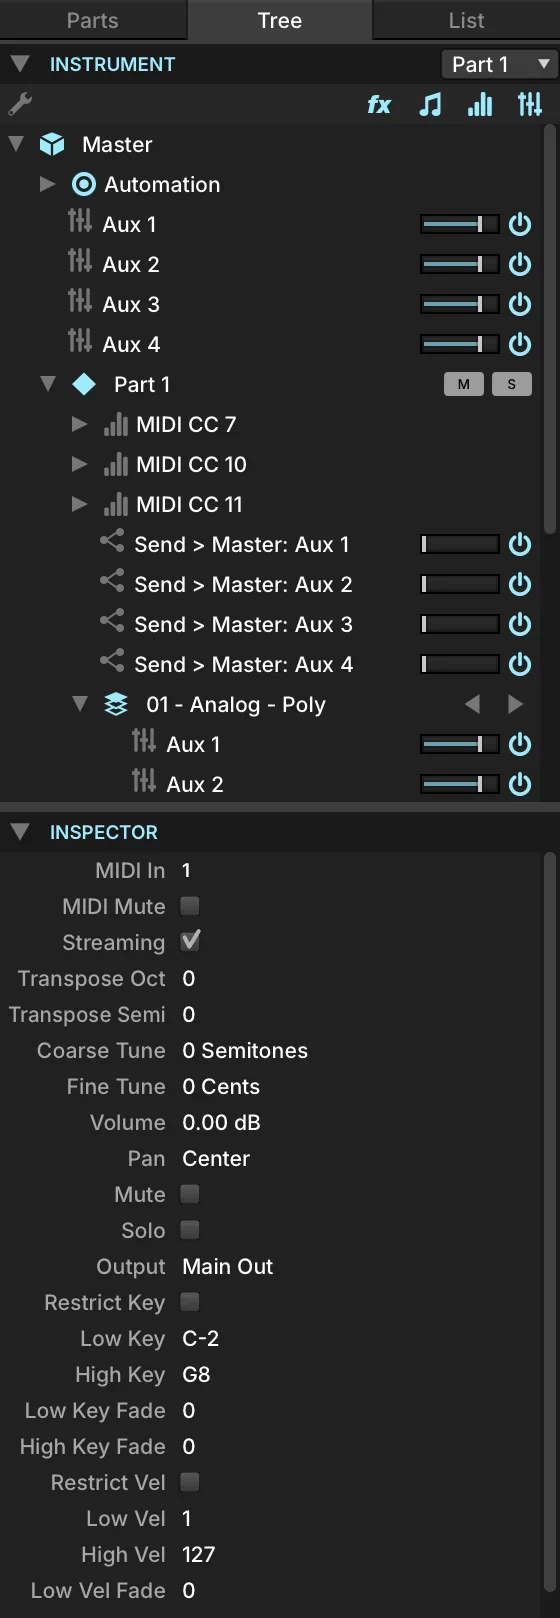
- 1 Instrument
The nodes of a single part, plus a few global nodes. Choose the part from the Part Selector menu in the upper right.
- 2 Node visibility toggles
Show or hide Effects, Event Processors, Modulation Sources, and Aux FX buses and sends. Master, Host Automation, Part, Program, Layer, Keygroup and Oscillator are always shown.
- 3 Navigating the tree
Press a node to select it and show its details in the Inspector. Press the arrow left of a node to expand or collapse it; hold Alt/Option to expand all of its children too.
The node selected in the Tree also drives the other views — the Edit tab, the Effects tab and so on — which makes it the quickest way around the layers, keygroups, effects and modulation assignments of a large program. Double-click a node to jump to its main editor: an effect opens in the Effects tab, a modulation source in the Mods tab.
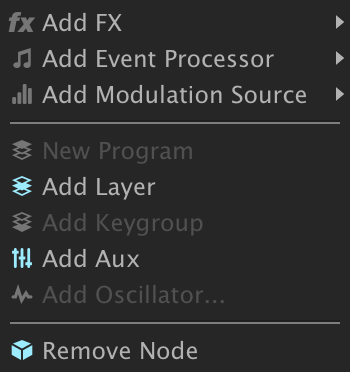
For a node’s options, select it and press the menu icon in the upper left, or right-click the node.
The Inspector lists the selected node’s properties. Double-click a value to type a new one, or drag it up or down. Most properties also appear in other views, such as the Edit tab or the Mixer, but some “under-the-hood” properties are shown only here.
List
The List gives a detailed rundown of one part and its program, in four sections that follow the same hierarchy: Part, Program, Layer(s) and Keygroup(s). Drag its right edge to widen it; each section collapses or expands with the arrow left of its name.
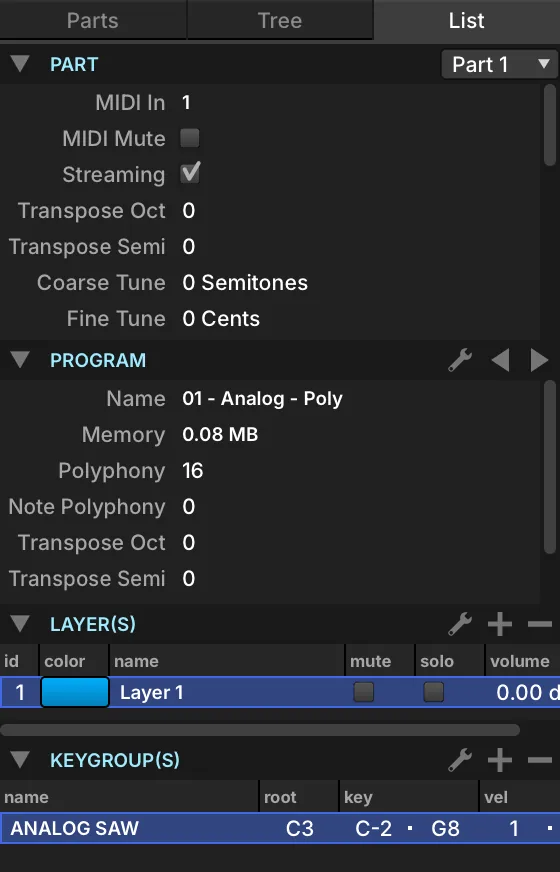
- 1 Part section
The settings of the selected part — the same as in the Parts List.
- 2 Part Selector menu
Chooses which part all four sections show.
- 3 Program section
The settings of the program loaded in the part — the same as the Program section of the Edit tab.
- 4 Program menu
Creates, loads, reloads, saves and protects the program. See Program Menu below.
- 5 Previous / Next Program
Steps through the program files in the current folder.
Layers and Keygroups
The Layers section lists every layer of the program, and the Keygroups section every keygroup of the selected layers. What you select here is what the Edit tab shows, which makes it easy to work on one layer or a few keygroups of a large program.
- Press a name to select it; hold Cmd/Ctrl to select several. Press the empty space below the last row to deselect all — with nothing selected, the Edit tab shows a composite, and edits apply to every layer or keygroup.
- Right-click a column header to choose which settings are shown as columns, and drag a header left or right to reorder the columns. In the Keygroups section, press a column name to sort by it, and press again to reverse the order; drag a column’s right edge to widen it.
- The Layer menu edits layer rules and cuts, copies, pastes and duplicates layers; the Keygroup menu cuts, copies, pastes and duplicates keygroups. See Adding, Moving and Deleting Keygroups.
- The Add and Remove buttons add a layer or keygroup, or remove the selected ones.
Program Menu
The Program section’s menu manages the program file. Point at a command to see what it does.
Info
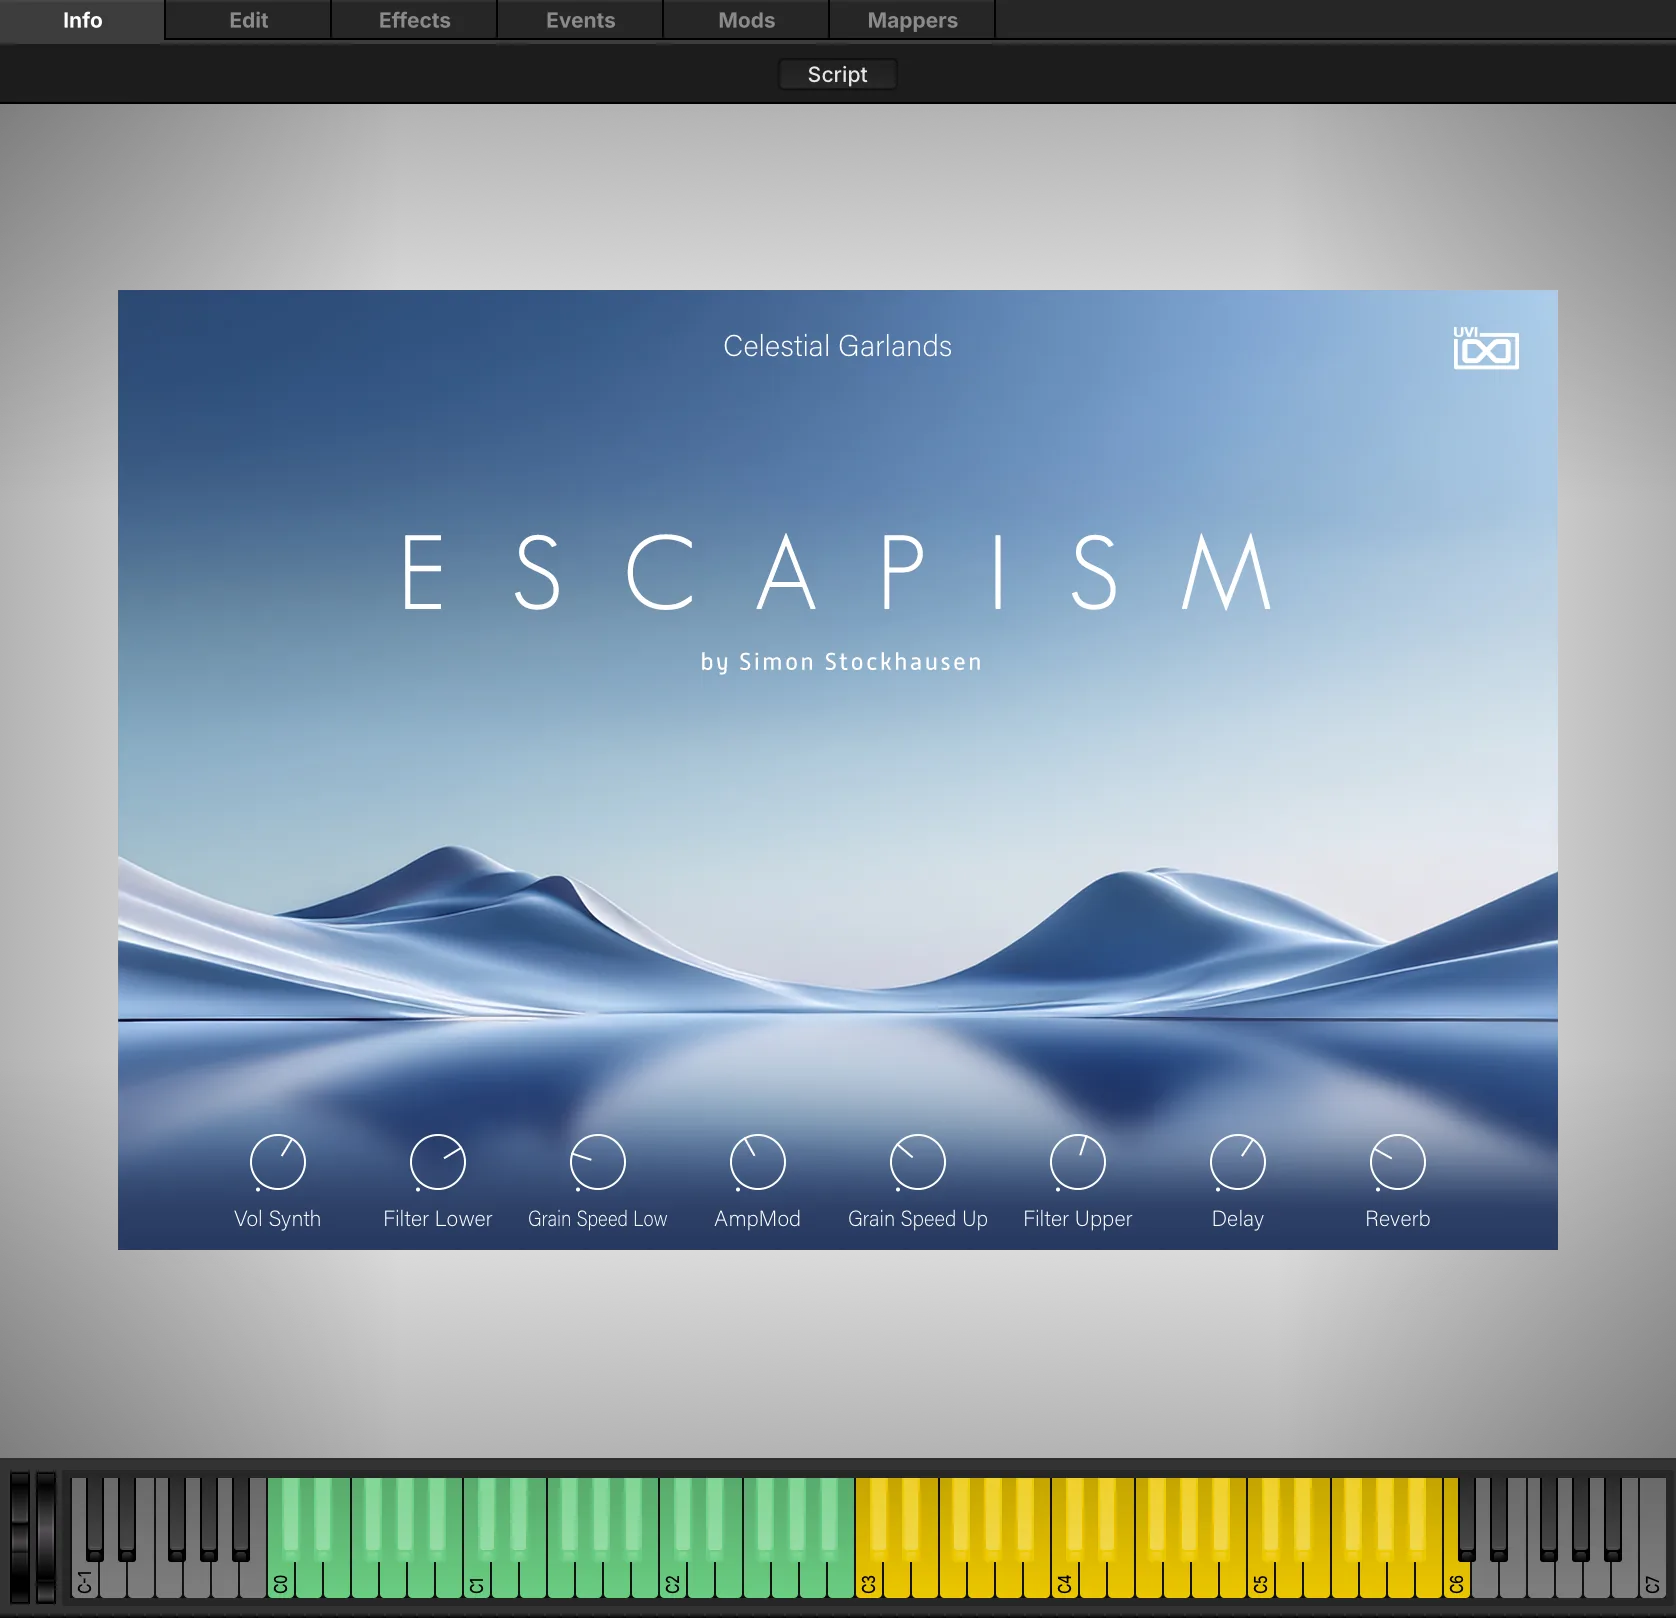
The Info tab is the “front panel” of the selected program: its macros, its description and images, and a playable keyboard.
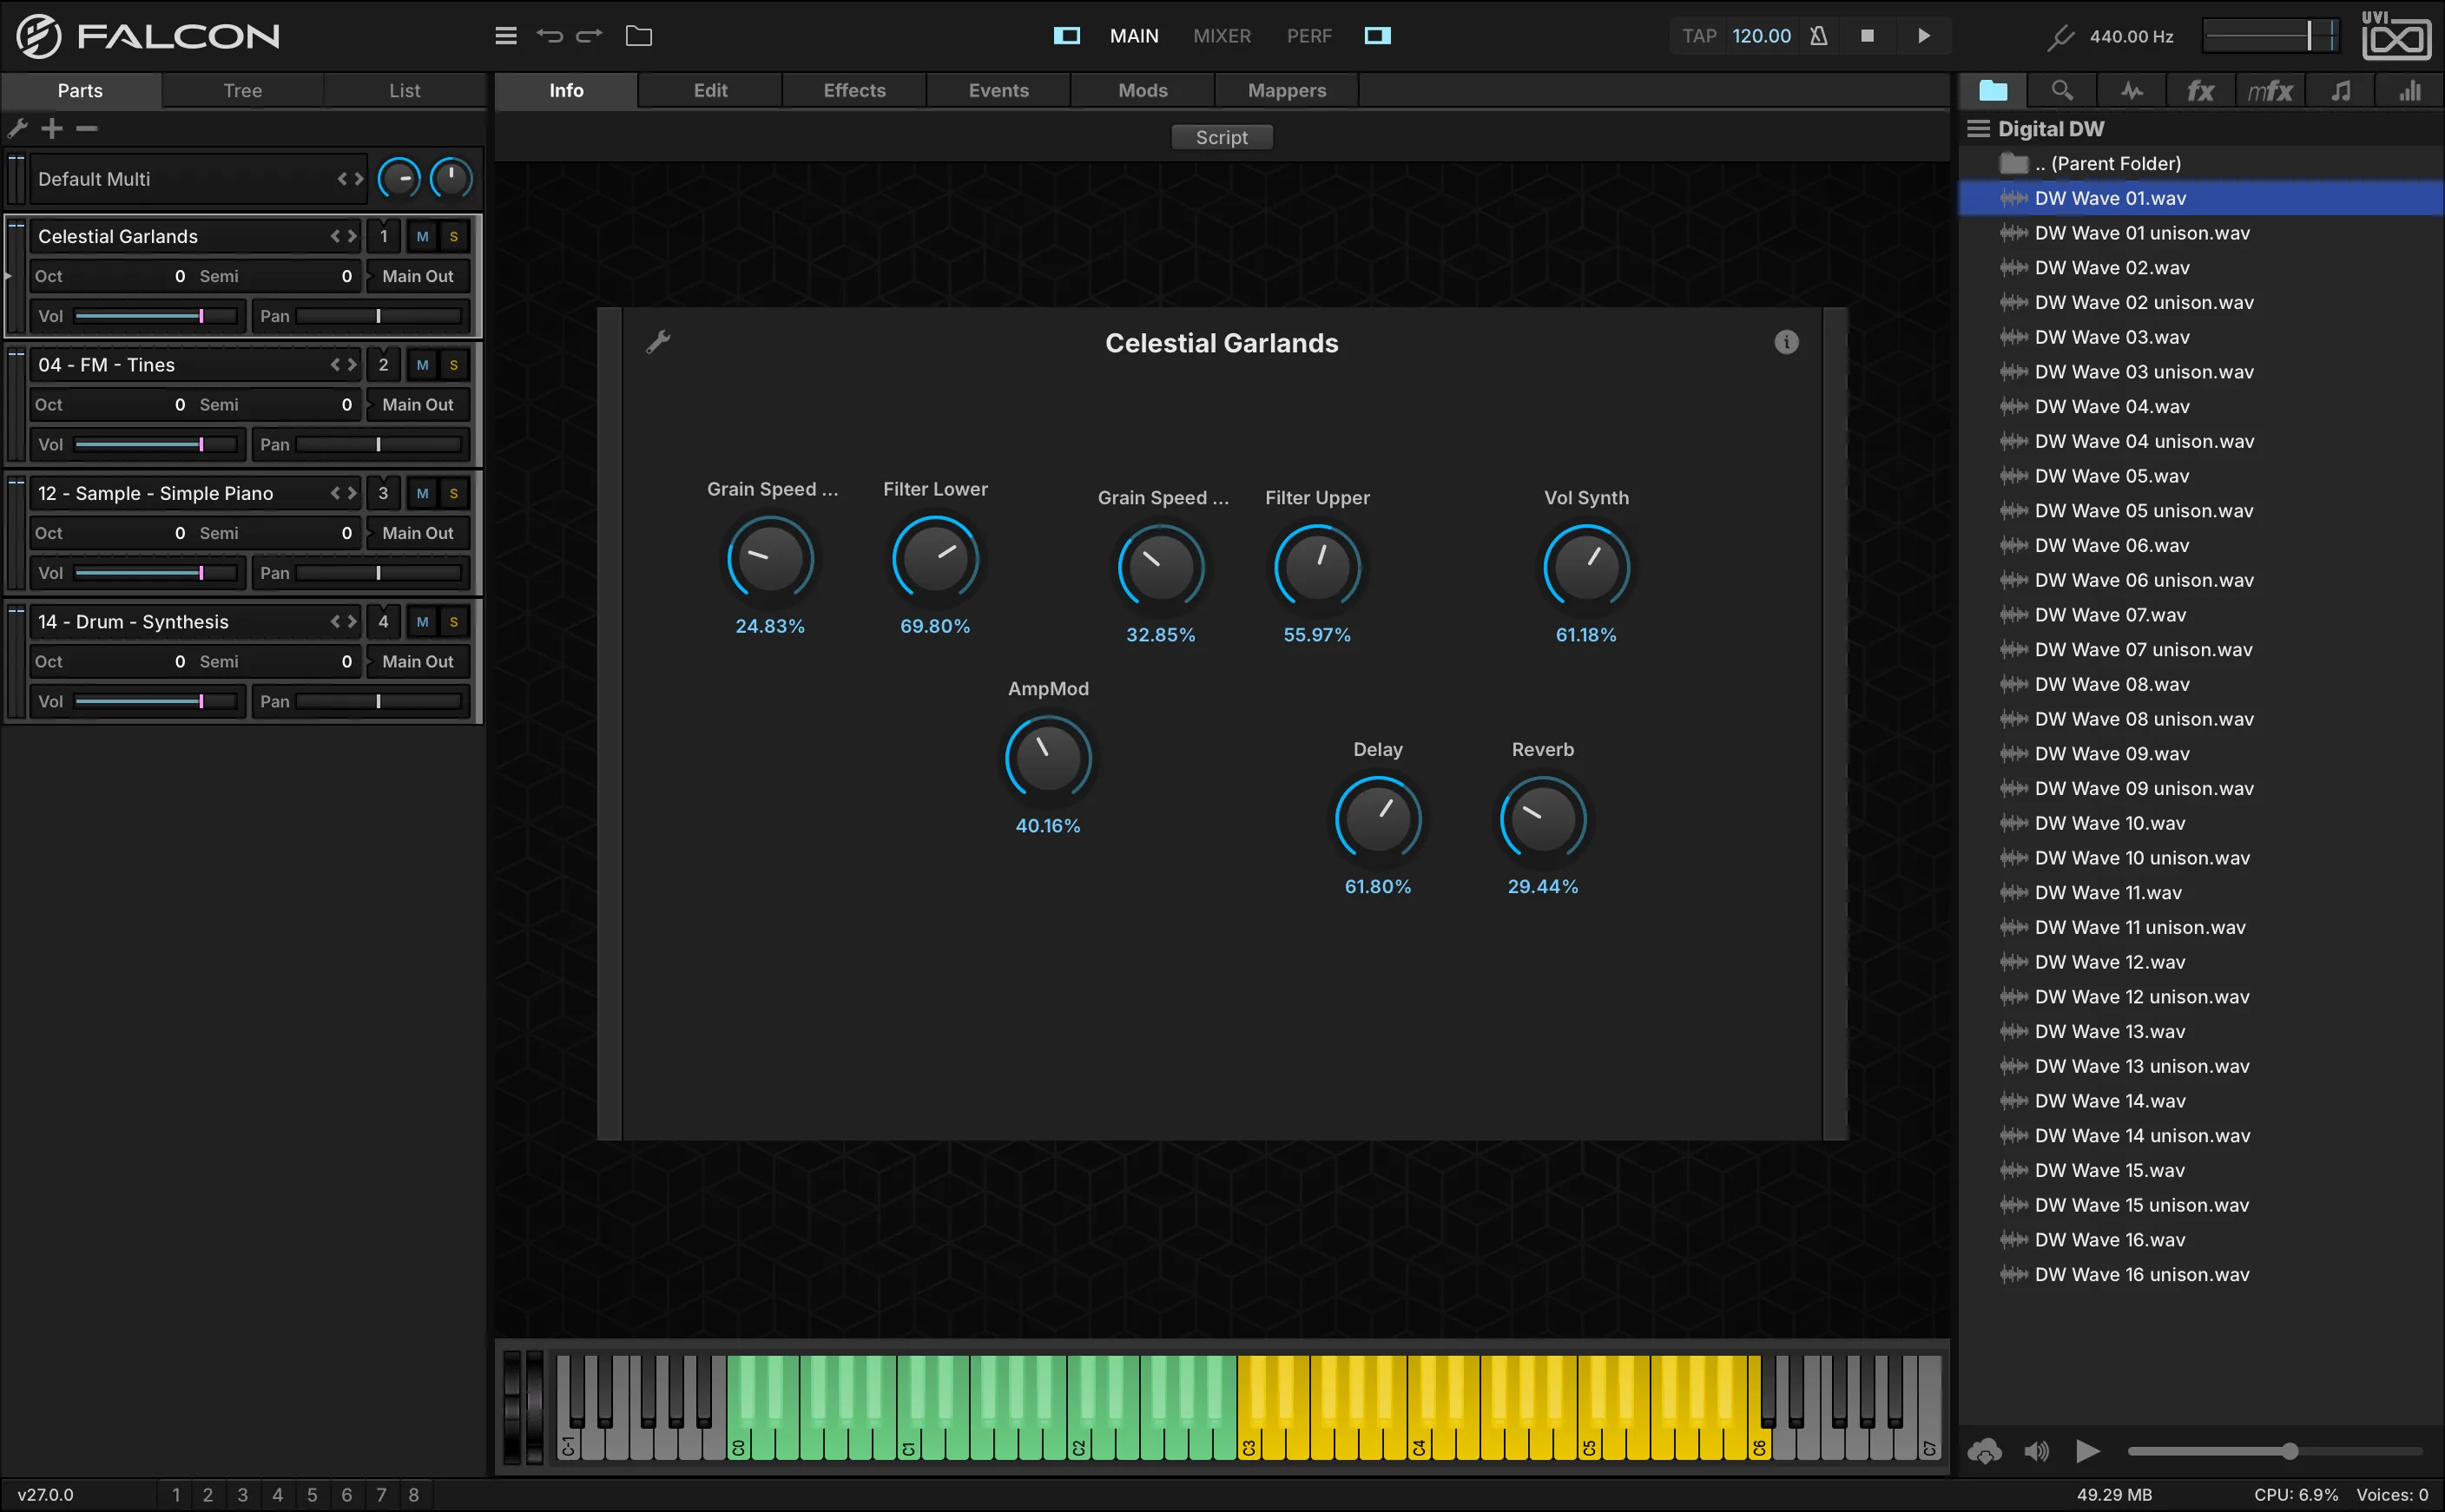
- 1 Script button
When the program’s script defines a custom interface, that interface is shown by default; the Script button switches between it and the standard view.
- 2 Edit Mode
Press EDIT to rearrange the macros: drag a control to move it, double-click a label to rename it, or right-click for more edit commands.
- 3 Program Information (i)
Shows the program’s description — modwheel assignments, what the macros do, playing tips. You can write and save descriptions for your own programs. UVI Soundware programs also show images; when there are several, the < and > arrows cycle through them.
- 4 Macros
The controls assigned to macros, for quick access to the program’s important settings. See Modulators › Macro.
At the bottom of the Info tab, the keyboard plays the program when clicked. The program’s key range is highlighted and the keys outside it are darkened; keys used by keyswitch layer rules are shown in blue. A Script Processor can also set its own key colors.
Edit
The Edit tab is organized into stacked sections — Program, Layer, Keygroup, Oscillator, Mapping Editor and Modulation Editor — that can be individually shown, hidden, collapsed, or expanded. The first four form the program hierarchy: a program contains layers, a layer contains keygroups, and a keygroup contains oscillators. See Structure for details.
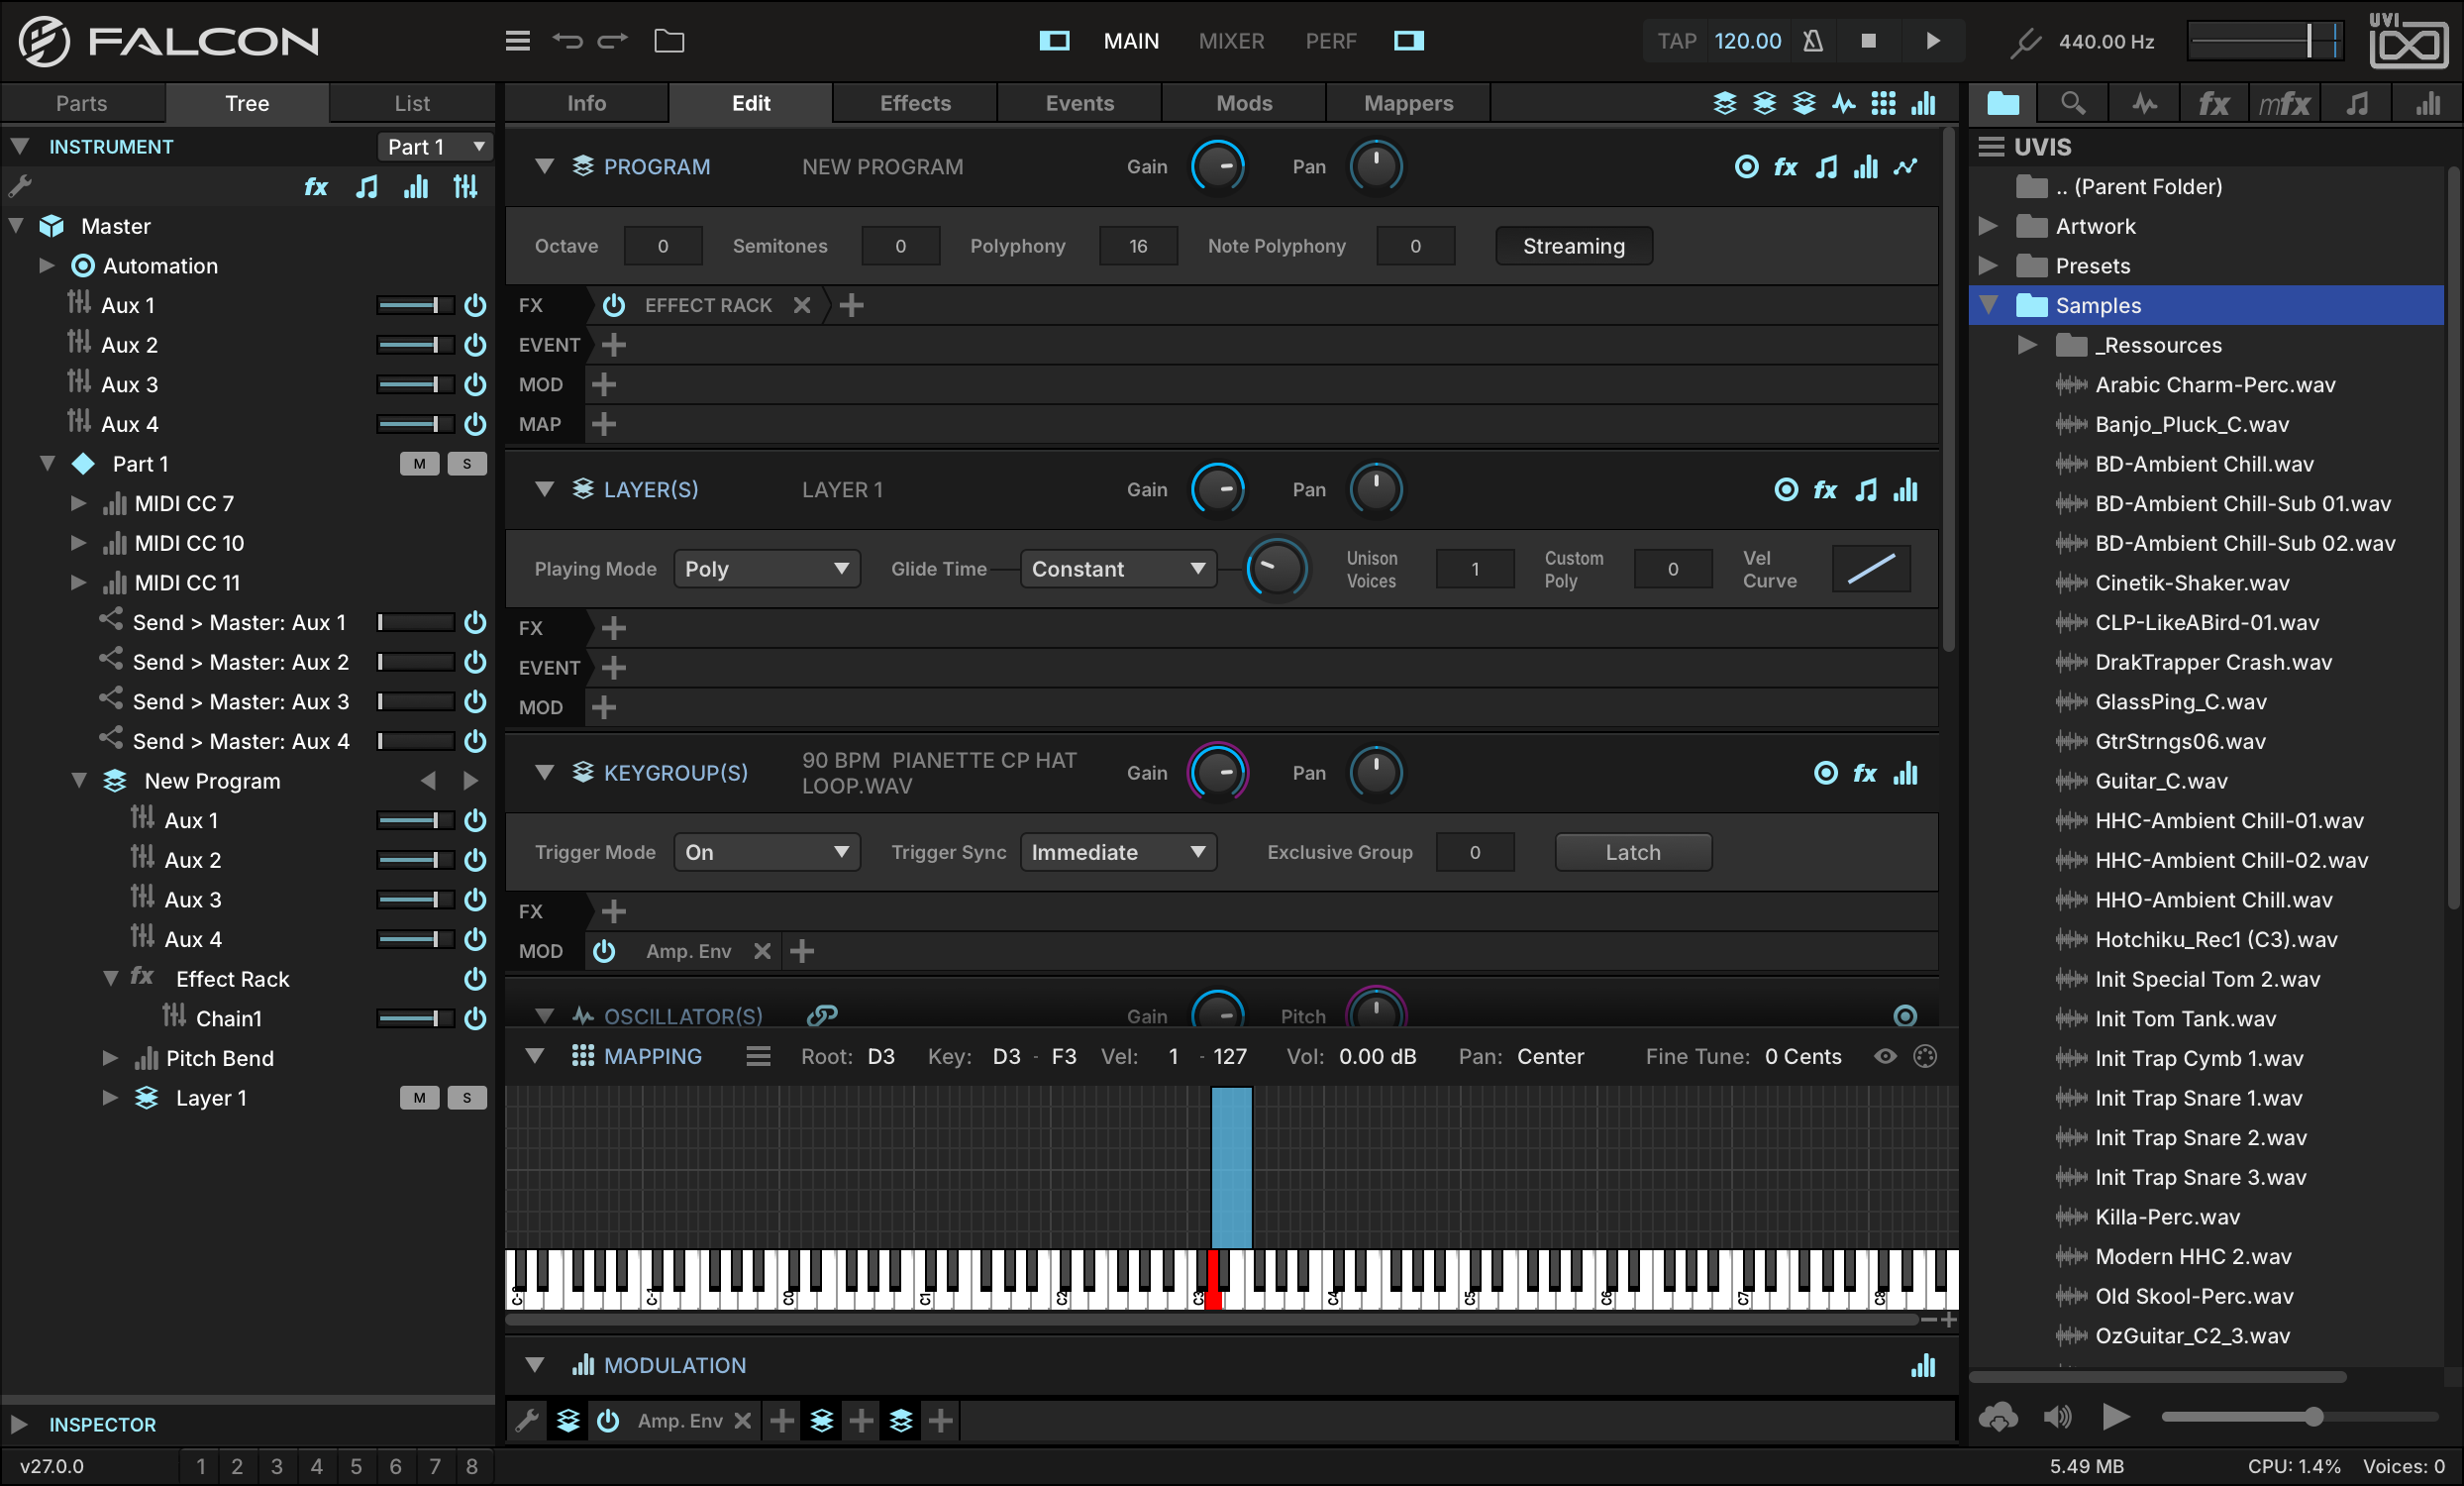
- 1 Section Headers
PROGRAM, LAYER, KEYGROUP, OSCILLATOR, MAPPING EDITOR and MODULATION EDITOR. Click the arrow on the left of a header (or double-click the header) to collapse or expand the section.
- 2 Show/Hide Sections
Each section can be shown or hidden using the corresponding buttons in the upper-right toolbar of the Edit tab.
- 3 Parameters View
Each of the four hierarchy sections contains a Parameters view that displays its controls. The parameter view can be shown or hidden by pressing the toggle in the section header.
- 4 Lanes
Additional lanes — Effects, Event processors, Modulation sources, Mapper editors — can be toggled per section using the corresponding buttons in the section header. Each lane is a condensed view of its full tab, showing only modules saved at that level of the program hierarchy.
- 5 Module Tabs
Each module appears as a tab. Click the tab name to show/hide its controls. The POWER button on the left of the tab enables/disables the module; the X button on the right deletes it. Press and hold on the module name to choose another module in its place.
- 6 Add Module (+)
Press the plus (+) button to add a new module to the lane from a menu of available modules. NOTE: For Effects and Event lanes, left-to-right order indicates signal flow. For Modulations and Mappers lanes the order is not significant. See Mods.
Program
The Program Editor configures program-wide playback parameters.

- 1 Gain & Pan
Sets the output level and stereo placement for the entire program. These are distinct from the Part gain and pan settings and are saved with the program.
- 2 Streaming
Toggles whether samples in the program are streamed from disk. When it is off, the program’s samples are loaded fully into memory. See Preferences › Streaming.
- 3 Octave & Semi
Transposes incoming MIDI to the program. OCTAVE shifts in octaves, SEMI in semitones.
- 4 Polyphony
Sets the default number of simultaneous voices available for each layer in the program. To override this on individual layers, see Custom Polyphony in the Layer section. Keeping polyphony as low as practical reduces processing load, especially with per-keygroup effects or modulators.
- 5 Note Polyphony
Sets the maximum number of simultaneous triggers of the same note. A setting of zero is a special value indicating UNLIMITED.
Layer
The Layer Editor configures playback behavior for the selected layer(s).

- 1 Gain & Pan
GAIN and PAN set the output level and stereo placement for the selected layer(s).
- 2 Play Mode
Determines what happens when additional notes are triggered while another note is held. POLY modes play multiple notes simultaneously; MONO modes play only the last triggered note.
- 3 Portamento
With POLY PORTAMENTO or MONO PORTAMENTO there is a glide from the previous note to the new one. GLIDE TIME sets the duration. The glide mode menu next to it chooses Constant (always the same time) or Proportional (longer for wider intervals). MONO PORTAMENTO SLIDE always starts from the pitch of the previous note, even if released first.
- 4 Unison Voices
Sets the number of voices triggered with each note received; the default is 1. When using multiple voices, the Unison modulation sources (External › Other) can modulate parameters per voice — for example Keygroup Pitch or Pan — for a richer sound.
- 5 Custom Polyphony
Sets the maximum polyphony for the layer. A setting of zero is a special value indicating no layer-specific limit (the program polyphony applies).
- 6 Velocity Curve
Maps incoming velocity values. Default is NORMAL (1:1). Right-click to choose Constant velocity (a fixed velocity, double-click to set it) or Velocity Curve, or one of the presets: MAX (always 127), HARD (you must play harder to reach high velocities), NORMAL and SOFT (soft playing already gives high velocities). Drag the curve up or down to shape it, or double-click to enter a value.
The curve displays incoming velocities on the X axis, and triggered velocities on Y. Drag the curve up or down to shape it, or double-click and enter a value:
- Values between -1 and 0 cover the range between the Hard and Normal presets.
- Values between 0 and +1 cover the range between the Normal and Soft presets.
- Values above +1, up to 127, set a constant velocity; exactly +1 is the Soft preset.
Keygroup
The Keygroup Editor configures triggering behavior for the selected keygroup(s).

- 1 Gain & Pan
GAIN and PAN set the output level and stereo placement for the selected keygroup(s).
- 2 Trigger Mode
Determines what event triggers the keygroup. ON: note-on (default). OFF: note-off. OFF + E: note-off, amplitude follows the current envelope level. OFF + V: note-off, amplitude follows the note-off velocity. OFF + VE: combines envelope and note-off velocity. The Off variants help match the amplitude of release samples to the preceding note.
- 3 Trigger Sync
Determines how the keygroup is played back once triggered. IMMEDIATE: triggered immediately. NEXT BEAT: triggered at the start of the next beat. NEXT BAR: triggered at the start of the next bar. The Next Beat/Bar options are useful with tempo-synced event processors such as the Arpeggiator, or with tempo-synced loops.
- 4 Exclusive Group
Marks keygroups as mutually exclusive — the classic use case is a hi-hat group where a closed hi-hat cuts off the open hi-hat. 32 exclusive groups are available per layer. A setting of zero indicates no exclusive group assignment.
- 5 Latch
When LATCH is enabled, notes are held (latched) indefinitely when triggered; to release the note, play the same note again.
Oscillator
A keygroup contains one or more oscillators. The Oscillator Editor sets the playback and pitch parameters common to all oscillator types.
Oscillators are chosen from a single panel that drops from whichever control opened it. Press the + button on the oscillator bar to add one, or press and hold — or right-click — an oscillator slot to replace what is already in it. The same panel opens from the Tree view, by right-clicking a keygroup and choosing Add Oscillator….
The panel lists every oscillator in columns under its category heading, SAMPLING and SYNTHESIS, each entry an icon and a name. The oscillator the slot already holds is highlighted. A card along the bottom describes whichever entry the pointer is on — its icon, its name, its category and a one-line description — and falls back to the current oscillator when the pointer leaves the list.

- 1 Edit All Oscillators
With EDIT ALL OSCILLATORS enabled, the parameters below are edited simultaneously for every oscillator in the keygroup. Disable to edit each oscillator individually by selecting its tab.
- 2 Trigger Mode
When the keygroup contains multiple oscillators, TRIGGER MODE chooses which is triggered. ALL: every oscillator on every note. CYCLE: round-robin in fixed order — with oscillators A, B and C the order is always A-B-C, A-B-C. RANDOM CYCLE: each oscillator triggers once per cycle in random order, with no direct repeats across cycles — B-A-C, A-C-B, then C-B-A. RANDOM: a single random oscillator each note — A-C-C-B-A-B-B-C-A.
- 3 Gain
Sets the output level for the selected oscillator(s) within the keygroup.
- 4 Coarse / Fine Tune & Pitch
COARSE TUNE and FINE TUNE set the oscillator’s pitch in semitones and cents — static, not modulatable. The PITCH control can be modulated and covers ±4 octaves. Typical use: Fine Tune to correct a sample, Coarse Tune to shift up/down the keyboard, Pitch to modulate with an LFO or envelope.
- 5 Note Tracking
Determines how incoming notes are transposed. 100% transposes 1:1 relative to the root key. 200% doubles the transposition (G4 root, G#4 played → sounds like A4). Negative values invert (-200%, G#4 → sounds like F4). 0% gives a constant pitch regardless of note.
Sample Editor
For sample-based oscillator types, the Sample Editor displays a waveform editor and additional controls specific to audio files and loops. (For synthesis oscillators, see Oscillators.).

- 1 Waveform Display
The waveform of the loaded sample, zoomed to fit by default. If the oscillator has no sample, drop one here from the FILES tab of the right sidebar or from the Finder (Mac) / File Explorer (Windows). Hold Alt/Option while scrolling to zoom horizontally, Shift to zoom vertically. Drag the display’s bottom edge to make it taller; its width follows the center pane, so drag the sidebar border to widen it.
- 2 Time Ruler
The duration of the sample. Right-click the ruler to switch its format between Samples, Beats and Seconds.
- 3 Sample Info
Overlays details about the loaded sample on the waveform: file location, bit depth, sample rate, number of channels, duration and file size, plus the loop details if the sample is looped.
- 4 Parameters
Shows or hides the parameters specific to the oscillator type. See Oscillators.
- 5 Start / End Markers
Drag the S and E markers, at the left and right edges of the waveform, to set where playback begins and ends within the file.
Editing
To edit the sample, click and drag to select a time range, then right-click for the editing commands: CUT, COPY, PASTE, UNDO, REDO, SELECT ALL, DESELECT ALL, CROP, DELETE, NORMALIZE, SILENCE, REVERSE, FADE IN, FADE OUT, PLAY SELECTION, SNAP SELECTION TO NEAREST ZERO-CROSSING, SET START MARKER USING CURRENT POSITION and SET END MARKER USING CURRENT POSITION. The same menu also holds a Zoom submenu and REVEAL IN FINDER (Mac) / REVEAL IN EXPLORER (Windows).
CHANGE PLAYING DIRECTION TO REVERSE plays the sample backwards; CHANGE PLAYING DIRECTION TO FORWARD restores it. SET AS ONE SHOT plays the entire sample on every trigger, whatever the keygroup’s amplitude envelope — a natural fit for drums and percussion; DISABLE ONE SHOT returns to standard playback.
To apply one of Falcon’s effects to the sample permanently, select some audio, choose APPLY FX, choose the effect, set its parameters and press OK. The effect is rendered into the sample, not applied in real time. Save the sample to keep the result, or choose Undo to discard it.
When several keygroups are selected, a Batch menu appears, which applies an action — normalizing, applying an effect — to every selected keygroup at once.
Looping
To add a loop, select part of the sample, choose CREATE LOOP and pick a loop type:
- FORWARD: the looped section plays forward; when playback reaches the loop end, it resumes from the loop start.
- ALTERNATE: the looped section plays alternately forward (loop start → loop end) and in reverse (loop end → loop start).
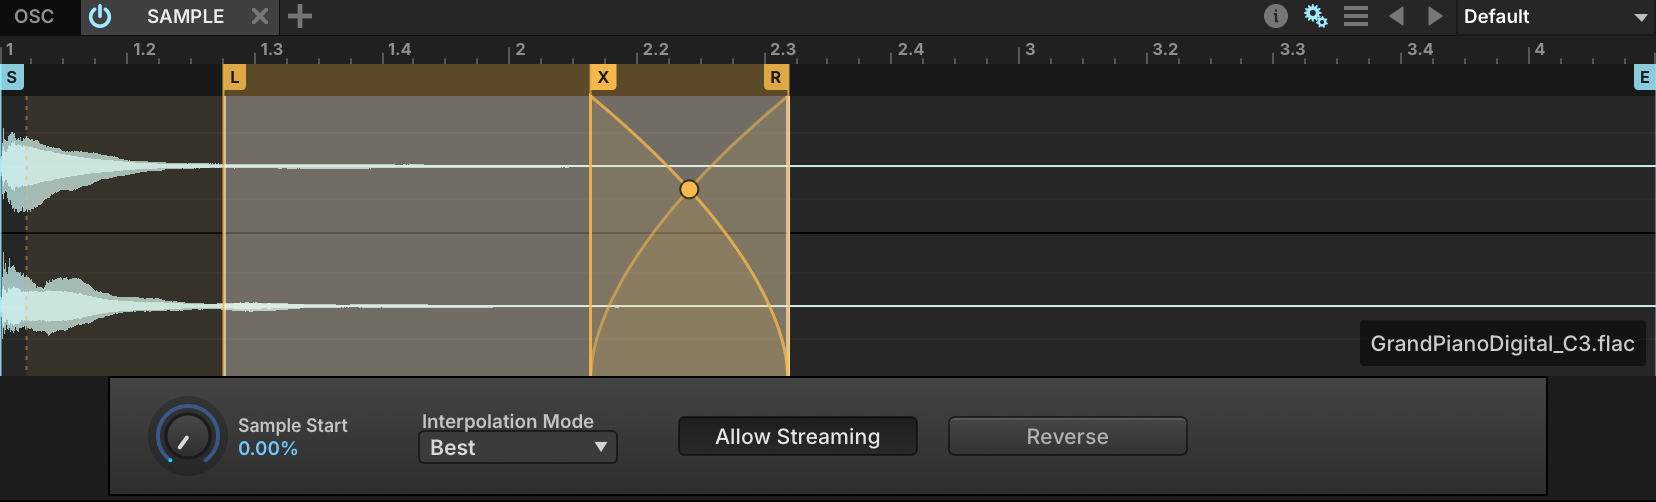
- 6 Loop Markers (L / R)
Drag the L and R markers to set where the loop begins and ends.
- 7 Loop Crossfade (X)
Crossfading the looped section makes a loop sound less looped and smooths out clicks at the loop point. ENABLE XFADE turns the crossfade on, DISABLE XFADE off; while it is on, drag the X marker to set the length of the crossfade, and drag the point on the crossfade curve to shape it. PRINT CROSSFADE writes the crossfade into the sample.
- 8 Looped Release
What happens when a note is released. ENABLE LOOPED RELEASE: the loop keeps playing until the release phase is over. DISABLE LOOPED RELEASE: playback continues past the loop end until the release phase ends or the end marker is reached. DELETE LOOP removes the loop.
Saving Samples
On sampling oscillators, the module’s Preset File menu (see Module Preset Menu) adds commands for the sample itself:
- SAVE SAMPLE: saves the sample file in place.
- SAVE SAMPLE AS…: saves the sample to a new file.
- SAVE SAMPLE WITH PLAYBACK OPTIONS: saves the sample file in place, and writes the sample and loop start/end markers into it.
- SAVE SAMPLE AS WITH PLAYBACK OPTIONS…: saves the sample to a new file, with the sample and loop start/end markers written into it.
To reveal the sample file on disk, right-click the sample and choose REVEAL IN FINDER (Mac) / REVEAL IN EXPLORER (Windows).
Mapping
The Mapping Editor displays the arrangement of the program’s layers and keygroups. A program can contain anything from a single keygroup in a single layer covering the entire key and velocity range, to many layers each holding dozens of keygroups assigned to very small ranges.
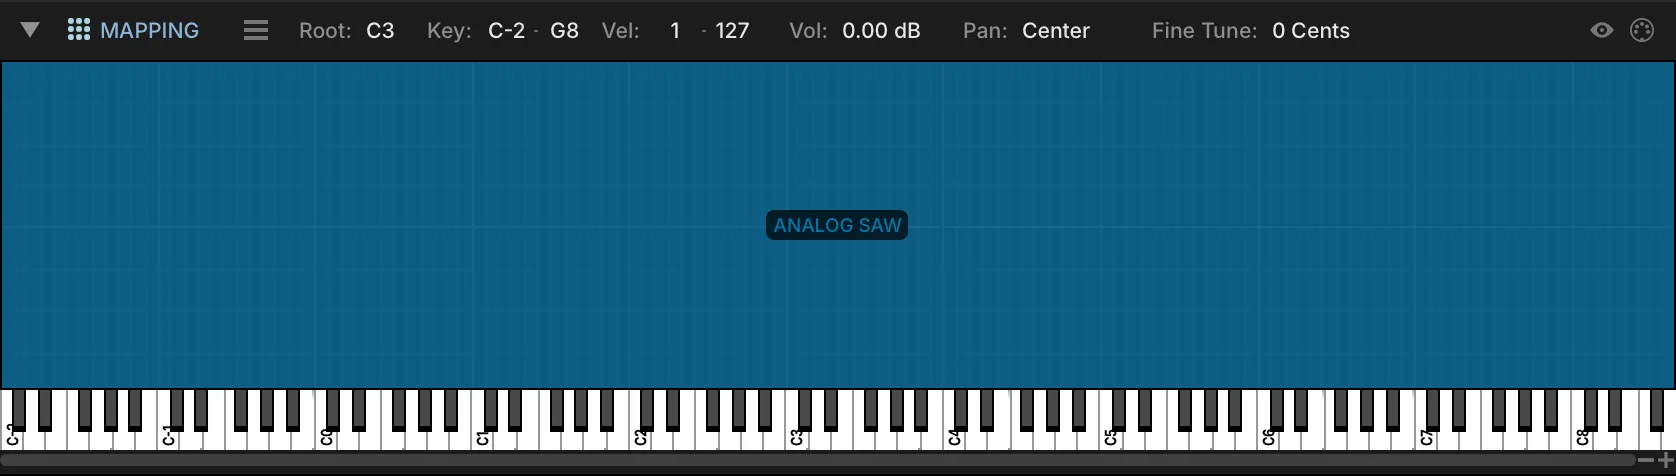
- 1 Mapping area
The key range runs horizontally and the velocity range vertically. Each keygroup is a block covering its key and velocity range; when the program has several layers, they are stacked on top of each other.
- 2 Selection details
Root key, key range, velocity range and other details of the selected keygroups. Edit them in the usual manner — double-click to type a value, or scroll. With several keygroups selected, an edit applies to all of them.
- 3 Mapping menu
Opens the Mapping Editor’s menu of edit commands, also available by right-clicking anywhere in the mapping area. See Adding, Moving and Deleting Keygroups.
Pressing a key on the piano keyboard triggers the note, and plays any keygroup assigned to that key. The vertical position sets the velocity: press closer to the bottom of the key for higher velocities, closer to the top for lower ones.
To adjust a keygroup’s key or velocity range, select it, then click and drag any of its edges. Hold Cmd/Ctrl before you start dragging to fade the range instead; a dashed line inside the keygroup marks where the fade begins.
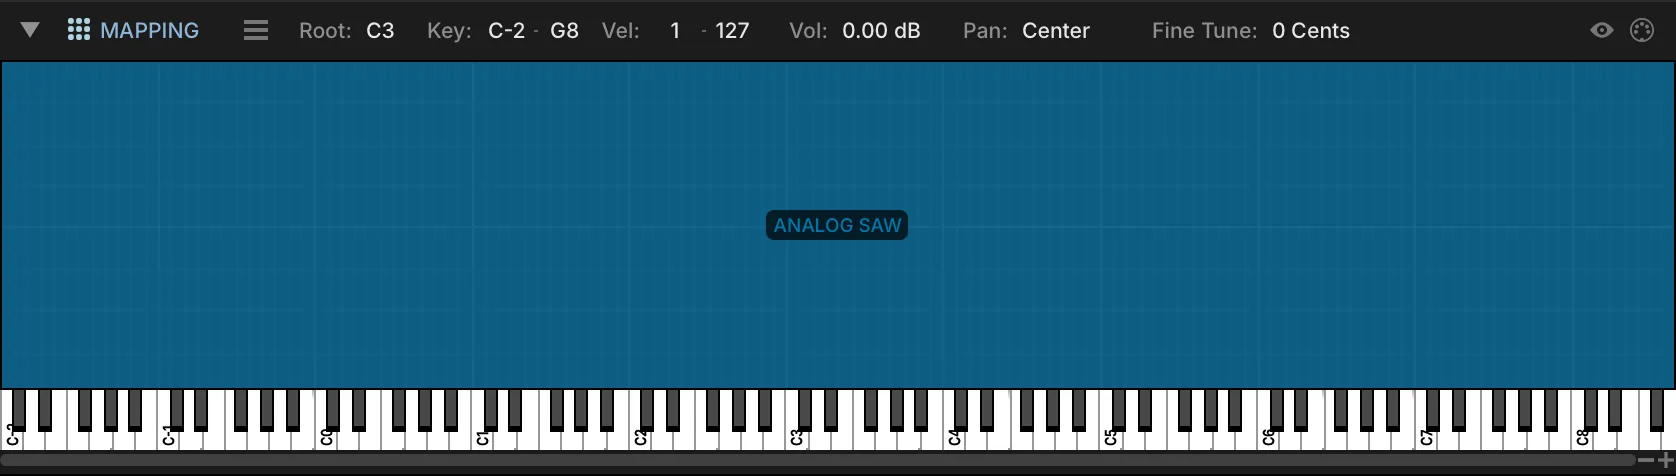
- 4 Navigation toggles
HIGHLIGHT PLAYED KEYGROUPS flashes keygroups as they are triggered; MIDI SELECT selects them as they are triggered.
- 5 Importing samples
Drag one or more samples from the FILES tab of the right sidebar or from your desktop to create keygroups. Where you drop sets the new keygroup’s key range: the closer to the top of the velocity range, the wider the key range. Hold Alt/Option while dragging to open the custom import dialog instead.
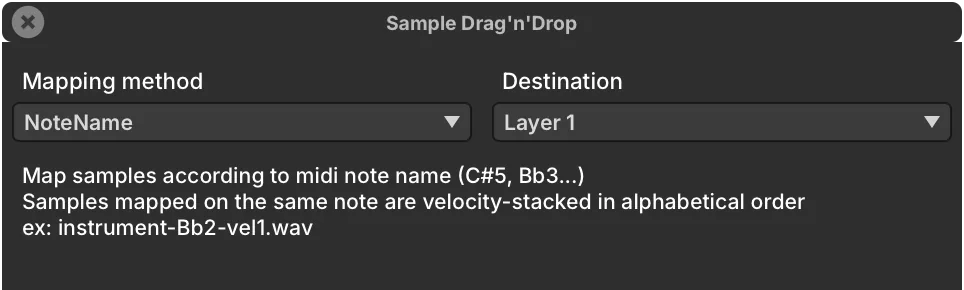
MAPPING METHOD chooses how each file is assigned — NOTE NAME, BLACK KEYS and others, many of them read from the file name or other metadata — and describes the selected one. DESTINATION LAYER picks the layer that receives the samples, or a new one.
- 6 Zoom and resize
Zoom horizontally with the + and − buttons in the lower right, or resize the editor vertically by dragging the Mapping Editor toolbar up or down.
Adding, Moving and Deleting Keygroups
The Mapping Editor’s menu holds all of its edit commands. To open it, right-click anywhere in the mapping area, or press the menu button towards the left end of the Mapping Editor toolbar. Point at a command to see what it does.
Keygroup Templates
A keygroup template is a snapshot of a keygroup in its entirety, including all of its oscillators, effects and modulators — a starting point for new patches, or a shortcut when building complex parts.
To create one, select the keygroup in the Mapping Editor and choose Save Keygroup Template from the Mapping Editor’s menu. Name the template and click Save. To overwrite an existing template, save it again under the same name.
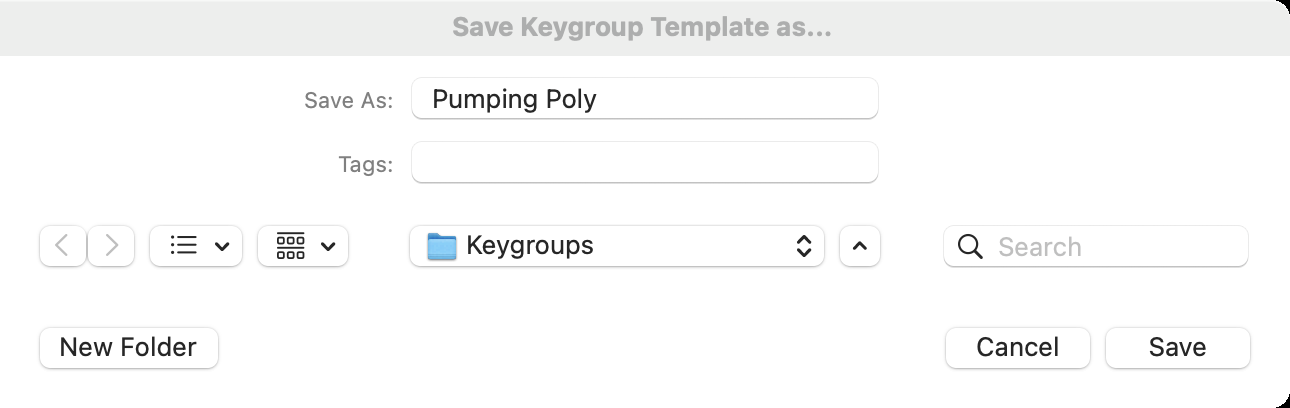
The new template is offered in the Create Keygroup and Create Keygroup in New Layer submenus, and can be added to any program from there.
- A template always holds exactly one keygroup: several keygroups cannot be saved into one template, nor saved as templates in one operation.
- If Save Keygroup Template is grayed out, select the keygroup in the Tree instead.
- To rename, organize or share your templates, open the folder where they are saved:
~/Documents/UVI/Falcon/User Presets/Keygroups.
Layer Rules
Layer Rules dynamically change which of a program’s layers a note triggers — to switch between legato and staccato articulations, for example, or to cycle through several variations of the same note for a more realistic performance.
To open the Layer Rules Editor, choose Edit Layer Rules (Cmd/Ctrl+E) from the Mapping Editor’s menu. The rules are listed on the left, and the program’s layers under Targets on the right.

- 1 Root Rule
The rule every sub-rule belongs to. Right-click it to add a sub-rule, or to delete the rule.
- 2 Rule Type
What the root rule uses to choose between its sub-rules — here, Key Switch. The menu is available once the rule has sub-rules; each type is described below.
- 3 Sub-rules
One per layer or group of layers, each with the condition that selects it — here the key switch notes C0 and D0. Select a sub-rule to set its condition and its targets.
- 4 Learn
Key Switch rules only: listens for the next note you play and uses it as the sub-rule’s key switch.
- 5 Condition
Sets the sub-rule’s condition — for a Key Switch rule, the note. Its value is shown in the sub-rule’s name.
- 6 Targets
The program’s layers. Tick the ones the selected sub-rule triggers: here the C0 sub-rule plays the Sustain layer, and D0 plays Staccato.
- Click No rule, right-click to add a new rule and choose Add root rule.
- Right-click the root rule and choose Add sub-rule, once for each layer or group of layers the rule chooses between.
- Choose the root rule’s type (see below), such as Key Switch. The type menu is available once the rule has sub-rules.
- Select each sub-rule, set the condition that triggers it, and choose its layers under Targets.
For example, a Key Switch rule with two sub-rules, the first set to C0 and the second to D0, plays the first sub-rule’s layers after C0 is pressed and the second’s after D0.
Sub-rules can have sub-rules of their own, which branch the triggering logic further. To remove a rule, right-click it and choose Delete rule.
| Rule type | Each sub-rule is triggered by |
|---|---|
| Key Switch | A key switch note. Learn sets it from the next note you play. |
| MIDI CC | A range of values of the controller chosen for the root rule. |
| Pitch Bend | A range of pitch bend values. |
| Speed | A range of time since the previous note-on, in hundredths of a second (0–100, so up to 1 s; longer gaps count as 100). |
| Note Duration | A range of note durations. |
| Cycle | Its turn: the sub-rules play one after the other (round robin). |
| Random | Chance: one sub-rule is picked at random for each note. |
| Random Cycle | Chance, without repeats: every sub-rule plays once, in random order, before any plays again. |
| Legato | A legato level: the interval, in semitones, from the held note to the new one. Level 0 plays notes that are not played legato. |
Effects
The Effects tab displays every audio effects path, from the effects on the master output down to those on a single keygroup. Within one node, effects process from top to bottom. Between levels, audio flows up, from the keygroup to the master. See Structure. For each effect, see Effects.

- 1 Navigation breadcrumbs
Choose which effects path you are viewing. Press a node’s name to show its effects, or the arrow to its right to go to one of its child nodes — for example, one of the program’s layers. Selecting a node in the Tree does the same.
- 2 Aux Sends
With the aux FX nodes shown in the Tree, each node that has aux sends shows them: send level, mute, and pre/post-fader for each aux bus.
- 3 Preset Browser
Drag an effect from the FX tab of the right sidebar into the chain to add it.
- 4 Tempo Sync
Effects with time-based parameters, such as delays or tremolo, show a TEMPO SYNC button next to the Preset File menu, which locks them to Falcon’s tempo; their time settings then read in note and bar values.
- Add an effect with the + button in the upper right, or by dragging it from the FX tab of the right sidebar.
- Reorder effects by pressing and holding an effect’s header and dragging it to a new position.
- Replace an effect by clicking its name and choosing another from the menu.
- Enable or disable an effect with the POWER button left of its name, and delete it with the X button at the far right.
- The Modulation and Keyboard sections can be shown or hidden with the buttons in the top right.
Aux FX
There are two aux effects sections, each with at least four independent aux buses:
- Master aux FX, fed by sends on each part of the multi; saved with the multi.
- Program aux FX, fed by sends on each layer and keygroup of the program; saved with the program.
To view and add aux effects, choose the aux bus from the navigation menu of the Program or Master node. The master aux FX and their sends also appear in the Mixer.
To add an aux bus, right-click the Program or Master node in the Tree and choose Add Aux. The new bus comes after the existing ones, and each layer and keygroup of the program (each part of the multi, for a master aux) gets a send to it. To remove an aux bus, right-click it in the Tree and choose Remove Node, or select it and press Delete; its sends are removed with it. Each section keeps at least four aux buses, and a send cannot be removed on its own. Aux buses are named by position (Aux 1, Aux 2, …), so removing one renumbers the buses after it. Both edits can be undone. In the List, the Keygroups section has a program aux send column for each program aux bus.
A program saves only the aux buses that hold effects, with their sends; when it is loaded, they return to their positions, and empty buses are added back up to four. A multi saves all of its master aux buses.
Multi FX
A Multi FX preset saves and recalls all the effects of the current node as one group, so a complex chain can be recalled instantly. Multi FX presets are saved and loaded from the Multi FX preset menu, and its POWER button enables or disables all of the node’s effects together. Clear Multi FX in the Multi FX preset menu removes all of the node’s effects.
Events
The Events tab displays every MIDI event processing path, from the master event processors down to those on a single layer. Event processors are not added to keygroups, since they generally address events that span several keygroups. Signal flows from top to bottom. For each event processor, see Event Processors.

- 1 Navigation breadcrumbs
Choose which event path you are viewing. Press a node’s name to show its event processors, or the arrow to its right to go to one of its child nodes — for example, one of the program’s layers.
- 2 Tree navigation
Selecting a node in the Tree also shows its event processors.
- 3 Preset Browser
Drag an event processor from the EVENT tab of the right sidebar into the chain to add it.
- 4 Modulation / Keyboard Sections
Show or hide the Modulation and Keyboard sections.
- 5 Add Event Processor (+)
Adds an event processor, chosen from the menu.
- Reorder event processors by pressing and holding a header and dragging it to a new position.
- Replace an event processor by clicking its name and choosing another from the menu.
- Enable or disable an event processor with its POWER button, and delete it with the X button in its toolbar.
Modulation
The Modulation Editor displays modulation assignments and sources, and is the central place for editing modulation generators.

- 1 Selected parameter
When you select a parameter, its node and name appear here. For example, selecting the layer gain knob displays “Layer > Volume”.
- 2 Modulation Assignments
The top half of the editor lists every modulation assignment of the selected parameter.
- 3 Modulation Source Editor
The bottom half displays the controls of the selected modulation source.
- 4 Show/hide source editor
Shows or hides the Modulation Source Editor.
Modulation flows from the top of the hierarchy (Master) down through the Part, Program, Layer and Keygroup levels to the oscillators. A modulation generator created at the Master level can therefore target any parameter of the Falcon instance, while one created at the Keygroup level only reaches parameters within its own keygroup. See Structure.
Understanding Modulation Sources
A modulation source generates a control signal that modifies other controls; on its own, it does not affect Falcon’s output. It only has an effect once it is assigned to a control, and where it sits in Falcon’s hierarchy determines which controls it can be assigned to.

- 5 Assignment tabs
A parameter can have any number of modulation assignments. Enable or disable each one with the POWER button on the left of its tab, or remove it with the X button on the right.
- 6 Source name
The node, name and type of the modulation source — for example, “Keygroup > Amp. Env DAHDSR” for a keygroup DAHDSR envelope named Amp. Env. Press and hold the name to choose a different source.
- 7 Ratio
How much the source affects the parameter: +1 to −1 (+100 % to −100 %) for most parameters, +48 to −48 semitones for pitch.
- 8 Invert
Flips the modulation range. For custom shapes, use the Modulation Mapper Editor (below).
- 9 Sub-Modulation
Every assignment has a SUB-MODULATION source that modulates the primary source’s ratio. It is enabled, removed, replaced and scaled the same way as the primary source. For example, an LFO on an oscillator’s pitch with the mod wheel as sub-source gives a vibrato whose depth follows the mod wheel.
Assigning Modulation, MIDI and Automation
Right-click any parameter to assign it a modulation source, a MIDI controller, a macro or a host automation slot. Point at a command to see what it does.
Assigns a MIDI CC to the parameter: choose one from the window that opens, or move the control on your MIDI controller. Choose Clear in that window to remove the assignment.
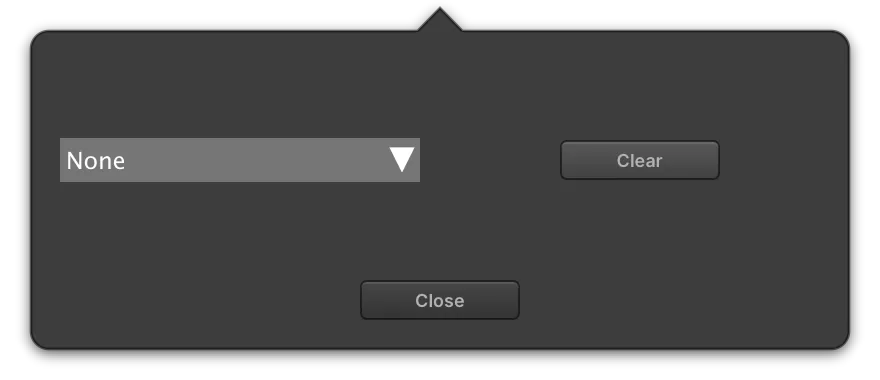
A few parameters can be automated but not modulated. Right-clicking one of them opens the MIDI/AUTOMATION CONTROL dialog instead, where a MIDI or host automation source can be assigned.
Modulation Mapper Editor
The Modulation Mapper Editor sits between the source and the parameter it modulates, and remaps the control signal to the mapper’s shape.
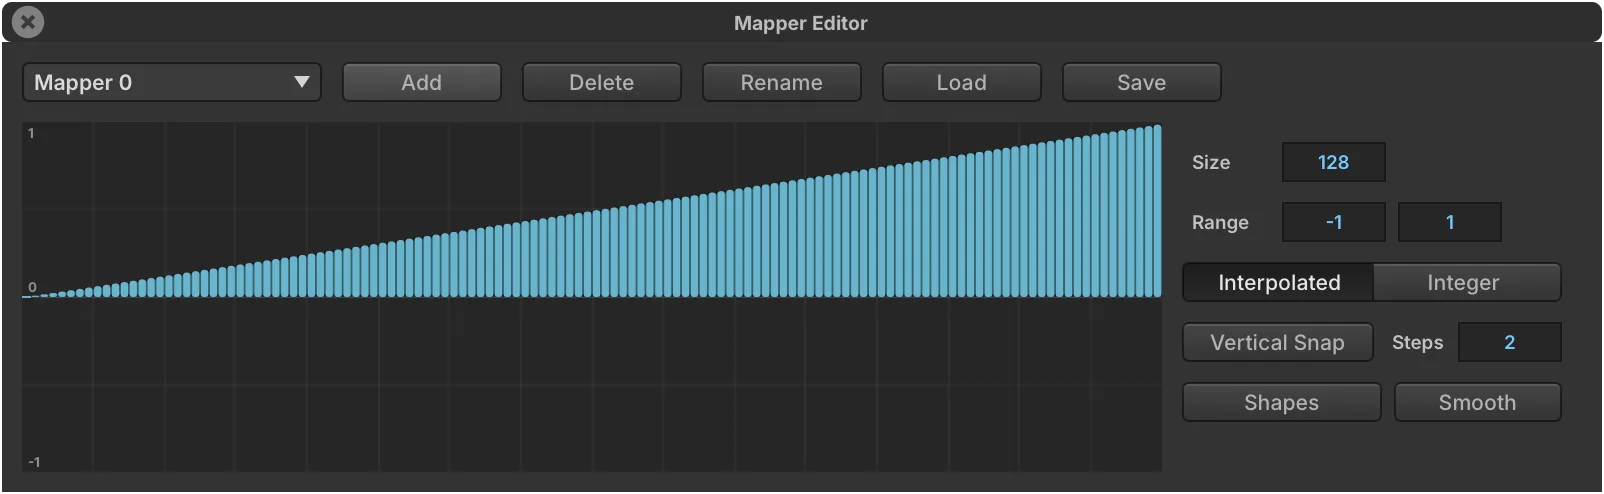
- 10 Mapper editor
Without a mapper, the source is mapped to the parameter 1:1, shown as a linear ramp from the lowest value to the highest.
- 11 Mapper selector
Choose an existing mapper from the menu, or press ADD to create one. Mappers can also be loaded from and saved to disk, renamed and deleted.
- 12 Size and Range
SIZE sets the horizontal axis of the graph, RANGE the vertical axis.
- 13 Drawing the shape
Click and drag in the graph to draw the shape. Hold Alt/Option to draw a straight line, or right-click for preset shapes and functions.
- 14 Interpolated
When enabled, the mapper moves smoothly from one value to the next; when disabled, it jumps, which gives a stair-stepped result.
- 15 Integer
Constrains the mapper’s output to integer values.
Modulation Source Editor
The Modulation Source Editor displays the controls of the selected modulation source or sub-source; each source type is described in Modulators. Its toolbar adds a few controls for moving between sources.

- 16 Modulation Quick View
Opens a menu to browse, select and create modulators, in three sections — Keygroup, Layer and Program, top to bottom — each with its own Add New submenu.
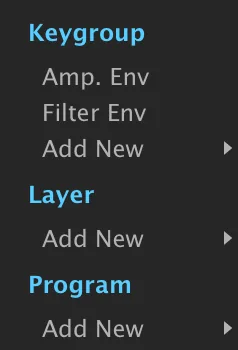
- 17 Modulation ribbon
Every modulator of the selected keygroup, layer and program, left to right, marked with the hierarchy icons. Browse, select, toggle, create and delete modulators here; hover over the ribbon and use the scroll wheel to move along it. A source added with + is not assigned to anything yet: assign it from a parameter’s right-click menu.
- 18 Tempo Sync
Shown for modulators that support TEMPO SYNC: the metronome icon locks the modulator to Falcon’s tempo, and its time settings then read in note and bar values.
Mods
The Mods tab displays every modulation source, from the master modulation sources down to those of a single keygroup. For each modulation source, see Modulators.

- 1 Navigation breadcrumbs
Choose which modulation sources you are viewing. Press a node’s name to show its sources, or the arrow to its right to go to one of its child nodes.
- 2 Tree navigation
Selecting a node in the Tree also shows its modulation sources.
- 3 Preset Browser
Drag a modulation source from the MOD tab of the right sidebar to add it.
- 4 Tempo Sync
Sources that can follow the tempo, such as an LFO’s rate, show a TEMPO SYNC button next to the Preset File menu.
- 5 Power / Rename
The POWER button left of the name enables or disables the source; the X at the far right deletes it. Double-click the name to rename it — descriptive names such as “Amp. Env.” and “Filter Env.” help tell sources of the same type apart.
- 6 Modulation / Keyboard Sections
Show or hide the Modulation and Keyboard sections.
- Add a modulation source with the + button in the upper right, or by dragging it from the MOD tab of the right sidebar.
- Replace a source by clicking its name and choosing another from the menu.
- Assign a source by right-clicking a control and choosing it under Add Modulation; existing sources are listed first, and a new one can be created on the spot. See Assigning Modulation, MIDI and Automation.
Mappers
The Mappers tab displays all modulation mappers of the program. How a mapper reshapes a modulation is described under Modulation Mapper Editor.

- 1 Navigation breadcrumbs
Press a node’s name to show its mappers. Unlike the other tabs, the Mappers tab has no arrow to go to a child node.
- 2 Tree navigation
Selecting a node in the Tree also shows its mappers.
- 3 Adding mappers
Press the + button in the upper right to add a mapper, or drag one from the sidebar browsers. Each mapper is enabled or disabled with its POWER button, and deleted with its X button.
Which Browser?
Falcon loads programs, multis, samples and presets from several places. This manual calls them:
| Name | What it is |
|---|---|
| Library Browser | The LIBRARY tab of the browser window. Opens with the Browser Toggle in the toolbar, or by double-clicking a program name or an empty part. |
| File Browser | The FILES tab of the same window: your disks, favorite places and Soundware. |
| Sidebar browsers | The tabs of the right sidebar: FILES, SEARCH, OSC, FX, MULTIFX, EVENT and MOD. Shift-double-click a program name to show it in the FILES tab. See Sidebar Browsers. |
| Module preset menu | The preset controls in the upper right of each module. See Module Preset Menu. |
Library Browser
The Library Browser searches, previews and loads presets and sounds from your UVI Soundware and Falcon expansions, and from your own files.
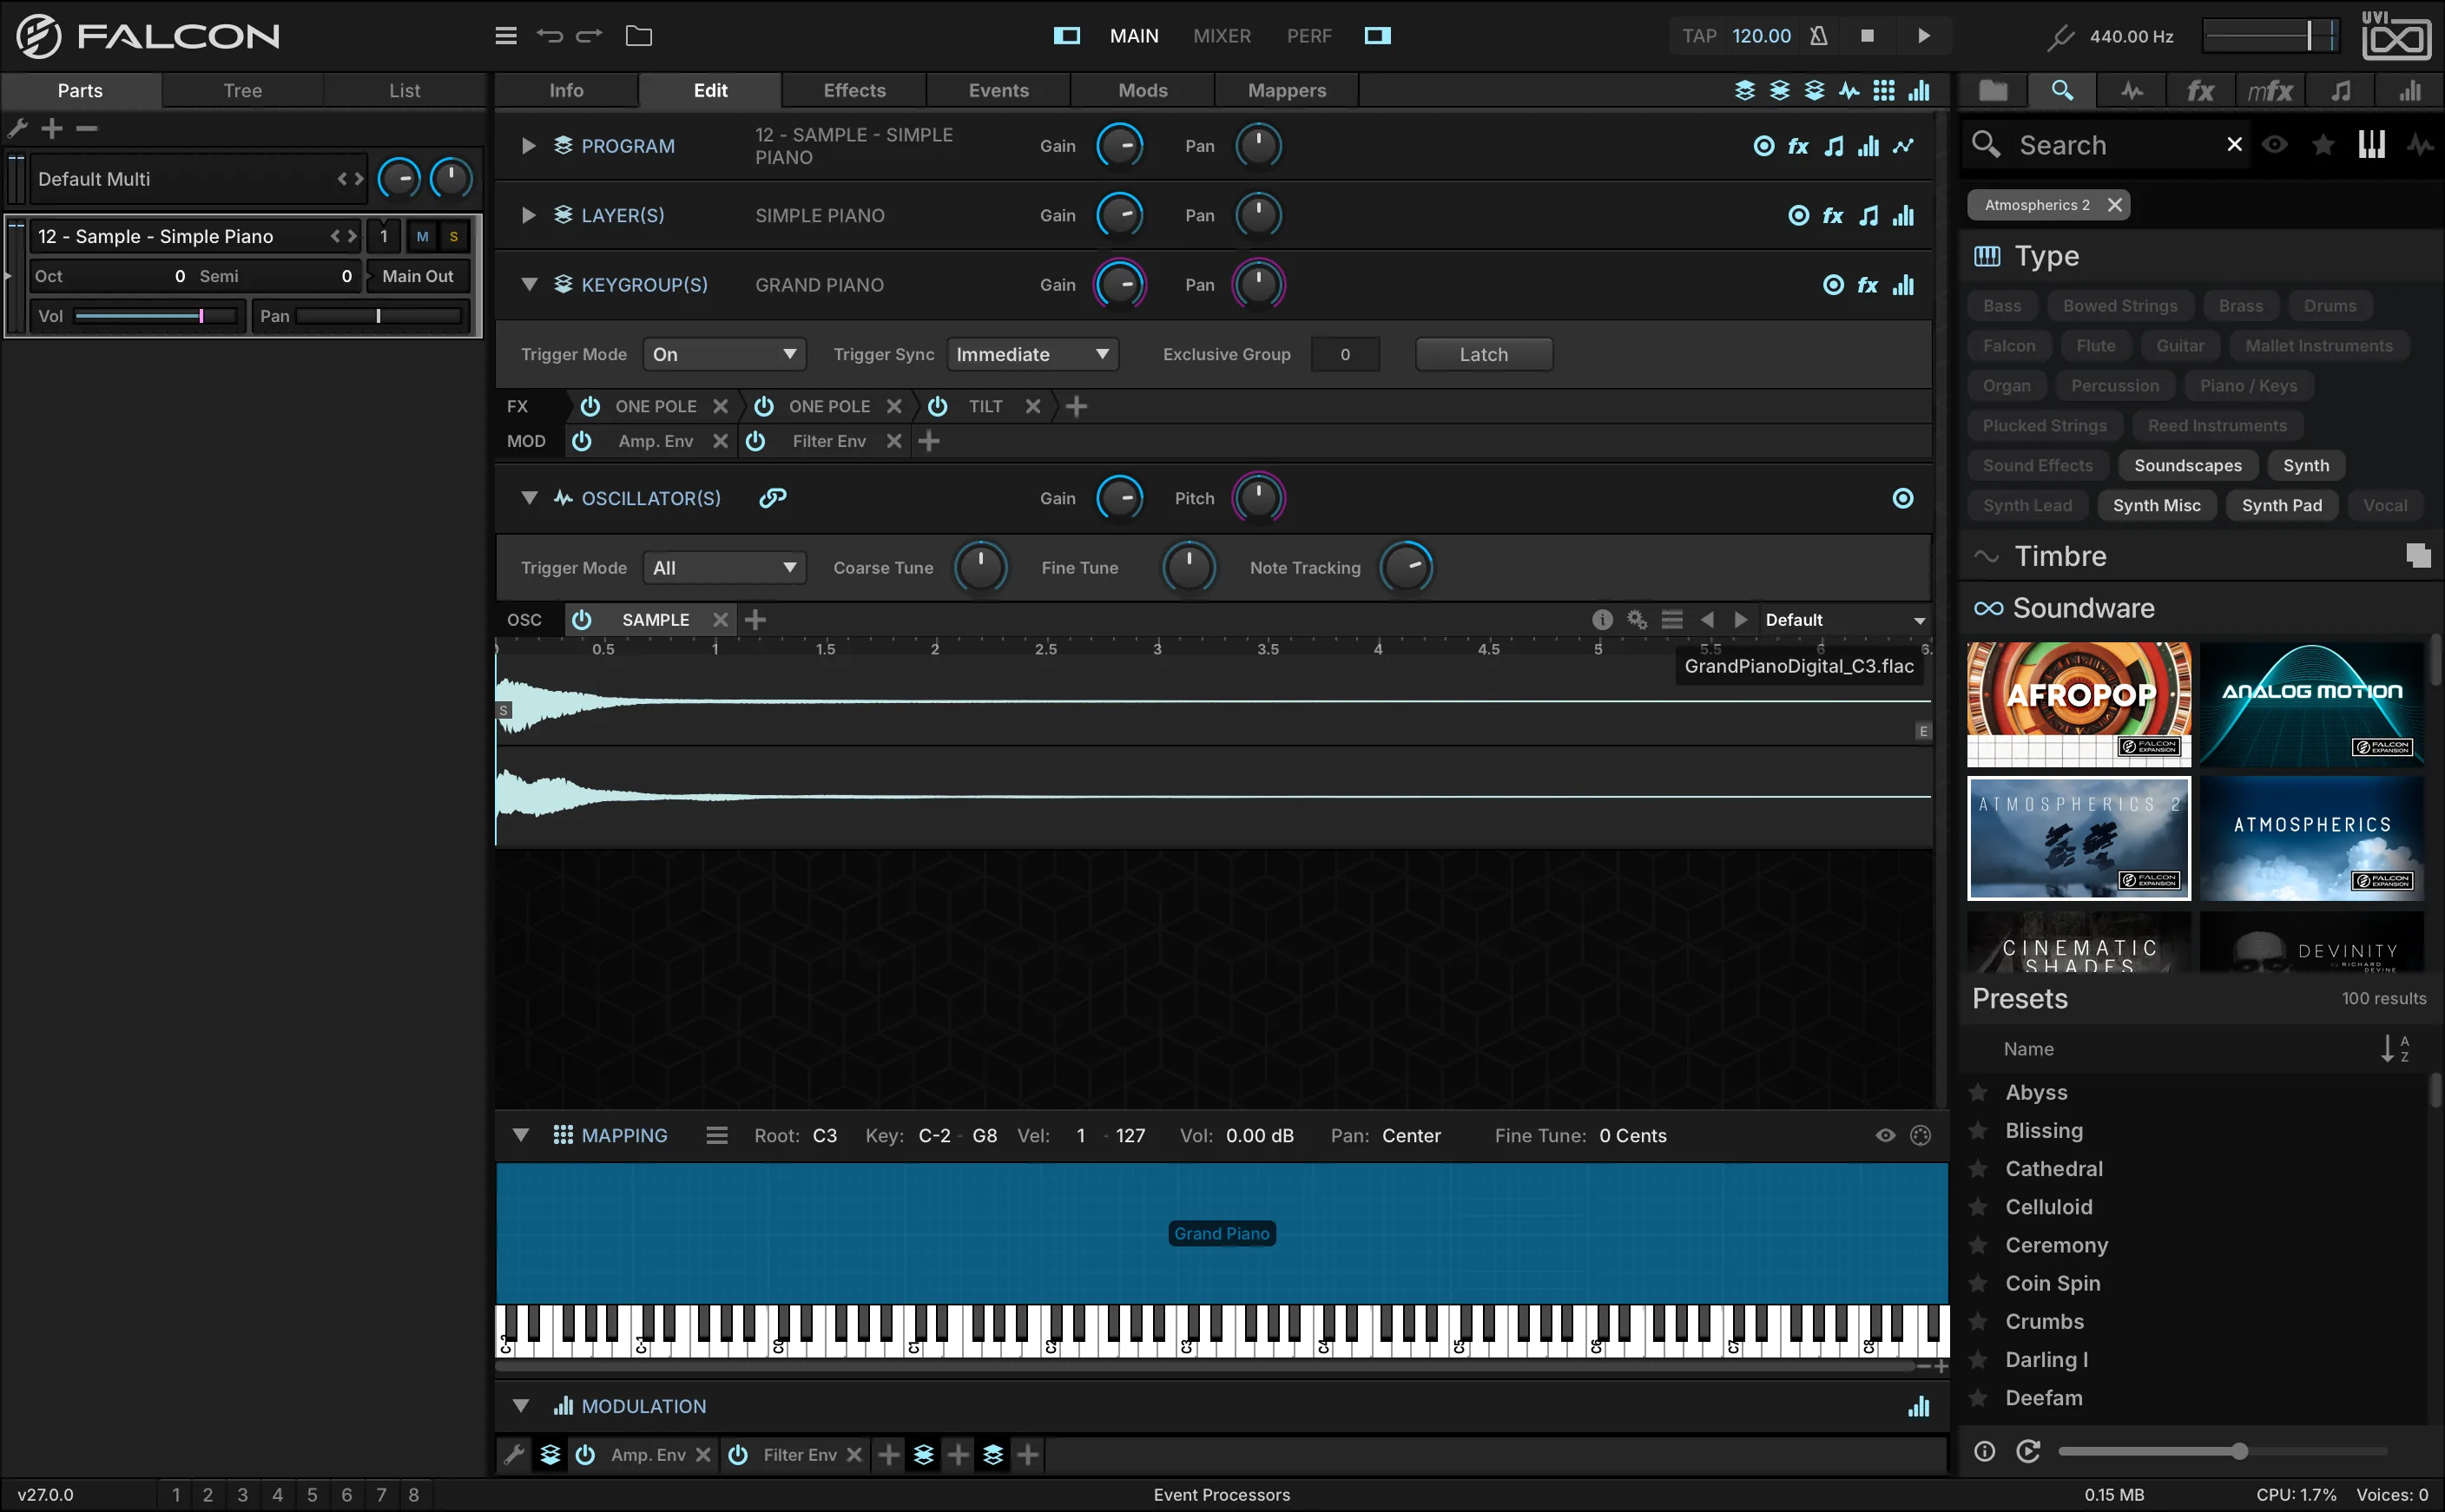
To open it, press the Browser Toggle in the toolbar, double-click a program name or an empty part in the Parts List, Mixer or Performance view, or choose Load Program from the Main Menu. The LIBRARY tab searches your Soundware and expansions; FILES switches to the File Browser.

- 1 Library
Searches your UVI Soundware and Falcon expansions.
- 2 Files
Switches to the File Browser, for your own files and folders.
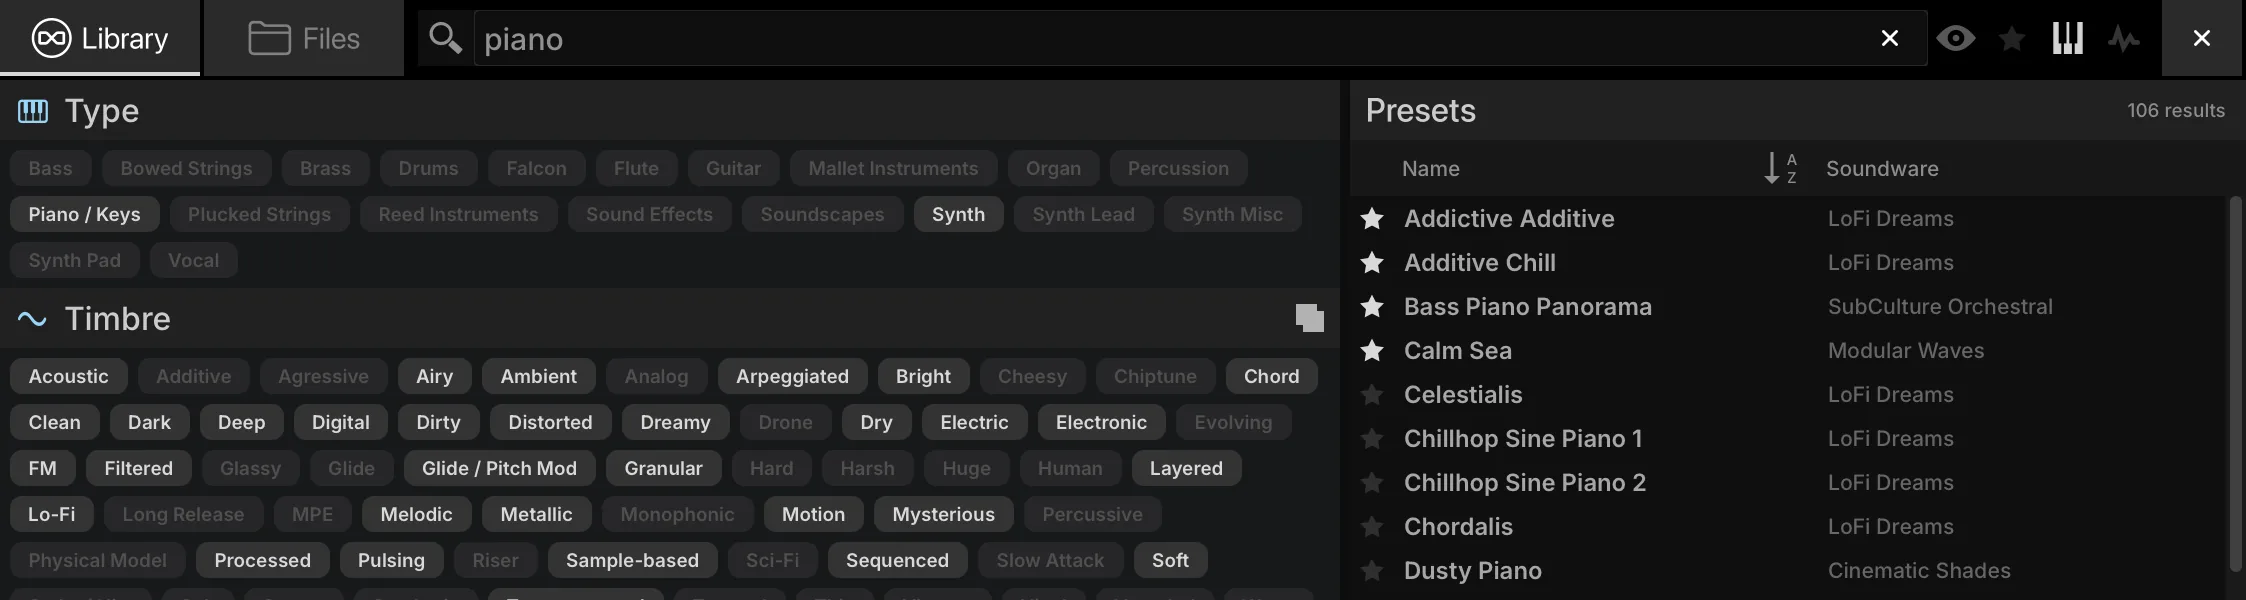
- 3 Search
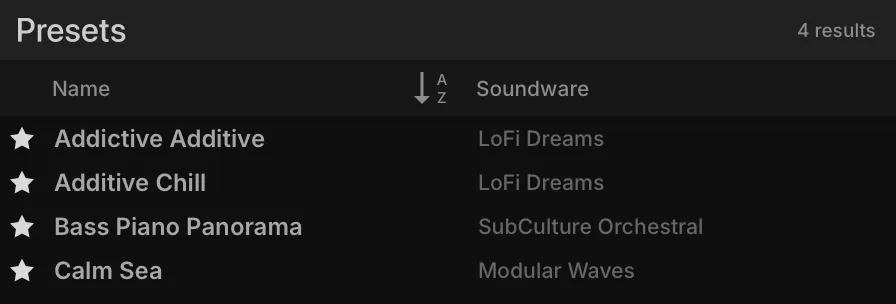
Type a search term; the matching results appear under PRESETS. The buttons at the far right switch between searching presets (keyboard icon) and sounds (waveform icon), and the star shows only your favorites.
- 4 Presets
The results. Double-click a preset to load it. Click the NAME column to reverse the sort order; right-click the column headers to add or remove columns.
The tags in three tiers — TYPE, TIMBRE and SOUNDWARE — narrow the results; click a tier’s title to expand or collapse it. The INFO panel shows details about the selected result, with the AUTOPREVIEW switch, the preview volume, and AC (auto-close), which closes the browser once a preset is loaded.
File Browser
The File Browser browses, searches, auditions and loads files: programs, loops and samples, and multis when it is opened to load a multi. The FILES tab of the right sidebar works the same way in a single column, for quick drag-and-drop of any file type (see Sidebar FILES Tab).
Browsing Files
The File Browser is the FILES tab of the browser window: open the Library Browser and click FILES. Its sidebar lists DEVICES — every disk and volume, network volumes included — PLACES, your favorite folders, and SOUNDWARE, every mounted Soundware.
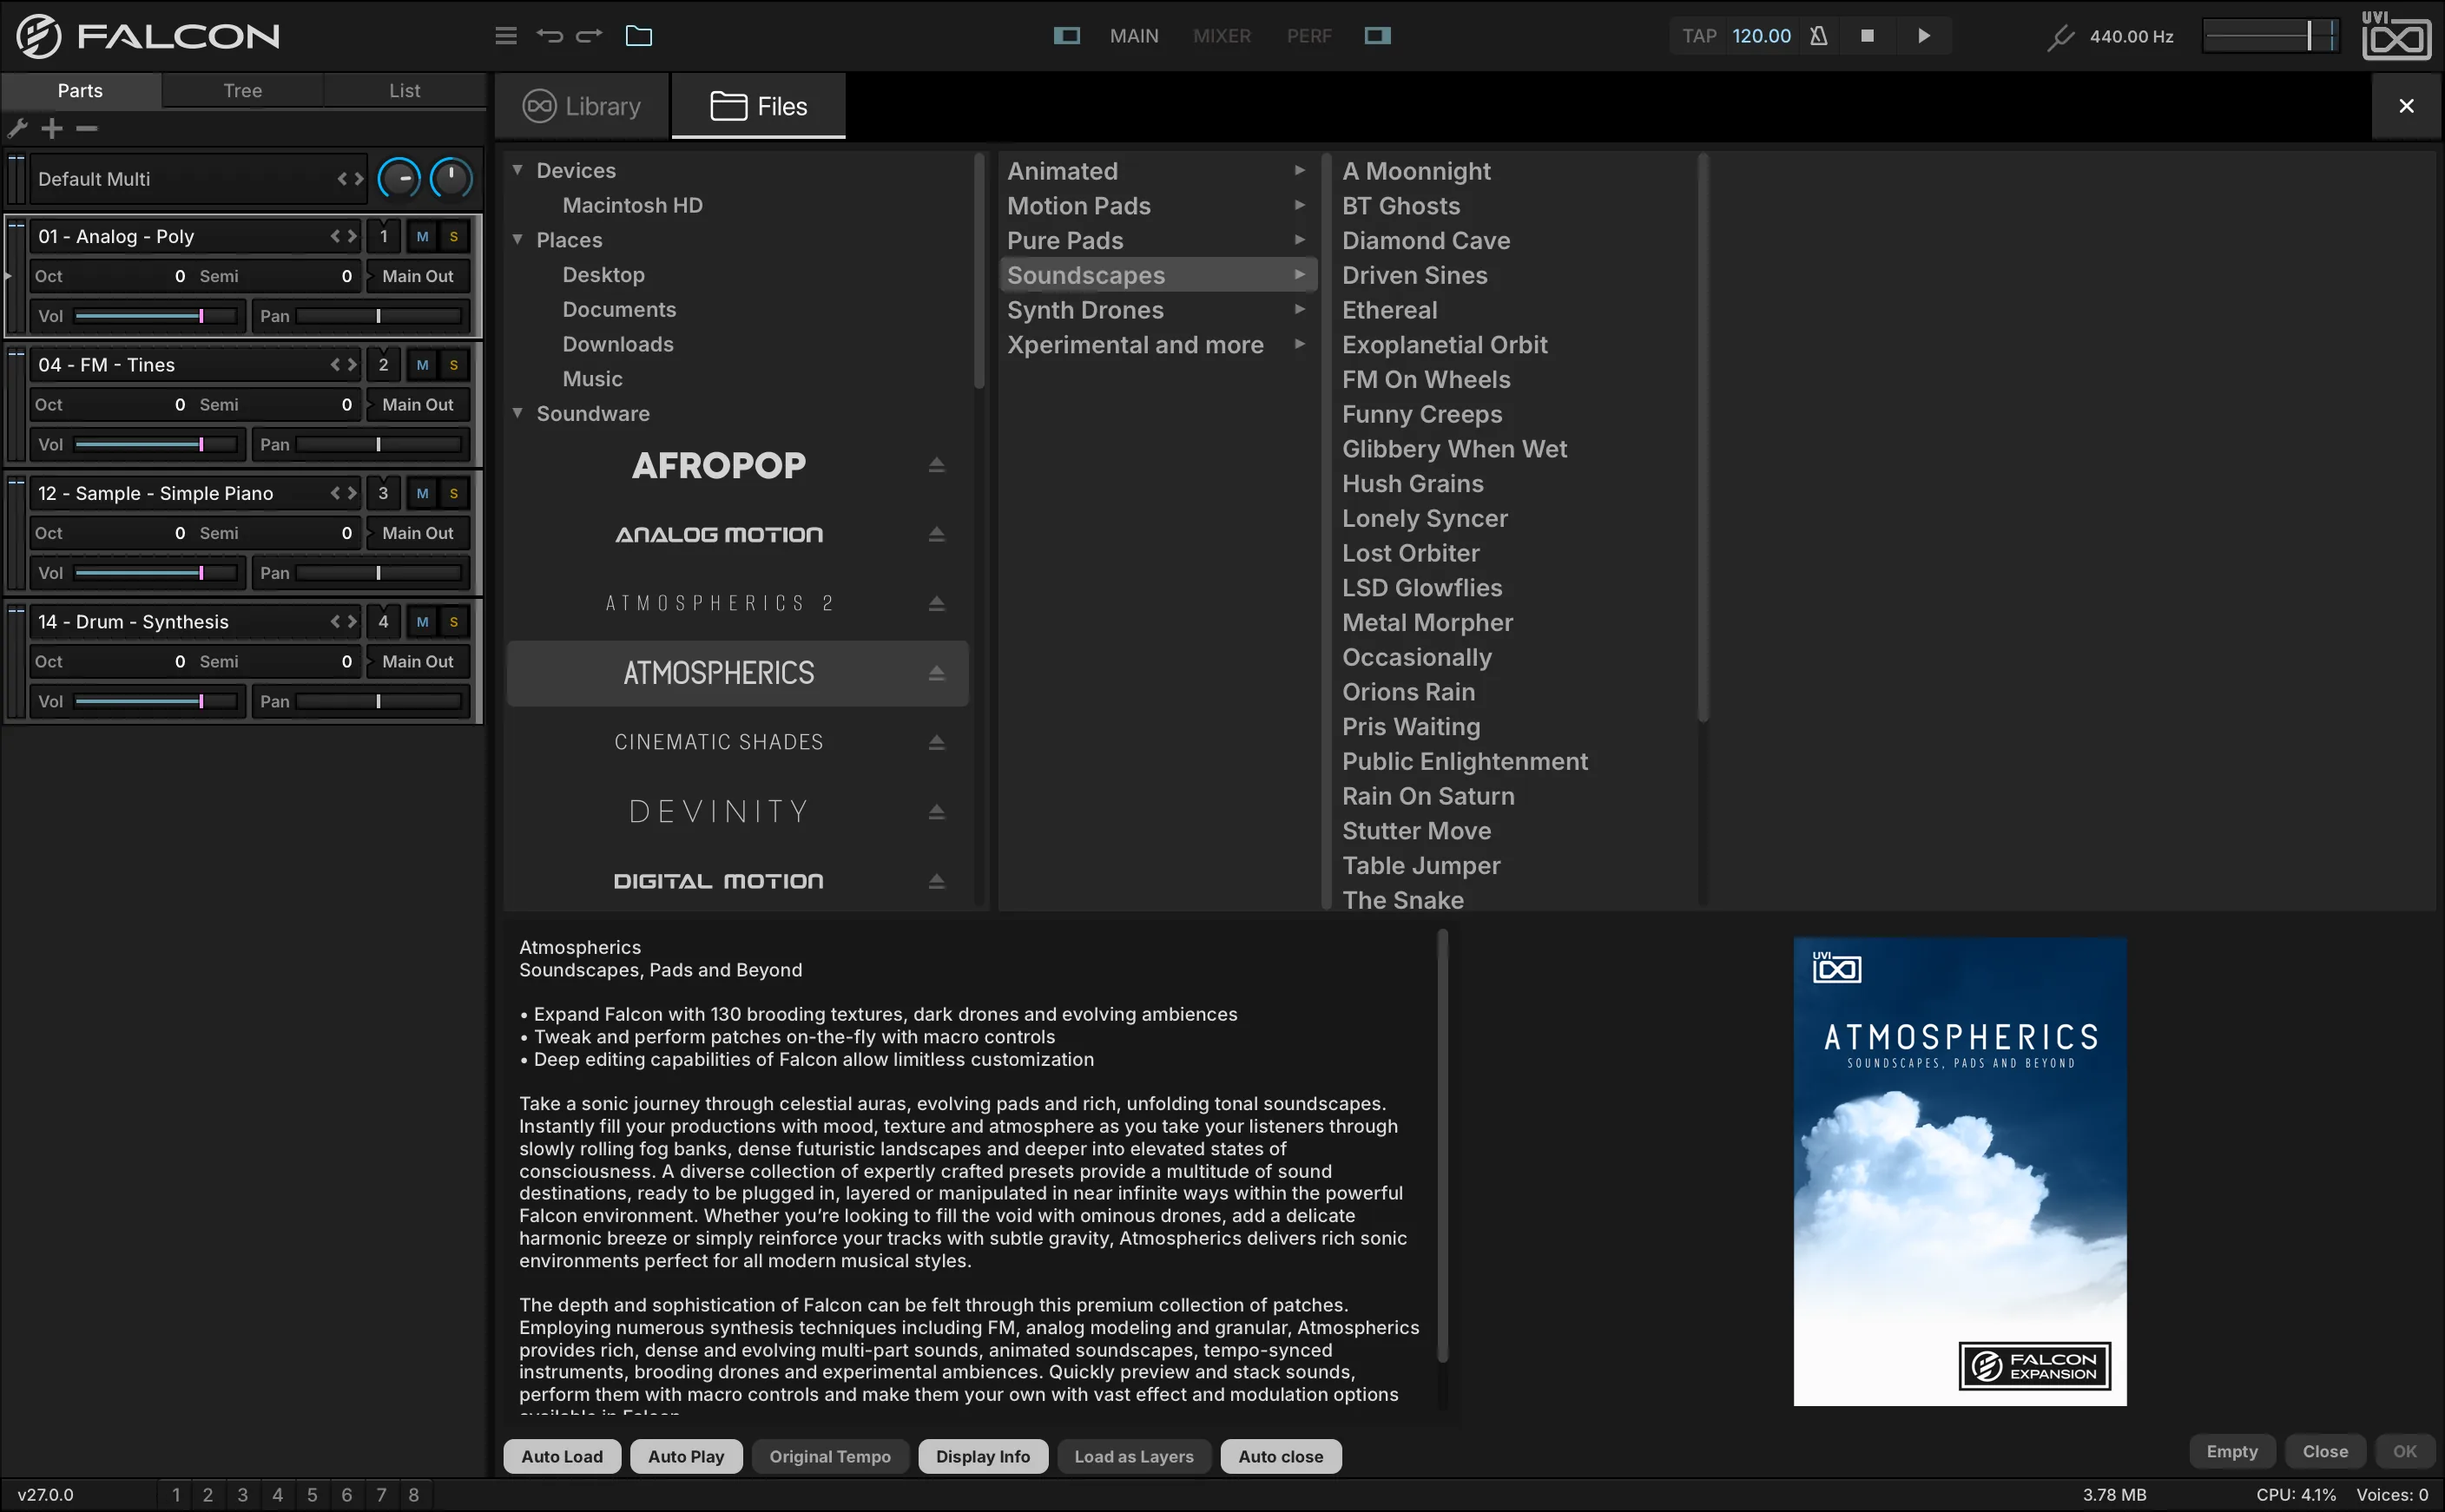
- 1 Library
Switches back to searching: instead of browsing a location, you type a search term and get matches from every indexed location. See Search below.
- 2 Soundware
Every mounted Soundware, whether mounted on demand or at startup (see Preferences › Soundware). Right-click a Soundware’s name for VERIFY SOUNDBANK INTEGRITY, where available: it checks that the file was not corrupted while being downloaded or moved between disks.
- 3 Original Tempo
Auditions an audio file at its original tempo rather than at Falcon’s current tempo.
- 4 Display Info
Shows or hides the panel in the lower half of the browser, with information about the selected file.
- 5 Load as Layers
Adds each program you load to the current one as new layers, leaving the current program’s effects, modulators and so on untouched — for example, to gather several articulations of an instrument in one part and switch them with layer rules. When disabled, a loaded program replaces the current one.
- 6 Auto Close
Closes the browser when OK is pressed or a file is double-clicked. Otherwise it stays open until you press CLOSE or Escape.
Choose a location in the sidebar to display its contents; files and subfolders open in columns to the right. To load the selected program or audio file, double-click it or press OK. You can also drag a file onto a part in the Parts List, or below the last part to load it into a new part. CLOSE or Escape closes the browser without loading; EMPTY unloads the program or sample of the selected part.
AUTO LOAD loads the audio file selected in the browser into the selected part; AUTO PLAY plays it, to audition it without loading.
Right-click a file or folder on disk to REVEAL IN FINDER (Mac) / REVEAL IN EXPLORER (Windows); a file you can write to also offers DELETE FILE.
Search
Instead of navigating to a folder, you can search for files matching your criteria. The locations searched are the folders marked INDEXED in Preferences › Soundware.
Results appear as you type, in four types:
- INSTRUMENTS: program files;
- LOOPS: looped audio samples;
- SOUNDS: non-looped audio samples;
- FAVORITES: presets and sounds tagged as favorites.
Highlight SEARCH in the sidebar to see all types at once, or a type’s name to see only that type; you can switch between types after entering a term, and typing more words narrows the results. Besides the name, the results can show the type, tags, fav, folder and volume (the Soundware) columns: right-click a column header to choose the columns shown, and drag a header to reorder them. Press a column name to sort by it, and press again to reverse the order. To clear the results, delete the search term, or close the browser.
Loading a Multi
To load a multi, double-click the multi name in the Parts List, or choose Load Multi from the Main Menu. The File Browser then loads only multis. Loading a multi clears the current one and replaces all of its settings, unless APPEND MULTI is enabled: the loaded multi’s parts are then added to the current multi, leaving its master effects, modulators and so on untouched.
Sidebar FILES Tab
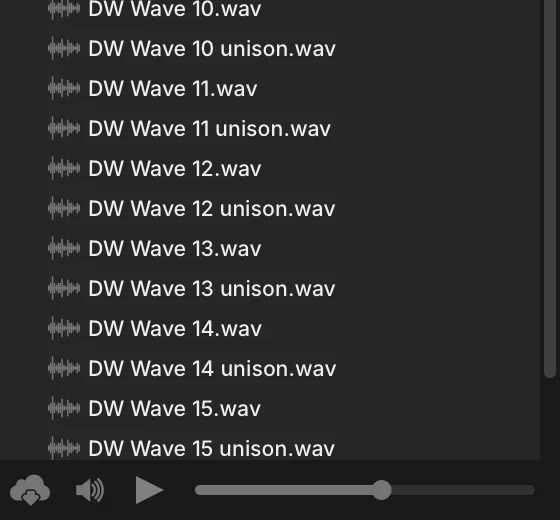
The FILES tab of the right sidebar is one of the sidebar browsers, shown in the Main, Mixer and Performance views; show or hide the sidebar with its toolbar button, and drag its left edge to resize it. It works like the File Browser, in a single column: expand or collapse a folder with the arrow left of its name, or double-click it to go one level down, and double-click .. (Parent Folder) to go back up. The sidebar menu button opens a menu of your Soundware, Places and Devices, and of the path from the current folder up to the top; choose / to return to the top level. In the SOUNDWARE section, click a Soundware’s name to expand or collapse its contents.
For auditioning, AUTO PLAY plays audio files as they are selected, the PLAY / STOP button next to it starts and stops playback manually, and the VOLUME slider sets the playback level. AUTO LOAD loads the selected sample into the selected keygroup — handy to swap the sample of a keygroup whose key and velocity ranges are already mapped.
Favorites
Presets and sounds can be tagged as favorites, and folders you use often can be added to Places.
- Presets and sounds: right-click a file inside a Soundware, in the File Browser or the sidebar FILES tab, or any file in the search results, and choose Add to favorites; a ★ appears next to its name. Remove from favorites removes the tag. Your own presets and sounds are tagged from the search results, so their folder must be indexed (see Preferences › Soundware). To list your favorites, sort the search results by the fav column.
- Favorite Places: right-click a folder on disk in the sidebar FILES tab (under Devices or Places) and choose Add to Favorite Places; it then appears under Places in every browser. You can also drag a folder onto the Places section. Remove from Favorite Places removes it.
Sidebar Browsers
The sidebar browsers, in the right sidebar, browse and load files and the presets of each module type. Show or hide them with their toolbar button, and drag their left edge to resize them. Each is a tab, from left to right:
- FILES — the file system (see Sidebar FILES Tab).
- SEARCH — the library search
- OSC — oscillators
- FX — effects
- MULTIFX — multi effects
- EVENT — event processors
- MOD — modulation sources
Each tab lists the modules of its type and, under each module, its factory and user presets, organized in folders nested as deep as needed.
The OSC and FX tabs draw that list as a tree, with a search field and a row of category buttons above it. Typing narrows the tree to the modules that match, and the match is made against more than the module name: every module carries its own keywords, so searching for “chorus” also reaches Thorus and “granular” reaches Grains. The category buttons filter the tree as well, and more than one can be active at once — Sampling and Synthesis on the Osc tab, and Delay, Reverb, Modulation, Filter, Equalizer, Amp / Stereo, Drive / Distortion, Dynamic, Pitch, Analysis, Effect Rack and Miscellaneous on the FX tab. With exactly one category selected the sub-category level disappears and its modules are listed directly. The FX tab adds a Legacy group at the end, collapsed.
The MOD, MULTIFX and EVENT tabs instead draw their modules as a grid of icon tiles, with a search field, a row of category buttons and, under the grid, a strip naming the module the pointer is on and describing what it does. The tiles can be moved through with the arrow keys, and the preset list sits below the grid, separated by a divider you can drag. On the Event tab the first level is the event processors themselves; choosing Script Processor reveals, under the list, a row of script-category symbols that narrow it, with a legend naming the one the pointer is on, and user scripts are filed under User whatever folder they were saved in.
Which form a tab takes, and how long the browsers remember your filters, is set in Preferences › General.
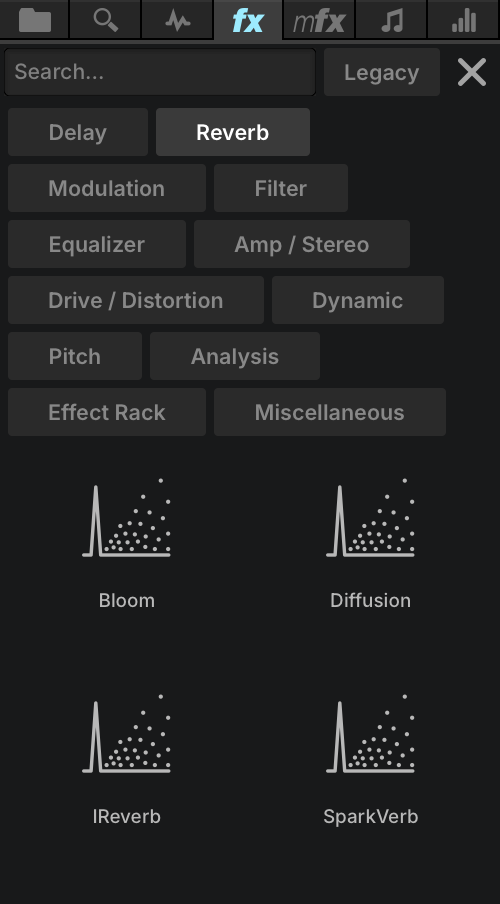
To load a preset, drag it to where it belongs: an oscillator preset onto the Mapping Editor, an effect preset onto a channel strip in the Mixer, a modulation source preset onto any control that can be modulated. A target that can accept the preset highlights as you drag over it.
Module Preset Menu
Every module — oscillator, effect, event processor and modulation source — saves and loads its own presets, so its settings can be reused in other programs. Each ships with factory presets, and you can add your own. The preset controls sit in the module’s upper right:
- The PRESET MENU shows the name of the current preset; press it for a menu of the module’s factory and user presets.
- The PREVIOUS PRESET and NEXT PRESET buttons step through them.
- In the PRESET FILE menu, SAVE PRESET saves a user preset and LOAD PRESET loads one from any location on disk. User presets can be organized into subfolders, as many levels deep as you need. COPY TO CLIPBOARD and PASTE FROM CLIPBOARD transfer the module’s settings, and on sampling oscillators the menu adds the commands described under Saving Samples.
Mixer
The Mixer works like a traditional mixing console, with gain, pan, output assignments, and effects assignment and editing. The top half displays the selected effect; the bottom half, a channel strip for each part, aux and the master.
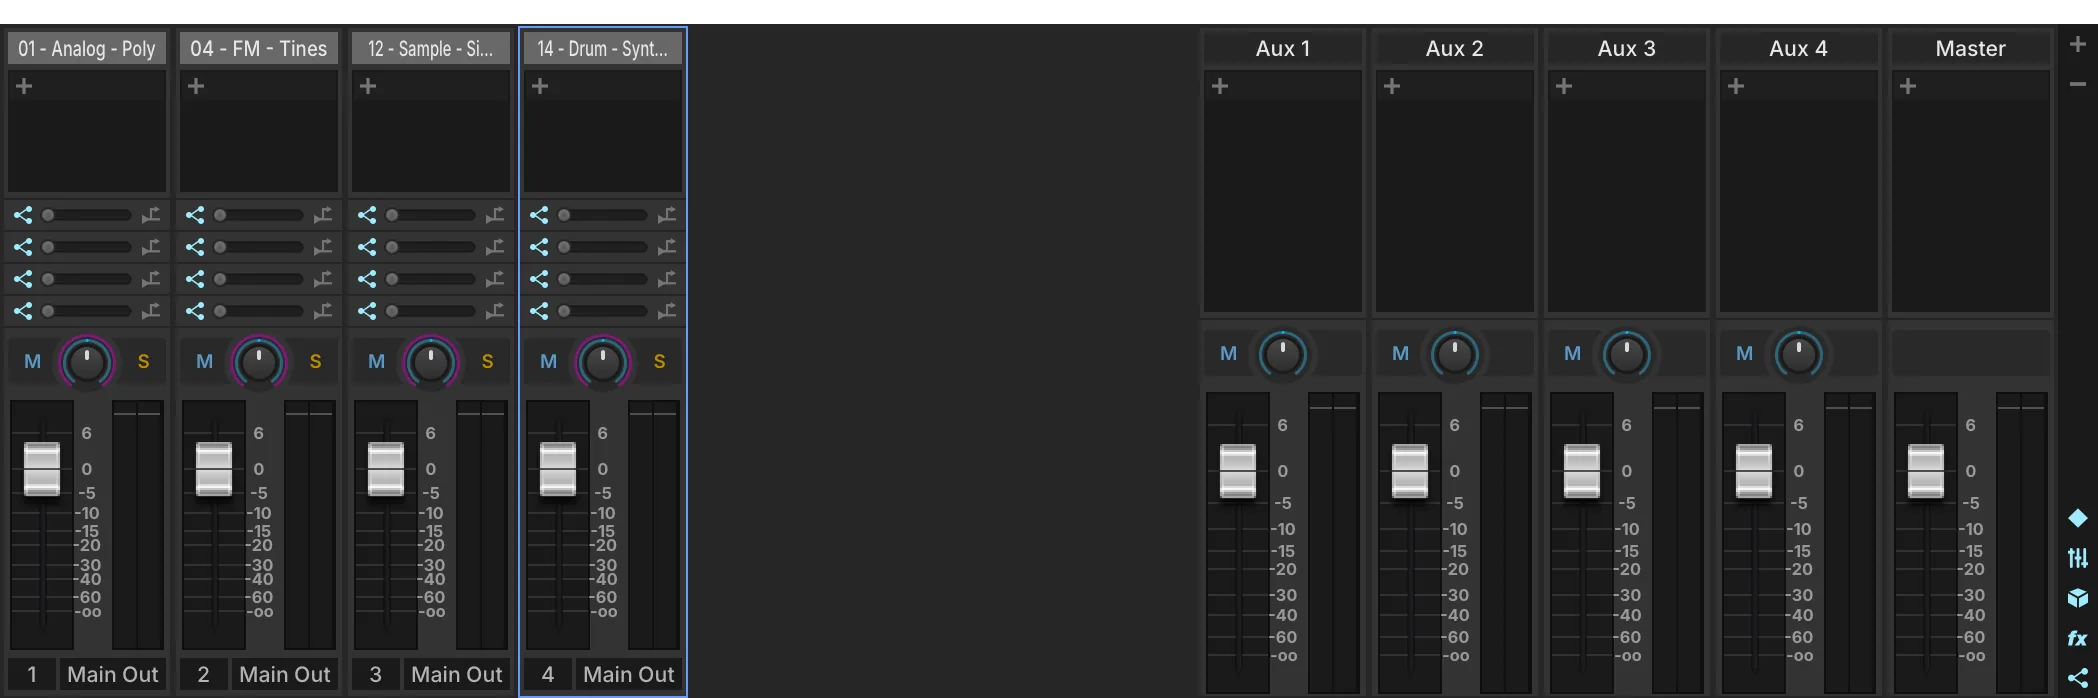
- 1 Add / remove parts
The + and − buttons, at the right of the Mixer, add and remove parts. Drag a part’s name to reorder it.
- 2 Section toggles
Show or hide each section of the Mixer: PARTS, AUXES, MASTER, FX and AUX SENDS.
The part channel strips carry the same settings as the Parts List, laid out as a mixer. Double-click a part’s name to open the Library Browser, or right-click it for Empty Part and Load Program.
Mixer Effects
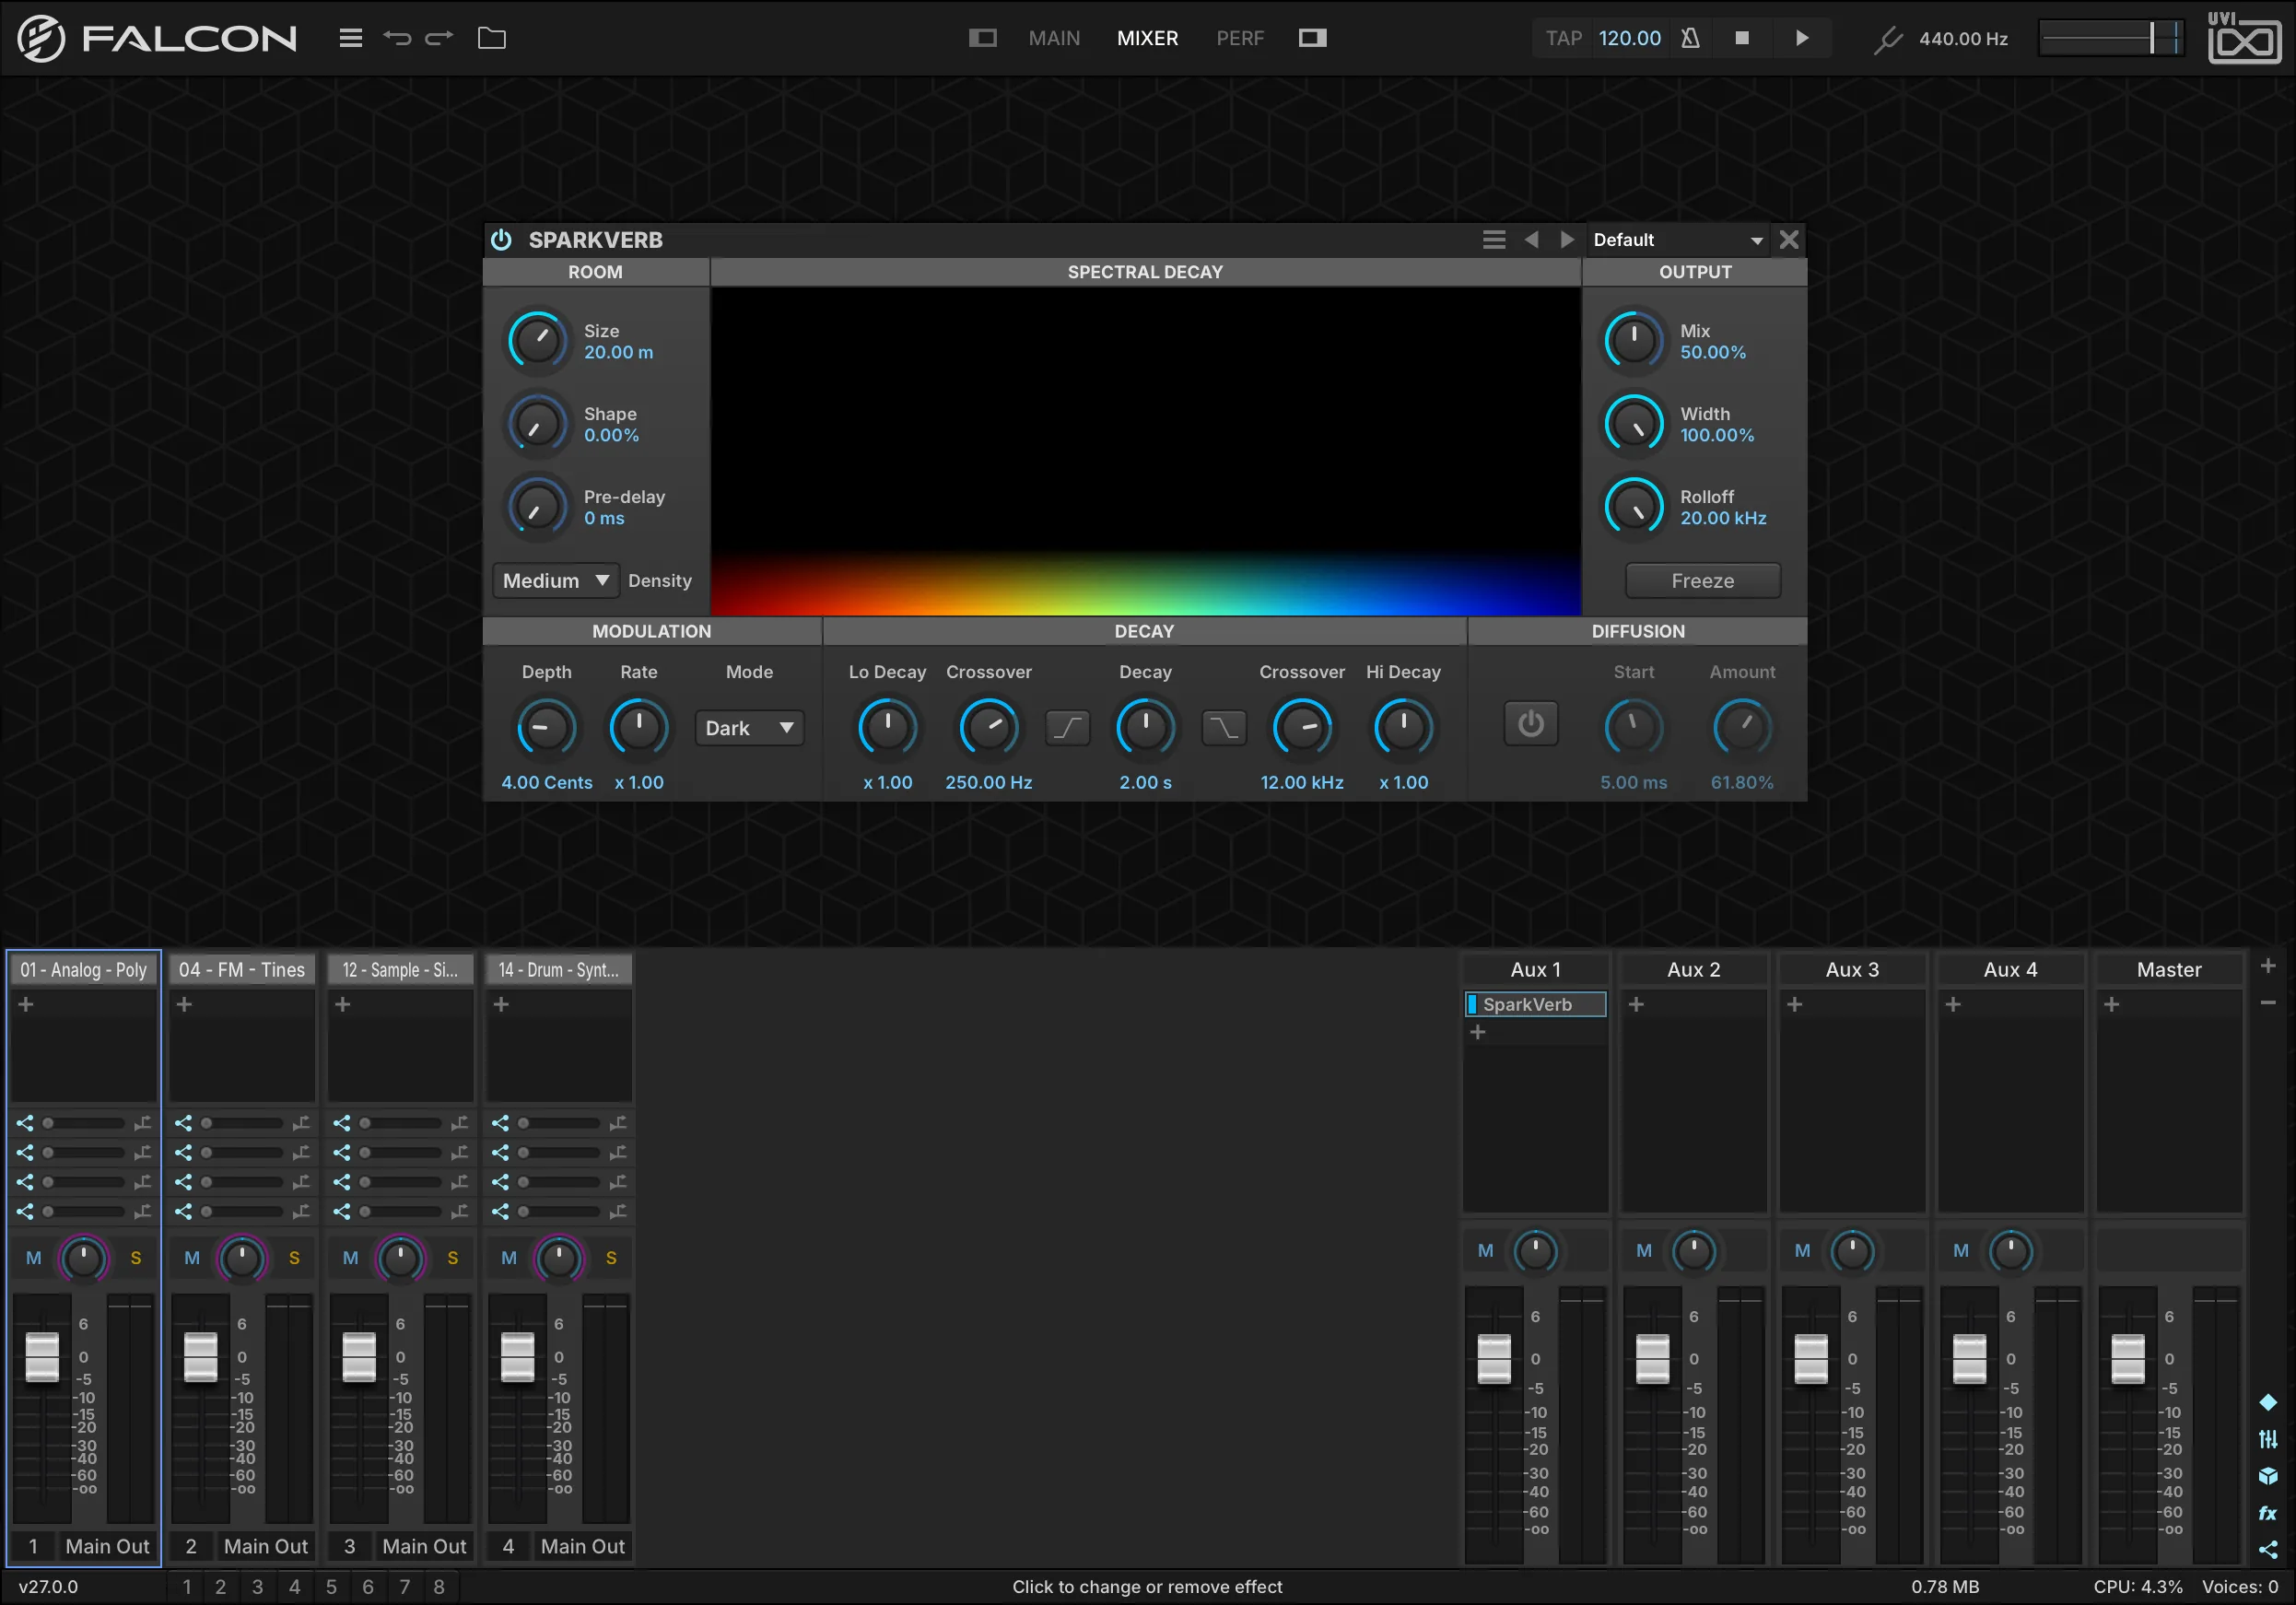
- Add an effect with the + button of any channel strip, or by dragging an effect preset from the FX tab of the right sidebar onto that + button. The new effect is selected and its controls appear in the effect editor above — the same module as in the Effects tab.
- Replace an effect by pressing and holding its name and choosing another, or by dragging an effect preset onto it.
- Bypass an effect with the button next to its name, by Shift-clicking its name, or with its POWER button in the effect editor.
- Remove an effect by pressing and holding its name and choosing Empty, or with its X button in the effect editor.
Auxes
The Mixer also shows the master aux buses, four by default (see Aux FX). Each part’s channel strip has a send to each of them, with an enable/bypass switch on the left and a pre/post-fader switch on the right; sends are post-fader by default. With more than four aux buses, scroll the sends to reach the others. The aux channel strips are like the part strips without the part-specific settings, and always output to the Main Out.
Master
The Master channel strip takes effects like the parts and auxes, and its fader is the Global Volume.
Performance
The Performance view gives a bird’s-eye view of all parts at once: an overview when there are many parts, or quick access to part settings during a live performance.

- 1 Part settings
The same controls as in the Parts List. When the Parts column is narrow, some of them are hidden.
- 2 Keyboard / Velocity Range
Restrict the part’s key and velocity range, independently of the program’s layers and keygroups. Drag the ends to adjust, drag the middle to move the range, or hold Alt/Option while dragging to apply a fade.
- 3 Keyswitch
A note that switches the part on when played — to toggle between articulations of one instrument, such as staccato and legato strings. Playing one part’s keyswitch switches the other keyswitched parts off. Tick the checkbox to enable it, then double-click the note name to set the note.
Preferences
Falcon’s general settings are set in the Preferences window: choose Preferences from the Main Menu. The window has four pages: General, Streaming, OSC and Soundware.
General
When set to One Shot, every sample dropped into Falcon is imported in one-shot mode. To change one sample’s mode, see Sample Editor.
Asks whether to save when you load another preset or quit Falcon.
The color each new part gets: Grey gives all parts the same shade of gray; Chromatic gives each new part a random color.
Hands the drawing of the interface to your GPU. On Windows, keep your GPU drivers up to date for best results.
The zoom level of the whole interface, from 75 % to 200 % — useful on HiDPI and 4K displays.
The zoom level of the script interfaces on the Info tab only, from 75 % to 200 %.
Forces the best interpolation mode in Sample oscillators when they load.
Shows the Info tab when you load a Soundware with a script interface.
Shows the splash screen when Falcon starts.
When enabled, the mouse wheel changes the knob or slider under the pointer; when disabled, it scrolls the panel underneath.
Reloads the UI state along with a template.
Leaves out the tags that none of the current results carries.
Lists everything the active filters allow before you type anything.
How long the browsers keep the filters you set: Remember, Forget after 1 hour, Forget after 1 day, Forget after 1 week, Forget on close, or Forget (always).
Shows the MOD, MULTIFX and EVENT tabs of the sidebar browsers as category grids rather than folder trees.
Adds the search field and the category filters to the OSC and FX tabs of the sidebar browsers.
Only in the VST plug-in: the output channel configuration Falcon starts with. Stereo by default; mono and surround formats are also offered.
Streaming
Rather than loading whole samples into memory, Falcon can read (stream) them from disk as they play, which balances the load between your computer’s RAM and its disks: it uses less memory, and lets you play more samples than your RAM could hold. Streaming performance depends directly on the speed of the disk: the faster, the better. The default settings suit most uses. To turn streaming on or off for a program, see Program.
The speed of the disk your Soundware sits on — Very fast - SSD, Fast - 7200 RPM, Medium - 5400 RPM, or Slow - USB1 / Network.
How much memory Falcon keeps for samples on their way from the disk, from 1 to 256 MB.
Restores the default streaming settings.
Applies the hard drive type and cache size you chose.
OSC
Open Sound Control (OSC) is a protocol for communication between computers and other audio devices, designed for networked devices. Any app or device that supports OSC can control Falcon remotely. To find a parameter’s OSC path, right-click it and open the OSC submenu (see Assigning Modulation, MIDI and Automation). For general information on OSC, see opensoundcontrol.org.
Makes Falcon available as an OSC destination on the network.
The name you would like this Falcon instance to have on the network.
The UDP port you would like this Falcon instance to listen on.
Once the server runs, the name actually assigned to this Falcon instance. Read-only.
Once the server runs, the port actually assigned to this Falcon instance. Read-only.
Rewrites the underscores in incoming OSC addresses as spaces. OSC addresses cannot contain spaces, so this lets a strictly compliant client reach Falcon elements whose names contain spaces (send Part_1 for Part 1).
Soundware
Each search path is a folder that Falcon scans for Soundware, with three toggles of its own.
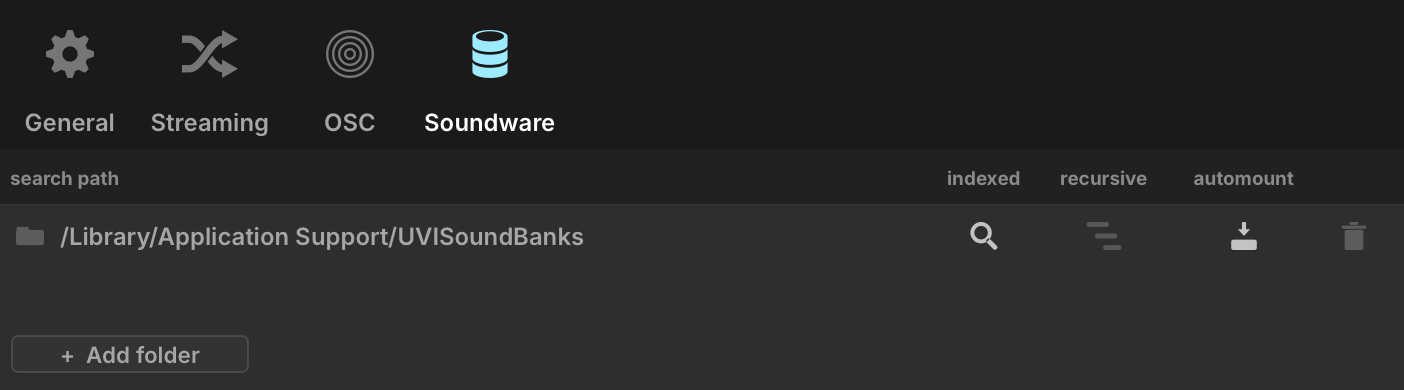
- 1 Search path
A folder Falcon scans for Soundware. You can set several.
- 2 Change folder
Click the folder icon to point this search path to another folder.
- 3 Indexed
The folder is included in the browsers’ search.
- 4 Recursive
The folder is scanned with all its subfolders, not just the folder itself. Meant to be used with Auto-mount. This can significantly increase Falcon’s startup time.
- 5 Auto-mount
Every ISO or UFS Soundware (UVI Soundware comes as
.ufsfiles) found in the folder is mounted at startup. Falcon’s startup time grows with the number of UFS Soundware auto-mounted. - 6 Remove
Removes the search path from the list. The folder itself is not touched.
- 7 Add folder
Adds a search path: browse for the folder you want Falcon to scan.