Modulators
Modulation generators can be instanced at any level in a patch, allowing them to control nearly any parameter, be it on an oscillator, effect or even on another modulator. This system allows you to paint motion into your sounds almost effortlessly, from subtle variation over time to complex on-demand sequences.
Control signals that move parameter values; they never carry audio or MIDI.

An envelope with attack, hold and decay stages, simpler than a full DAHDSR. It suits simple shapes, like the envelopes of some classic synths.
Read more ↓
An attack, decay, sustain and release envelope whose decay behaves like that of classic analog envelopes. It gives a more vintage feel than a precise digital ADSR.
Read more ↓
The simplest envelope, with an attack and a decay stage only. It is often used for percussive sounds that need no sustain or release.
Read more ↓
A classic envelope with delay, attack, hold, decay, sustain and release stages: an ADSR with an extra delay before the attack and a hold between attack and decay. It suits amplitude and filter envelopes that need full control.
Read more ↓
An envelope traced from an audio file: it follows the level, brightness or pitch contour of a recording and plays it back as a modulation source. It gives a sound the movement of a real performance, with speed control and a loop region that turns a one-shot gesture into a sustained movement.
Read more ↓
A random walk generator. It simulates natural drift, such as the wandering pitch or amplitude of a sustained note.
Read more ↓
A random modulator that generates smooth streams of random values, shaped by rate, depth and trigger options. It suits organic, evolving movement, from subtle shifts to flowing textures.
Read more ↓
A low frequency oscillator that generates a cyclical modulation signal below the audible range, with classic and additional waveforms. It suits vibrato, tremolo, filter sweeps and other periodic movement.
Read more ↓
A control that appears on the Info tab and moves every parameter assigned to it. It puts a program’s important settings on its front panel, one knob per parameter or one knob for many.
Read more ↓
An envelope of up to 128 points with adjustable curves, drawn by hand or built from dropped MIDI or audio files, which can be looped. It suits long, expressive modulation sequences and looped, LFO-like shapes.
Read more ↓
An LFO that mixes sine, triangle, square, saw and random contributions. It suits complex cyclic shapes that a single waveform cannot give.
Read more ↓
An LFO whose waveform is built from parametric controls such as Shape, Symmetry, Pulse Width and Swing. Since these controls can themselves move in real time, it suits cyclic modulation whose shape evolves.
Read more ↓
A modulation source driven by a Script Processor: a script sends target values to it with sendScriptModulation, and it ramps to each value it receives. It lets a script drive any parameter that can be modulated.

A random LFO whose values move smoothly from one to the next. It suits gentle, unpredictable movement.
Read more ↓
A programmable step sequencer of up to 128 steps, tempo-synced to musical divisions or running at a free rate. It suits rhythmic patterns such as gating, and with spline interpolation, smooth LFO-like shapes.
Read more ↓
A polyphonic step sequencer of up to 16 steps that generates an independent modulation signal for each voice. It suits animated pads, evolving sweeps and rhythmic motion.
Read more ↓AHD
The AHD envelope (attack, hold, and decay) is a simpler envelope than a full DAHDSR envelope, similar to envelopes found on some classic synths.
The ATTACK (0–10 s), HOLD (0–10 s), and DECAY (0–30 s) values can be set by the sliders, or by adjusting the points in the envelope editor. Additionally, the curve of the Attack and Decay ramps can be changed by dragging the line itself. For more details on editing the envelope graphically in the envelope editor, see: DAHDSR › Envelope Editor.
To choose if and how velocity will affect the envelope, use the VEL. AMOUNT (0–100 %) and VEL. SENS (±100 %) controls, as described in DAHDSR › Vel. Amount and Vel. Sens.
Analog ADSR
The Analog ADSR envelope (attack, decay, sustain, and release) is an envelope with decay characteristics similar to classic analog envelopes, providing a more vintage feel than a precise digital ADSR.
The ATTACK (0.0001–10 s), DECAY (0.0001–10 s), SUSTAIN (0–100 %), and RELEASE (0.0001–10 s) controls set the basic envelope shape, and DYNAMIC (0–40 dB) controls the amount of the output range controlled by the trigger velocity.
PUNCH (0–100 %) drives the attack beyond its normal ceiling: the attack aims at a higher target and only hands over to the decay once it has reached that overshoot, while the output itself remains clipped to full level. The audible result is a flat plateau at the top of the envelope, covering the end of the attack and the beginning of the decay, which grows longer as Punch is raised.
Two modes alter how the envelope is triggered and processed. If the ATTACK/DECAY mode is set to AD, only the attack and decay phases of the envelope are used; sustain and release will have no effect. When set to ADSR, all phases of the envelope can be configured. The Analog ADSR’s TRIGGER MODE offers the Retrigger and Legato modes described in LFO › Trigger mode.
The manual TRIGGER button allows for the envelope to be triggered on demand, and can be controlled remotely via automation or modulation.
You can choose how velocity affects the envelope’s attack and decay with the VELATTACK (±100 %) and VELDECAY (±100 %) controls. Additionally, the VELOCITY button inverts the velocity feeding those two controls, so that soft notes behave like hard ones. It does not affect DYNAMIC, which always follows the played velocity.
Likewise, you can choose how key follow affects the envelope’s attack and decay with the KEYATTACK (±200 %) and KEYDECAY (±200 %) controls.
Attack Decay
The Attack Decay envelope is the simplest modulation envelope provided. An Attack Decay envelope is often used for percussive sounds that don’t need a sustain or release.
DECAY (0.001–10 s) is set to a time value, and ATTACK (0–100 %) is set as a percentage of the Decay time. The attack is clamped internally to between 1 % and 99 % of the decay, so the two phases never collapse into one.
DAHDSR
The DAHDSR envelope (delay, attack, hold, decay, sustain, and release) is a classic synthesis envelope style. It is an extension of the common ADSR envelope, with an additional delay phase at the beginning and a hold phase between attack and decay.
The DELAY (0–10 s), ATTACK (0–10 s), HOLD (0–10 s), DECAY (0–30 s), SUSTAIN (0–100 %), and RELEASE (0–20 s) values can be set by the sliders, or edited graphically by using the envelope editor.
The shape of the release ramp is a parameter in its own right: RELEASE CURVE (−1 to 1) leaves the release falling in a straight line at zero, bends it into a concave shape at negative values and into a convex one at positive values. It holds the same value that dragging the release ramp in the envelope editor sets, and unlike the envelope times it cannot be used as a modulation destination.
To choose if velocity will affect the envelope, use the VEL. AMOUNT (0–100 %) control. At zero percent, velocity will have no effect. VEL. SENS (±100 %) remaps the velocity input curve; values between zero and 100 % use a progressively more exponential curve, and values between −100 % and zero use an increasingly logarithmic curve.
The ENVELOPE EDITOR is a graphical, interactive display of the envelope shape. Each point represents a phase of the envelope. Points can be adjusted by dragging or double-clicking, and the curve of ramps can be changed by dragging the line itself.
When dragging points, you can hold different modifier keys to adjust the result:
-
Shift: fine control
-
Cmd/Ctrl: constrain to vertical movement only.
-
Alt/Option: constrain to horizontal movement only.
-
Shift+Cmd/Ctrl: temporarily change absolute/relative mode (see below).
When a point is adjusted, it will affect the values on both sides of the point while keeping the overall length of the envelope constant. For example, when the Hold point is moved, both the Hold time before the point and the Decay time after the point will be adjusted, but the total envelope time will remain the same. If you would like to adjust the value of only one envelope segment at a time, enable RELATIVE SEGMENT MODE under the Envelope Editor’s menu. The menu can be opened by right-clicking anywhere in the envelope display.
The same menu also offers SNAP TO GRID, which constrains dragged points to the grid, and a GRID submenu to set the grid’s metric division (available when the modulator is tempo-synced).
While a note is held, the envelope loops on the sustain phase by default. However, you can change the looped portion of the envelope by right-clicking a point and choosing SET AS LOOP START or SET AS LOOP END. Loop endpoints are highlighted orange.
Scrolling up and down with your mouse or trackpad will zoom the editor’s display in and out, and the ZOOM TO FIT option in the menu snaps the display to the current size of the envelope.
Data Envelope
The Data Envelope takes its shape from an audio file rather than from breakpoints. Drop a sample onto its display, choose an extraction method, and the module traces the level, brightness or pitch contour of that recording and plays it back as a modulation source. Speed detaches the playback from the pace of the original performance, and a loop region placed anywhere in the data turns a one-shot gesture into a sustained movement.
Dropping an audio file on the display opens the EXTRACT AUDIO ENVELOPE dialog and its choice of four methods: RMS follows the average level, PEAK the peak level, BRIGHTNESS the spectral balance, and PITCH the melodic contour. The first three are normalized to the loudest point of the file and move in one direction only, while a pitch extraction is bipolar, swinging above and below its own starting point.
SPEED (0.1–10) sets the rate at which the data is read back, relative to the pace of the original audio: below 1 the gesture is drawn out, above it the gesture is compressed.
RANGE (1–48 st) is a span rather than an amount. The extracted values are divided by it before they leave the module, so it sets how much of the data’s excursion is needed to reach full modulation: a narrow Range brings small movements up to the full output, a wide one keeps them proportionally small. A pitch extraction writes the span it measured into this control, while the level and brightness methods normalize their own data and leave it at its minimum.
DEPTH (0–100 %) scales the amount of modulation the envelope sends out, and SMOOTH (0–1 s) rounds off the abrupt jumps of the data, which is most useful on pitch and brightness contours.
The display draws the extracted curve, with a playhead following the most recently triggered voice and two handles marking the loop region. The handles are dragged directly on the display, have no numeric fields, and cannot be brought within a hundredth of the data of one another.
LOOP sets how that region is used. Off ignores it and plays the data through once, after which the envelope stops. Continuous repeats the loop region for as long as the note lasts. Sustain leaves the loop at note off and plays the remainder of the data out. A short crossfade covers the seam, so a loop across discontinuous data does not click.
Drunk
The Drunk module generates a random walk signal which simulates the natural randomness that occurs in cases such as the drift in pitch or amplitude of a sustained note.
The INITIAL VALUE (−1 to 1) sets the starting point for the signal. From there, the signal varies semi-randomly around that value, fluctuating with the BANDWIDTH (0.1–1000 Hz) speed. The signal varies up or down, weighted according to the BIAS (−1 to 1). The SMOOTH (0.1–1000 Hz) speed determines the rate of smoothing applied as the value varies.
The default range of the Drunk module is bidirectional from the starting value (bipolar). For a range that moves in a single direction relative to the starting value (unipolar), disable BIPOLAR mode.
The Drunk module’s. TRIGGER MODE determines how the module is triggered. It offers the Retrigger, Legato and No Retrigger modes described in LFO › Trigger mode.
Flow Noise
A “random glide” modulator for organic, evolving movement. Generate smooth streams of random values, shaped by rate, depth, and trigger options, ideal for subtle shifts or dynamic, flowing textures.
RATE (0.1–100 Hz) sets the modulation speed.
DEPTH (0–100 %) controls the vertical value range of the modulation.
RANDOMSTART sets a random start position after each trigger.
BIPOLAR sets the modulation range as bipolar (−1 to +1) or unipolar (0 to +1).
TRIGGER MODE determines how the modulator is triggered:
-
RETRIGGER: Each trigger restarts the random stream, always the same one unless RANDOMSTART is on.
-
LEGATO: Any simultaneous triggers of the modulator will not trigger the modulator again, and will start at the same place as any other concurrent triggers. All triggers will be released together when the last one is released.
-
NO RETRIGGER: The modulator runs continuously, triggering from the beginning when Falcon’s playback starts or stops.
LFO
The LFO, or low frequency oscillator, is an oscillator that generates a cyclical modulation signal below the audible range.
The LFO WAVEFORM can be one of the classic LFO shapes (Sine, Square, Triangle, Ramp Up, Ramp Down), or one of these additional shapes:
-
ANALOG SQUARE
-
RANDOM SAMPLE & HOLD
-
CHAOS LORENZ
-
CHAOS ROSSLER
-
USER
The FREQ (0–20 Hz) control sets the duration of one cycle of the LFO. When TEMPO SYNC is enabled, the cycle duration ranges from 32 bars down to 64th-note triplet, synced to Falcon’s tempo. When TEMPO SYNC is disabled, the cycle duration is in Hz (cycles per second).
To set the point within the LFO cycle where it will begin when triggered, change the PHASE (0–1) control. The image of the waveform will update to show the result of the phase change (except for random/chaos waveforms, as the images are approximations of randomly generated waveforms). The User waveform is a custom, editable waveform shape. To edit the waveform, right-click to open it in a large overlay view. Click and drag to draw a waveform shape, or right-click and choose RESET ALL VALUES to start over. Press anywhere outside the overlay to close it.
DELAY (0–10 s) is a time delay between when the LFO is triggered and when LFO playback begins. DEPTH (0–100 %) controls the vertical value range of the LFO’s cycle, and RISE (0–10 s) is a time period during which the Depth ramps up to its full range. SMOOTH (0–1 s) sets a time value that smooths out transitions between values in the LFO’s cycles. These adjustments can be used to create more varied and nuanced modulations, such as a subtle vibrato that occurs only while a note is sustaining after its initial attack and decay.
TRIGGER MODE determines how the LFO is triggered:
-
RETRIGGER: Each trigger of the LFO starts from the beginning of the LFO’s cycle.
-
LEGATO: Any simultaneous triggers of the LFO will not trigger the LFO again, and will start at the same place as any other concurrent triggers. All triggers will be released together when the last one is released.
-
NO RETRIGGER: The LFO runs continuously, triggering from the beginning when Falcon’s playback starts or stops.
-
SONG: The position will sync with the host position in bar/beat.
MANUAL TRIGGER (0–1) restarts the LFO on demand, without a note, as soon as its value rises above the halfway point, so an automation curve or another modulator can retrigger it. The restart follows the same path as a note trigger: the cycle begins again at the PHASE position and the Delay and Rise stages run from the beginning.
The default range of the LFO cycle is from −1 to +1 (bipolar). For a range of zero to +1 (unipolar), disable BIPOLAR mode.
Macro
Macros are a special type of internal modulation. When a macro is added, a corresponding control appears on the Info tab. When this macro control is adjusted, so is the control assigned to it.
A control can be assigned one-to-one to a macro, as a shortcut for a commonly used control in the program, or multiple controls can be assigned to a single macro, for complex transformations of multiple controls by adjusting a single knob or button.
The default range of a macro is from zero to 100% (unipolar). For a range of −100 % to +100 %, enable Bipolar mode.
NOTE: Although macros can be assigned to any control in a program that can be modulated, the macros themselves are only added to the Program node.
To change a macro’s name, double-click the macro’s DISPLAY NAME and enter a new name. This will change the macro’s displayed name on the Info tab and in the modulation assignment menu.
VALUE (0–100 %) is the actual value sent when the macro is adjusted, either directly via this knob or via the macro’s control on the Info tab.
STYLE chooses the style of control that will appear on the Info tab for the macro. CONTINUOUS displays a continuously variable knob, and ON/OFF displays a toggle button with only two states.
Multi Envelope

A user-definable envelope that can be created with up to 128 points and interactive curve shapes by drawing it manually or by dragging and dropping MIDI or audio files. Allows for long and highly expressive modulation sequences and can be looped for LFO-like behavior.
Because the Multi Envelope can have many points (up to 128), unlike the other envelope modules in Falcon, there are no knobs or sliders for setting the values of each envelope phase. All editing is done in the graphical Envelope Editor. In addition to the Envelope Editor’s basic usage described in DAHDSR › Envelope Editor, the Envelope Editor for the Multi Envelope has a number of additional features:
-
Shift-click or double-click: Add a new point for the Multi Envelope.
-
Shift-right-click an existing point: Remove the point.
-
Right-click an existing point: Contextual menu, with options to remove the point or set it as the loop start/end.
-
Alt/Option-click-drag: Draw a line to create two new points.
The Multi Envelope has two loop options. By default, the envelope is looped, but the loop can be removed via the REMOVE LOOP option in the envelope editor’s contextual menu. If you wish to add the loop back, choose Add Loop. By default the envelope has no release point, so the loop keeps running after note-off (RELEASE LOOPED is ticked). Untick RELEASE LOOPED to set a release point just after the loop end, so note-off leaves the loop; this needs a point after the loop end. Tick it again to remove the release point.
COMPLEXIFY in the same menu subdivides the envelope, splitting every segment at a random position near its middle and offsetting the new point’s level, more for longer segments, for quick variations on a shape you have drawn.
The Multi Envelope can be tempo-synced or set to discrete time values. When TEMPO SYNC is enabled, the GRID option in the Envelope Editor menu becomes available and sets the metric division of the grid.
SPEED sets the time factor for the envelope. At 1.0, the time is as shown on the grid. At larger values, the speed is multiplied and the envelope plays back more quickly; at smaller values, the opposite. For an example value of 200 ms between points, with Speed = 1.0 the transition will be 200 ms, Speed = 0.10 will be 2000 ms, and Speed = 10 will be 20 ms.
SMOOTH (0–1 s) smooths the envelope output, rounding off abrupt transitions between segments.
The Multi Envelope’s TRIGGER MODE determines how the envelope is triggered. It offers the Retrigger, Legato and No Retrigger modes described in LFO › Trigger mode.
To choose if and how velocity will affect the envelope, use the VEL. AMOUNT (0–100 %) and VEL. SENS (±100 %) controls, as described in DAHDSR › Vel. Amount and Vel. Sens.
The default range of the envelope is from zero to +1 (unipolar). For a range of −1 to +1, enable BIPOLAR mode; the levels of the existing points are rescaled to the new range.
Advanced editor
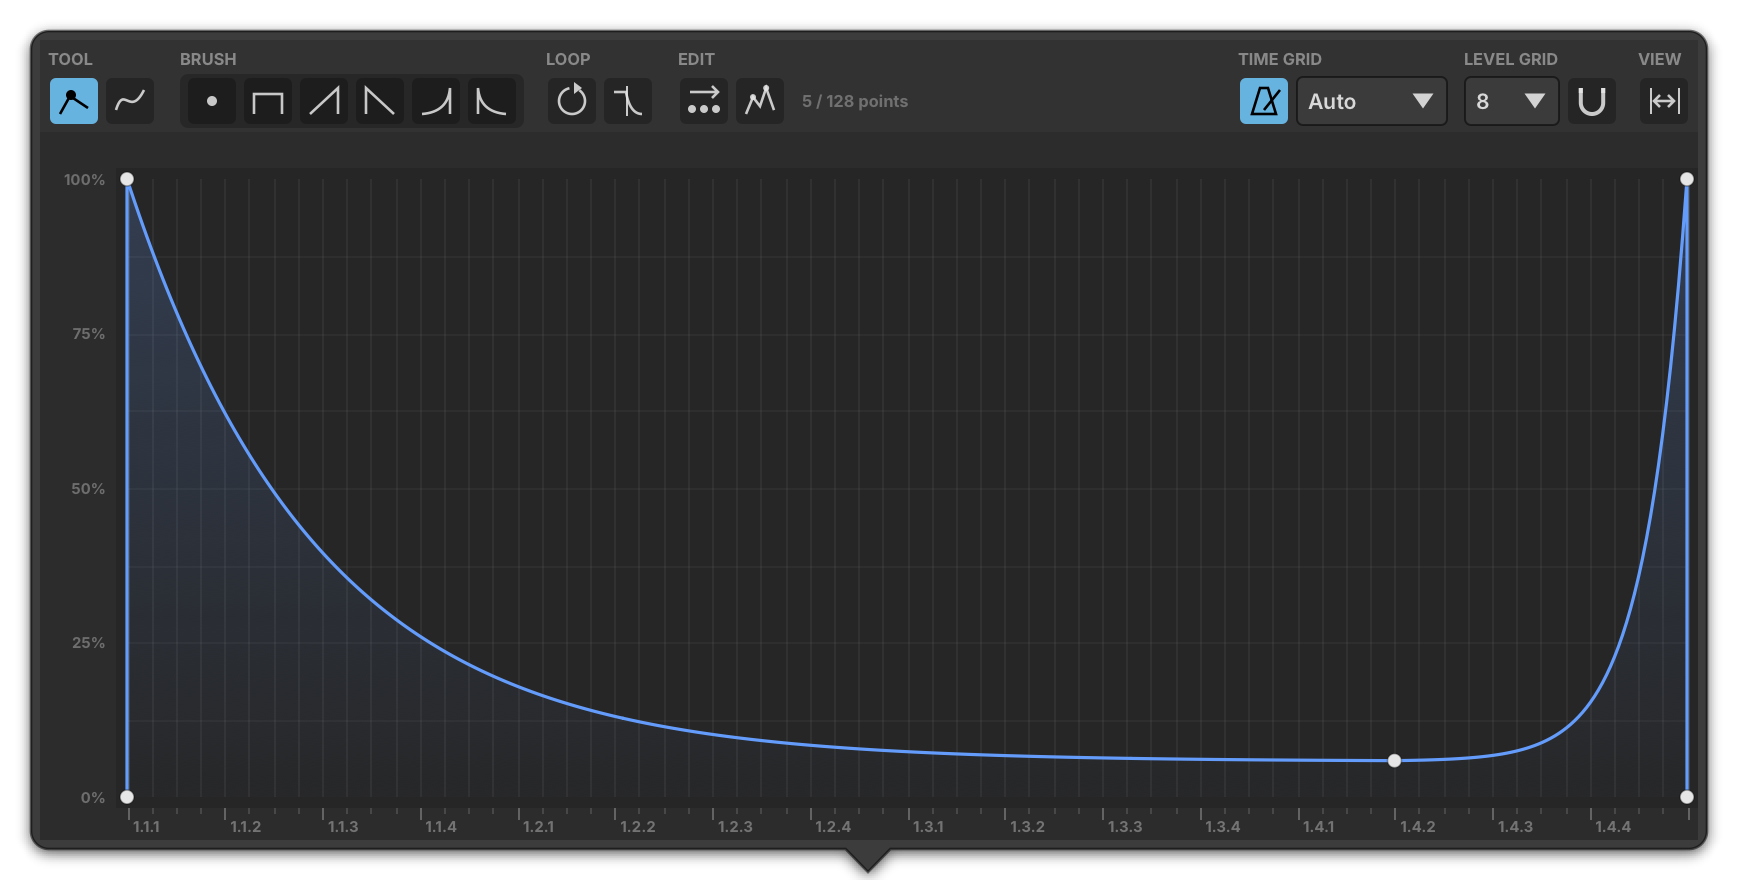
The EYE button in the module header, or the expand icon on the curve, opens the envelope in a larger editor with its own toolbar. The tool, brush and edit mode it was left in are remembered for each envelope while Falcon is running. Press Escape with nothing selected to close it.
The toolbar, from left to right:
-
TOOL: Edit selects and moves points. Freehand draws a line as you drag forward in time; on release it becomes points, replacing those it covers.
-
BRUSH: six shapes painted by clicking or dragging on an empty part of the canvas, always on the grid, whether or not Snap is on. Point places one point per click, Step fills a grid cell at a flat level, and Rising ramp, Falling ramp, Rising curve and Falling curve go from the bottom of the range to the brush level, or back. A whole drag is one edit, undone in one go.
-
LOOP: Loop repeats the envelope between the L and R flags while the note is held. Release makes note-off jump to the Rel flag; with it off, the loop keeps running through the release. Release is available only while there is a loop.
-
EDIT: with Relative on, moving a point moves every later point with it; Shift+Cmd/Ctrl while dragging switches the mode for that drag only. Complexify splits every segment around a random point near its curve.
-
The counter shows how many points the envelope has, out of a maximum of 128.
-
TIME GRID: the metronome button syncs the envelope to the host tempo, its times then reading in beats. The menu sets the grid, from 1/1 to 1/64 triplet, or Auto, which follows the zoom; unsynced, Auto is the only choice.
-
LEVEL GRID: the menu sets how many horizontal lines divide the range, from 2 to 32 (8 by default). The magnet button snaps the points you drag or add to the time and level grids.
-
VIEW: Zoom to fit shows the whole envelope again.
Drag the L, R and Rel flags in the ruler above the curve onto a point to set the loop and the release.
In the canvas:
-
Drag a point to move it: Shift for fine moves, Cmd/Ctrl to move it vertically only, Alt/Option horizontally only. Double-click a point to type its level; right-click it to remove it. The loop’s start and end points share their level.
-
Drag a curve up or down to bend it; Alt/Option-click it to make it linear again, or double-click it to add a point on it.
-
On the background, drag to select, Cmd/Ctrl-drag to add to the selection, double-click or Shift-click to add a point, and Alt/Option-drag to draw freehand.
-
The mouse wheel zooms around the pointer, and Shift+wheel scrolls. When zoomed in, the overview strip at the bottom moves the view.
-
Delete removes the selected points and the arrow keys nudge them (Shift for finer steps). Cmd/Ctrl+A selects all; Cmd/Ctrl+C, Cmd/Ctrl+X and Cmd/Ctrl+V copy, cut and paste, pasting where you last clicked on the background; Cmd/Ctrl+D duplicates.
-
Dropping a shape or MIDI file replaces the envelope; dropping an audio file offers the extraction methods below.
Drag-and-drop audio to create envelope points
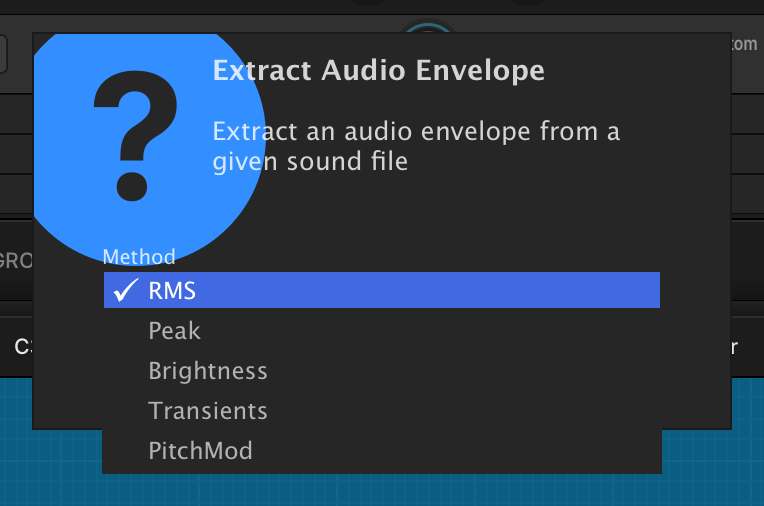
Drag-and-drop audio files onto the envelope to create envelope points, then choose an extraction method from the following:
-
RMS: extract the average level of the audio file.
-
PEAK: extract the peak level of the audio file.
-
BRIGHTNESS: extract the brightness envelope (i.e. spectral centroid / center of mass evolution over time) of the audio file.
-
TRANSIENTS: extract the transients of the audio file.
-
PITCH: extract the pitch of the audio file.
Multi LFO
Complex LFO with sine, triangle, square, saw, and random contributions.
The Multi LFO can be tempo-synced or set to discrete time values.
The FREQUENCY control sets the duration of one cycle of the LFO. When TEMPO SYNC is enabled, the cycle duration ranges from 32 bars down to 64th-note triplet, synced to Falcon’s tempo. When TEMPO SYNC is disabled, the cycle duration is in Hz (cycles per second) with super high speed up to 20 Hz.
To set the point within the LFO cycle where it will begin when triggered, change the PHASE (0–1) control. The image of the waveform will update to show the result of the phase change.
RISE TIME (0–10 s) is a time period during which the Depth ramps up to its full range.
SINE (±100 %), TRIANGLE (±100 %), SQUARE (±100 %), SAW (±100 %), and S&H (±100 %) sliders set the contribution of each waveform to the composite LFO output. All values are summed to form the final LFO shape. The square contribution has its own PULSE WIDTH (5–95 %) control.
DEPTH (0–100 %) controls the total vertical value (amplitude) range of the LFO’s cycle.
The default range of the LFO cycle is from −1 to +1 (bipolar). For a range of zero to +1 (unipolar), disable the BIPOLAR mode button.
INVERT flips the polarity of the composite waveform, turning its peaks into troughs. It acts before the unipolar conversion, so the shape is still mirrored when BIPOLAR is disabled, and the output stays within the zero to +1 range.
NORMALIZED rescales the composite waveform so its peak stays within the LFO’s output range, regardless of how many of the SINE/TRIANGLE/SQUARE/SAW/S&H contributions are summed.
SMOOTH (0–1 s) sets the amount of smoothing applied to transitions in the composite LFO waveform.
TRIGGER MODE determines how the LFO is triggered:
-
RETRIGGER: Each trigger of the LFO starts from the beginning of the LFO’s cycle.
-
LEGATO: Any simultaneous triggers of the LFO will not trigger the LFO again, and will start at the same place as any other concurrent triggers. All triggers will be released together when the last one is released.
-
NO RETRIGGER: The LFO runs continuously, triggering from the beginning when Falcon’s playback starts or stops.
-
SONG: The position will sync with the host position in bar/beat.
MANUAL TRIGGER (0–1) restarts the LFO cycle on demand, without a note, as soon as its value rises above the halfway point. The cycle starts again at the PHASE position, the Rise Time ramp restarts from zero, the smoothing is cleared and the S&H contribution draws new random values.
Parametric LFO
The Parametric LFO generates a cyclical modulation using parametric controls such as Shape, Symmetry, Pulse Width and Swing for a totally unique waveform that can evolve in real time.
The FREQ control sets the duration of one cycle of the LFO. When TEMPO SYNC is enabled, the cycle duration ranges from 32 bars down to 64th-note triplet, synced to Falcon’s tempo. When TEMPO SYNC is disabled, the cycle duration is in Hz (cycles per second) with super high speed up to 50 Hz.
To set the point within the LFO cycle where it will begin when triggered, change the PHASE (−1 to 1) control. The image of the waveform will update to show the result of the phase change.
DEPTH (0–100 %) controls the vertical value (amplitude) range of the LFO’s cycle.
SHAPE (±100 %) morphs from a flat line (−100 %) through triangle (0 %) and sine to square (+100 %); PULSE WIDTH (0–100 %), SYMMETRY (±100 %), and SWING (0–200 %) can be utilized to generate waves such as sawtooth ramp-up and down.
The default range of the LFO cycle is from −1 to +1 (bipolar). For a range of zero to +1 (unipolar), disable the BIPOLAR mode button.
TRIGGER MODE determines how the LFO is triggered:
-
RETRIGGER: Each trigger of the LFO starts from the beginning of the LFO’s cycle.
-
LEGATO: Any simultaneous triggers of the LFO will not trigger the LFO again, and will start at the same place as any other concurrent triggers. All triggers will be released together when the last one is released.
-
NO RETRIGGER: The LFO runs continuously, triggering from the beginning when Falcon’s playback starts or stops.
-
SONG: The position will sync with the host position in bar/beat.
Script Event Modulation
A modulation source driven by a Script Processor rather than by the keyboard or a shape: a script sends target values to it with sendScriptModulation, and the modulator ramps to each value it receives.
EVENT ID (0–127) is the identifier the modulator listens on, and must match the id the script sends.
The default range of the output is from −1 to +1 (bipolar). For a range of zero to +1 (unipolar), disable BIPOLAR mode.
Smooth Random
Random LFO generator with smooth evolution.
RATE (0–1000 Hz) sets the modulation speed. At 0 Hz the signal holds its current value.
DEPTH (0–100 %) controls the vertical value range of the modulation.
RANDOMSTART sets a random start position after each trigger.
BIPOLAR sets the modulation range as bipolar (−1 to +1) or unipolar (0 to +1).
TRIGGER MODE determines how the LFO is triggered:
-
RETRIGGER: Each trigger of the LFO starts from the beginning of the LFO’s cycle.
-
LEGATO: Any simultaneous triggers of the LFO will not trigger the LFO again, and will start at the same place as any other concurrent triggers. All triggers will be released together when the last one is released.
-
NO RETRIGGER: The LFO runs continuously, triggering from the beginning when Falcon’s playback starts or stops.
Step Envelope
The Step Envelope is a programmable pattern sequencer. The Step Envelope can be tempo-synced for steps of musical divisions, or set to discrete time values.
The value of each step can be set by clicking and dragging vertically. You can also click and drag horizontally to draw a shape over multiple steps. To clear all steps, right-click and choose RESET ALL VALUES. To view the step editor in finer detail, choose the edit button in the module header to open it in a large overlay view. Press anywhere outside the overlay to dismiss it.
The number of steps in the grid is set with the STEPS control, from 1 step up to 128 steps. The FREQ (0–20 Hz) control sets the rate at which the sequence advances from one step to the next. When TEMPO SYNC is enabled, step duration ranges from 32 bars down to 64th-note triplet, synced to Falcon’s tempo. When tempo sync is disabled, step durations are in Hz (steps per second).
The default range of each step is from zero to +1 (unipolar). For a range of −1 to +1, enable BIPOLAR mode, which is useful for LFO-like patterns.
DEPTH (0–100 %) scales the whole sequence, multiplying every step level by that amount, so the pattern keeps its shape while its overall amount of modulation is reduced; at zero the Step Envelope outputs nothing.
The Step Envelope’s INTERPOLATION MODE determines how each step’s value transitions to the next. With the default Hold mode, each value is held for the duration of the step, then immediately jumps to the next step’s value; with the alternate Spline mode, each value transitions to the next with a continuous spline curve.
The Step Envelope’s TRIGGER MODE determines how the envelope is triggered. It offers the Retrigger, Legato and No Retrigger modes described in LFO › Trigger mode.
MANUAL TRIGGER (0–1) restarts the sequence from its first step on demand, without a note, as soon as its value rises above the halfway point, so an automation curve or another modulator can restart the pattern. In No Retrigger mode the sequence normally follows the host timeline; the first manual trigger detaches it from that timeline, and from then on the sequence advances from its own restarted position.
SMOOTH (0–1 s) sets the amount of smoothing for each step.
Voice Modulator
A polyphonic step-sequencer that generates independent modulation signals per voice. Create animated pads, evolving sweeps, and rhythmic motion with sequences of up to 16 steps.
- When multiple notes are played at once, the number of triggered steps depends on the number and timing of the notes.
The value of each step can be set by clicking and dragging vertically. You can also click and drag horizontally to draw a shape over multiple steps. To clear all steps, right-click and choose RESET ALL VALUES.
The number of steps in the grid is set with NUMSTEPS (1–16).
LEGATO determines how the steps are triggered:
-
OFF: The sequence advances one step for each new note input. If multiple notes are played simultaneously, the sequence will advance by the number of notes played. The triggering position continues from the last triggered step.
-
ON: A note played while no other note is held restarts the sequence from the first step. Notes added on top of a held chord keep advancing it, as in OFF mode.
Modulation Sources
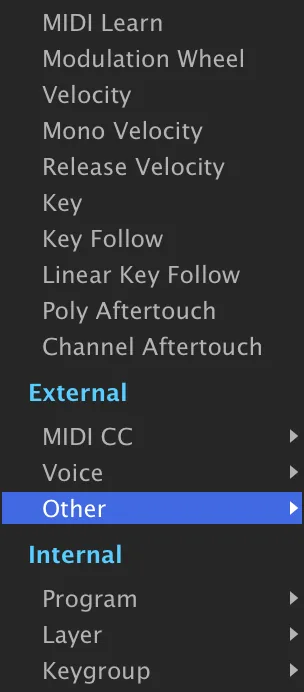
The menu opens on an unlabeled list of the most frequently used sources, followed by the External and Internal sections.
A quick overview of the available sources:
Quick
- MIDI Learn — opens the MIDI Learn dialog to quickly assign a control message from your MIDI controller.
- Modulation Wheel — uses the modwheel (or CC#1) of your controller.
- Velocity — uses MIDI note-on velocity.
- Mono Velocity — uses the last incoming MIDI note velocity.
- Release Velocity — uses MIDI note-off velocity.
- Key — uses MIDI notes as a unipolar value from left to right.
- Key Follow — uses MIDI notes as a bipolar value (C3 centered) with a curve.
- Linear Key Follow — uses MIDI notes as a bipolar value (C3 centered) with no curve.
- Poly Aftertouch — uses polyphonic aftertouch messages.
- Channel Aftertouch — uses channel (mono) aftertouch messages.
External Sources
The External section groups the external sources into submenus:
- Macros — the macros already added to the program; shown only when the program has macros.
- MIDI CC — manually assign a MIDI Control Change message from the menu.
- Voice — Velocity, Mono Velocity, Release Velocity, Key, Key Follow, and Linear Key Follow.
- Other — the remaining note-driven and controller sources:
- Alternate — alternates the value with each note.
- Organ Pan — uses organ-style panning.
- Unipolar Random — creates a randomized unipolar value for each note press.
- Random — creates a randomized bipolar value for each note press.
- Unison — uses unison messages.
- Unipolar Unison — uses unipolar unison messages.
- Pitch Bend — uses the pitch-bend message of your controller.
- Poly Aftertouch — uses polyphonic aftertouch messages.
- Channel Aftertouch — uses channel (mono) aftertouch messages.
Internal Sources
Internal sources route from any modulator already instanced elsewhere in the patch — the modulator types documented earlier in this chapter — organized into submenus that mirror the node at which each source lives: the effect rack holding the destination, Master, Part, Program, Layer, and Keygroup. Only nodes at or above the destination are offered. For a destination inside a program, Master and Part are also left out, so the program does not depend on where it is loaded.